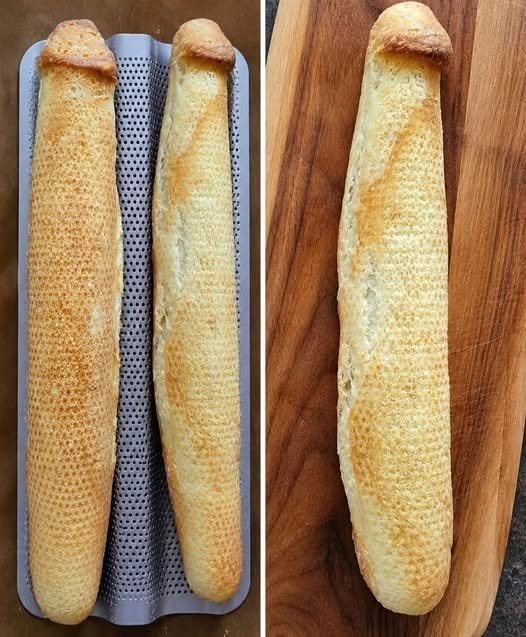
There is nothing quite like the smell of freshly baked homemade baguettes filling the kitchen. With their long, golden shape, lightly crisp crust, and soft, airy center, French baguettes are a classic bread that feels special but can actually be made at home with a few simple ingredients.
This homemade baguette recipe creates beautiful loaves like the ones shown in the picture. The outside develops a lovely golden crust while the inside stays tender and chewy. A perforated baguette tray can help maintain the long shape, but you can also bake the loaves on a regular baking sheet.
The secret to delicious baguettes is not complicated ingredients—it is proper dough hydration, gentle shaping, enough resting time, and a hot oven.
Why You’ll Love This Recipe
- Simple everyday ingredients
- No stand mixer required
- Light, airy, and soft interior
- Golden, crisp crust
- Perfect for beginners
- Great for sandwiches and dipping
- Delicious served fresh and warm
- Can be prepared ahead of time
Ingredients
- 3 ½ cups bread flour or all-purpose flour
- 1 ½ cups warm water
- 1 ½ teaspoons instant yeast
- 1 ½ teaspoons salt
- 1 teaspoon sugar
- 1 tablespoon olive oil, optional
- Extra flour for shaping
For the Baking Environment
- A little water for creating steam
- Parchment paper, if needed
- Baguette baking tray or regular baking sheet
Step 1: Prepare the Dough
Start by adding the warm water to a large mixing bowl. The water should be warm to the touch but not hot.
Add the yeast and sugar and gently stir. Let the mixture sit for about 5 minutes if you’re using active dry yeast. If you’re using instant yeast, you can mix it directly with the flour.
Add the flour and salt gradually. Mix everything together with a wooden spoon until a rough, sticky dough forms.
The dough may look messy at first, and that is completely normal. Baguette dough is relatively soft and hydrated, so avoid adding lots of extra flour.
If the dough feels extremely dry, add a teaspoon of water at a time. If it is very wet, allow it to rest before deciding whether more flour is needed.
Step 2: Develop the Dough
Cover the bowl with plastic wrap or a clean kitchen towel and let the dough rest for about 15–20 minutes.
After resting, lightly wet your hands and gently stretch one side of the dough upward before folding it toward the center. Turn the bowl and repeat this process several times.
This simple folding method helps develop gluten without requiring a mixer or heavy kneading.
Repeat the folding process every 20–30 minutes for the first hour.
The dough should gradually become smoother, stronger, and more elastic.
Step 3: First Rise
After the folding process, cover the dough again and leave it in a warm place for approximately 1½–2 hours, or until it has noticeably increased in size.
For even better flavor, you can place the covered dough in the refrigerator and allow it to rise slowly overnight.
A slow fermentation gives homemade baguettes a deeper flavor and more interesting texture.
When the dough is ready, it should look slightly puffy and contain visible air bubbles.
Step 4: Divide the Dough
Lightly flour your work surface and gently transfer the dough onto it.
Try not to press all the air out of the dough. Divide it into 2 or 3 equal portions, depending on how long and thin you want your baguettes.
Gently shape each piece into a loose rectangle or log. Cover the pieces with a kitchen towel and allow them to rest for about 15 minutes.
This short resting period makes the dough much easier to shape.
Step 5: Shape the Baguettes
Take one portion of dough and gently flatten it into a rectangle.
Fold the top third toward the center and press lightly. Fold the bottom third upward and gently seal it.
Then roll the dough into a long cylinder, starting from the center and working toward the ends.
Gently stretch the loaf until it reaches approximately 12–16 inches in length, depending on your baking tray.
Try to keep the thickness relatively even from end to end.
Repeat with the remaining dough.
Place the shaped baguettes onto a lightly floured baguette tray or parchment-lined baking sheet. Leave enough space between each loaf for expansion.
Step 6: Final Proof
Cover the shaped baguettes loosely with a clean kitchen towel.
Allow them to rise for approximately 30–45 minutes.
Do not let them become excessively puffy. You want them to increase in size while still maintaining enough strength to rise beautifully in the oven.
While the baguettes are proofing, begin preheating your oven to 450°F (230°C).
A very hot oven is important for achieving the golden crust and dramatic oven rise associated with good baguettes.
Step 7: Score the Dough
Once the baguettes have finished their final proof, use a very sharp knife or bread lame to make several diagonal cuts across the top.
Make approximately 3–5 shallow slashes along each loaf.
The cuts should slightly overlap or follow the traditional baguette pattern.
Scoring gives the bread room to expand as it bakes. It also creates the beautiful appearance of a bakery-style baguette.
Do this step gently so you don’t deflate the dough.
Step 8: Create Steam
Steam is one of the most important elements when baking baguettes.
Place a small oven-safe pan on a lower rack while the oven preheats. When the baguettes go into the oven, carefully pour a little hot water into the pan.
Another option is to place a few ice cubes into a preheated oven-safe pan.
The steam keeps the surface of the dough flexible during the first part of baking, allowing the baguettes to expand before the crust sets.
Be extremely careful when adding water to a hot oven because steam can cause burns.
Step 9: Bake the Baguettes
Place the baguettes into the hot oven and bake at 450°F (230°C) for approximately 20–25 minutes.
After the first 10–15 minutes, you can carefully remove the steam pan if desired.
Continue baking until the baguettes are beautifully golden brown.
The exact baking time depends on the size of your loaves and your oven. Smaller baguettes may finish sooner, while thicker loaves may need additional time.
A properly baked baguette should feel light for its size and have a crisp, golden exterior.
Step 10: Cool Before Serving
Remove the baguettes from the oven and place them on a wire rack.
Allow them to cool for at least 20–30 minutes before slicing.
Although the aroma will make it difficult to wait, cooling allows the interior crumb to finish setting.
Once slightly cooled, slice the baguette using a serrated bread knife.
Tips for Perfect Homemade Baguettes
Don’t use too much flour. A soft dough produces a lighter, more open crumb. Too much flour can make the bread heavy.
Use a hot oven. Proper heat is essential for good oven spring and a crisp crust.
Don’t skip the resting time. Fermentation develops both flavor and structure.
Handle the dough gently. Avoid pressing out all the air during shaping.
Score with confidence. A quick, clean cut is better than slowly dragging a knife through the dough.
Use steam. Steam helps create a thinner, crispier crust and encourages the baguette to expand properly.
Let the bread cool. Cutting immediately can affect the texture of the interior.
How to Store Baguettes
Fresh baguettes are best enjoyed on the day they are baked. Store leftovers loosely wrapped in a clean kitchen towel or paper bag at room temperature.
Avoid storing them in the refrigerator because refrigeration can make bread stale more quickly.
If you have extra baguette, slice it and freeze the pieces in an airtight freezer bag. When you’re ready to eat them, warm the slices in the oven for a few minutes to bring back some of their crispness.
Delicious Ways to Serve Homemade Baguettes
Fresh baguettes are incredibly versatile. Serve thick slices with butter for breakfast or use them to make delicious sandwiches.
They are also wonderful with garlic butter, cheese, scrambled eggs, soups, stews, or creamy pasta dishes.
For a simple appetizer, slice the baguette, toast it lightly, and top it with tomatoes, herbs, olive oil, or cheese.
You can also turn leftover baguettes into homemade garlic bread, croutons, breadcrumbs, or French toast.
Final Thoughts
Making French baguettes at home is easier than it may seem. The ingredients are simple, but the combination of proper fermentation, gentle shaping, a hot oven, and steam creates an impressive loaf with a crisp golden crust and soft, airy center.
Once you become comfortable with the dough, you can experiment with different sizes and shapes or add herbs, garlic, seeds, or other ingredients for your own variation.
Fresh from the oven, these homemade baguettes are wonderfully crisp on the outside, tender inside, and perfect alongside almost any meal. With this easy recipe, you can enjoy bakery-style bread right from your own kitchen.

Leave a Reply