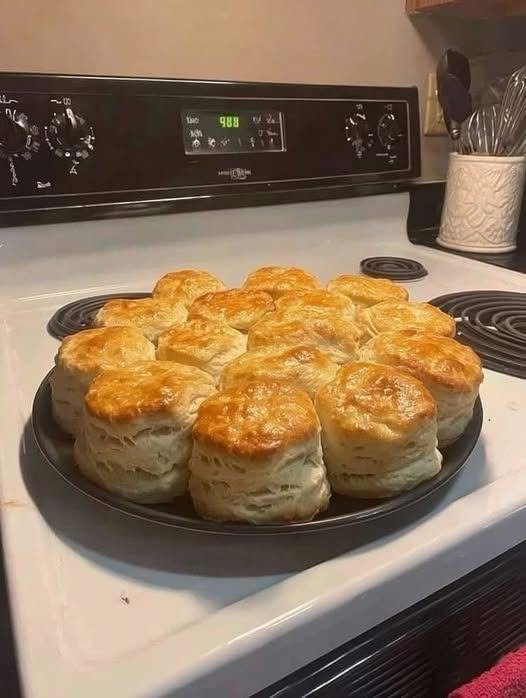
There is nothing quite like a warm batch of homemade buttermilk biscuits fresh from the oven. Golden and beautifully crisp on top, soft and tender in the middle, and filled with delicate flaky layers, these biscuits are the kind of comfort food that makes any breakfast or family meal feel extra special.
The biscuits shown in the picture are wonderfully tall and rustic, with golden tops and soft layers throughout. The best part is that you don’t need any fancy equipment to make them. With a few simple ingredients and a gentle hand, you can make bakery-style biscuits right in your own kitchen.
Why You’ll Love These Biscuits
These homemade biscuits are:
- Light, fluffy, and tender
- Golden brown on top
- Deliciously buttery
- Made with simple ingredients
- Perfect for breakfast or brunch
- Wonderful with gravy, honey, or jam
- Easy enough for beginners
- Best served warm from the oven
The secret to those beautiful flaky layers is keeping the butter cold and avoiding overworking the dough.
Ingredients
- 4 cups all-purpose flour
- 2 tablespoons baking powder
- 1 teaspoon baking soda
- 1 teaspoon salt
- 1 tablespoon granulated sugar
- 1 cup cold unsalted butter
- 1 ½ cups cold buttermilk
- 2 tablespoons melted butter, for brushing
If you don’t have buttermilk, you can make a simple substitute by adding 1 tablespoon of lemon juice or white vinegar to 1 cup of milk. Let it sit for about 5–10 minutes before using.
Step 1: Prepare the Dry Ingredients
Preheat your oven to 425°F (220°C).
In a large mixing bowl, combine the flour, baking powder, baking soda, salt, and sugar. Whisk everything together until evenly distributed.
Making sure the dry ingredients are well mixed helps the biscuits rise evenly and prevents concentrated pockets of baking powder or salt.
Step 2: Add the Cold Butter
Cut the cold butter into small cubes.
Add the butter to the flour mixture and use a pastry cutter, fork, or your fingertips to work it into the flour.
Do not completely blend the butter into the flour. You want to leave some small, visible pieces of butter throughout the mixture.
Some pieces should be about the size of peas, while others can be slightly larger.
These little pieces of butter are extremely important because they melt during baking and create pockets of steam. That steam helps separate the dough into flaky layers.
For the best results, keep the butter as cold as possible.
Step 3: Add the Buttermilk
Make a small well in the center of the flour and butter mixture.
Pour in the cold buttermilk and gently stir with a wooden spoon or spatula.
Mix only until the dough comes together.
The dough should look slightly rough and shaggy rather than perfectly smooth. Don’t worry if there are a few dry spots at first.
If the dough feels extremely dry, add a small splash of buttermilk. Avoid adding too much liquid because overly wet dough can make shaping difficult.
Step 4: Create the Flaky Layers
Lightly flour your work surface and turn the dough onto it.
Gently press the dough into a rectangle.
Fold the dough in half, then gently press it down again.
Repeat this folding process about 3–4 times.
This simple technique creates layers of dough and butter without requiring traditional pastry-making skills.
Be careful not to knead the dough heavily. Overworking it can develop too much gluten and result in tough biscuits.
If the dough becomes warm or sticky, place it in the refrigerator for about 10–15 minutes before continuing.
Step 5: Cut the Biscuits
Gently press the dough into a rectangle approximately ¾–1 inch thick.
Use a round biscuit cutter to cut out the biscuits.
Press the cutter straight down rather than twisting it.
Twisting can seal the edges of the dough and prevent the biscuits from rising properly.
Place the cut biscuits close together on a baking sheet or round baking pan. Keeping them close helps the sides stay soft while the tops become beautifully golden.
Gather any remaining dough, gently press it together, and cut a few more biscuits.
Try not to repeatedly knead the scraps because this can make the final biscuits tougher.
Step 6: Chill Before Baking
For especially flaky biscuits, place the prepared biscuits in the refrigerator for about 10–15 minutes before baking.
This gives the butter another chance to become firm.
Meanwhile, make sure your oven has reached the full baking temperature.
A properly preheated oven gives the biscuits the strong initial heat they need to rise quickly.
Step 7: Brush the Tops
Before placing the biscuits in the oven, brush the tops lightly with melted butter or a little buttermilk.
The butter helps the tops develop a beautiful golden finish and adds extra flavor.
Be careful not to brush the sides of the biscuits because the butter can make the layers stick together.
Step 8: Bake the Biscuits
Place the baking tray in the preheated oven.
Bake for approximately 15–20 minutes, or until the tops are puffed and golden brown.
The exact baking time will depend on the size and thickness of your biscuits.
Watch the biscuits during the final few minutes. You want a rich golden top without overbaking the centers.
When they are finished, remove them from the oven and immediately brush the tops with a little additional melted butter if desired.
Step 9: Serve Warm
Allow the biscuits to cool for just a few minutes before serving.
These biscuits are at their best when they are warm and freshly baked.
Pull one apart with your hands and you’ll see the soft, flaky layers inside.
Serve them with butter, honey, strawberry jam, cream, or your favorite spread.
For a savory meal, serve them alongside scrambled eggs, fried chicken, sausage gravy, roasted meat, or a hearty soup.
Tips for Perfect Flaky Biscuits
Keep the Butter Cold
Cold butter is one of the biggest secrets to flaky biscuits. If the butter melts before the biscuits reach the oven, you may lose some of those beautiful layers.
Don’t Overmix
Once the buttermilk has been added, mix just until the dough comes together. A little roughness is perfectly fine.
Don’t Twist the Cutter
Press the biscuit cutter straight down and lift it straight back up. Twisting can compress the edges.
Use a Hot Oven
A hot oven helps the butter create steam quickly and gives the biscuits their impressive rise.
Handle the Dough Gently
The less you work the dough, the more tender your biscuits will be.
Bake Biscuits Close Together
Placing biscuits close together encourages them to rise upward rather than spreading too much sideways.
How to Store Homemade Biscuits
Homemade biscuits are best served fresh, but leftovers can be stored in an airtight container at room temperature for up to a couple of days.
To warm them, place them in a preheated oven for a few minutes.
You can also freeze unbaked biscuit dough. Cut the biscuits as directed, arrange them on a tray, and freeze until firm. Transfer them to a freezer-safe bag or container.
When ready to bake, place the frozen biscuits directly onto a baking sheet and bake, adding a few extra minutes to the cooking time.
Delicious Ways to Serve Them
These biscuits are incredibly versatile.
For breakfast, split them open and fill them with scrambled eggs, cheese, sausage, or crispy bacon.
For something sweet, spread them with butter and honey or homemade fruit jam.
For a classic Southern-inspired meal, serve them with creamy sausage gravy.
They are also delicious alongside fried chicken, roasted vegetables, soups, stews, and creamy chicken dishes.
You can even turn leftover biscuits into breakfast sandwiches or use them as the base for a quick dessert topped with fresh berries and whipped cream.
Final Thoughts
Homemade flaky biscuits are one of those recipes that prove simple ingredients can create something truly special. With flour, butter, buttermilk, and a few basic pantry ingredients, you can make tall, golden biscuits with soft centers and beautiful flaky layers.
The key is to keep the butter cold, handle the dough gently, create a few folds, and bake the biscuits in a properly heated oven.
Once you make them from scratch, you may never want to reach for packaged biscuits again. Serve them warm with butter and honey for a cozy breakfast, or pair them with your favorite savory meal for a comforting homemade side.
These golden, buttery biscuits are simple, rustic, and incredibly satisfying—the perfect recipe to keep on hand whenever you’re craving something warm and homemade.

Leave a Reply