Homemade Caterpillar Bread Rolls Recipe – Soft, Buttery and Fun to Make
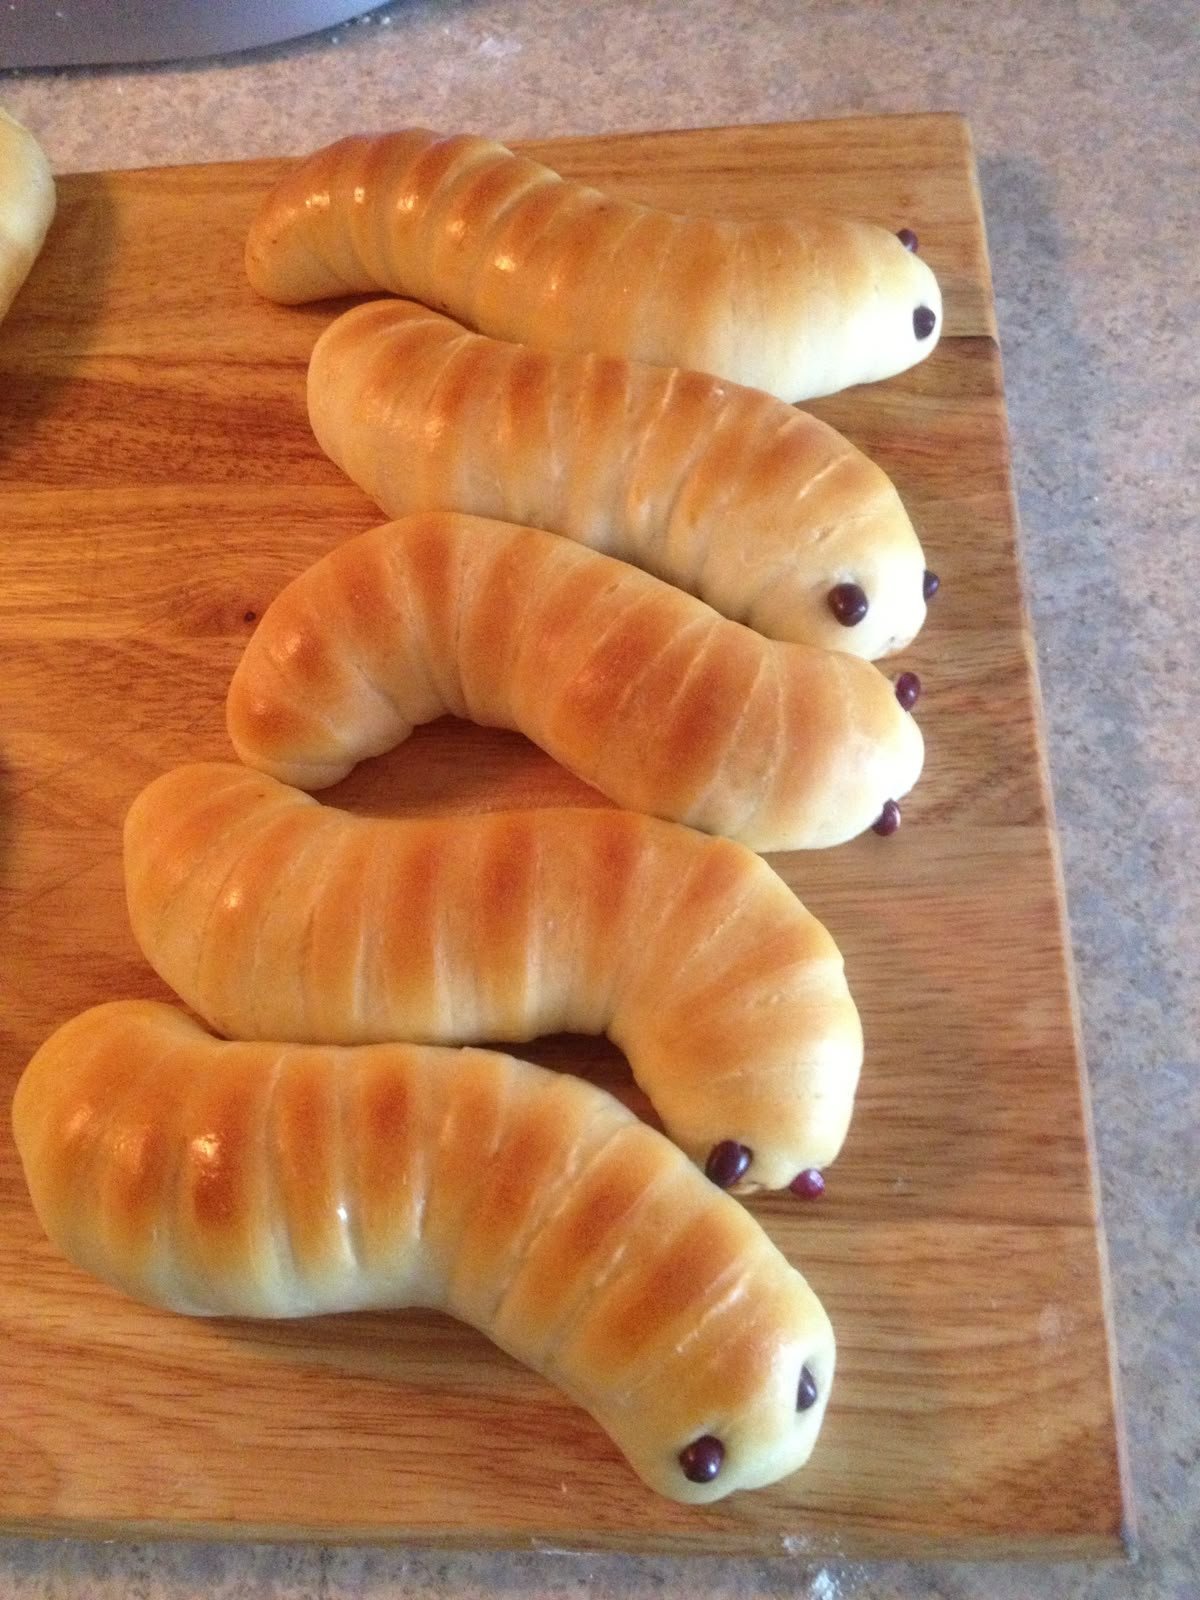
These adorable caterpillar bread rolls are the perfect combination of soft, fluffy bread and playful presentation. With their golden-brown crust, tender interior, and little chocolate eyes, they look just like cute caterpillars crawling across your kitchen board! They are wonderful for kids’ lunchboxes, birthday parties, school snacks, and family gatherings.
The best part is that these rolls are made with simple baking ingredients you probably already have in your kitchen. The dough is easy to prepare, beautifully soft, and perfect for shaping into fun caterpillar designs. Whether you are an experienced baker or trying homemade bread for the first time, this recipe will help you create bakery-style rolls right at home.
Preparation time
25 minutes
Rising time
1½–2 hours
Baking time
15–20 minutes
Yield
8–10 rolls
Why You Will Love These Caterpillar Rolls
- Soft and fluffy: Milk, butter, and a little sugar make the bread tender and delicious.
- Kid-friendly: The cute caterpillar shape makes snack time more exciting.
- Simple ingredients: No special equipment or complicated techniques are required.
- Customizable: Decorate the eyes with chocolate chips, raisins, or small pieces of dark chocolate.
- Perfect for any occasion: Serve them for breakfast, afternoon tea, parties, or lunchboxes.
Ingredients
For the dough
- 500 g all-purpose flour or bread flour
- 250 ml lukewarm milk
- 7 g instant yeast
- 50 g granulated sugar
- 1 large egg
- 60 g softened butter
- 1 teaspoon salt
For decoration
- 1 egg, beaten, for egg wash
- 16–20 chocolate chips or small chocolate pieces for the eyes
- 1 tablespoon milk, if needed for brushing instead of egg wash
Step-by-Step Instructions
Step 1: Prepare the yeast mixture
Pour the lukewarm milk into a large mixing bowl. Add the sugar and yeast, then stir gently to combine.
If using active dry yeast, leave the mixture for approximately 5–10 minutes until it becomes foamy. Instant yeast can usually be mixed directly with the flour, but dissolving it in the milk is also fine.
Make sure the milk is warm rather than hot. Very hot liquid can damage the yeast and prevent the dough from rising properly.
Step 2: Make the dough
Add the flour, egg, and salt to the milk mixture. Mix until a rough dough forms.
Add the softened butter and knead for about 8–12 minutes by hand, or 6–8 minutes using a stand mixer with a dough hook.
At first, the dough may feel sticky, but continue kneading until it becomes smooth, elastic, and soft. Add extra flour only a little at a time if absolutely necessary, as too much flour can make the finished rolls dense.
Step 3: Let the dough rise
Place the dough in a lightly greased bowl and turn it once so the surface is coated.
Cover with a clean kitchen towel or plastic wrap. Leave it in a warm place for approximately 60–90 minutes, or until it has doubled in size.
The exact rising time depends on your kitchen temperature. A cooler room may require more time, so look at the dough rather than relying only on the clock.
Step 4: Divide and shape the caterpillars
Gently press down the risen dough to release excess air. Transfer it to a lightly floured work surface.
Divide the dough into 8–10 equal portions. Roll each portion into a long rope, approximately 20–25 cm long.
Shape each rope into a gentle curve or loose S-shape to create the caterpillar body. Make small, shallow diagonal cuts across the top of the dough with a sharp knife or kitchen scissors to create the segmented appearance seen in the photograph.
Avoid cutting too deeply, because the dough needs to remain connected and rise into a soft roll.
Arrange the shaped caterpillars on a baking tray lined with parchment paper, leaving enough space between them to expand.
Step 5: Allow the second rise
Cover the shaped rolls loosely and let them rise for another 25–40 minutes.
They should look puffier and feel light when gently touched. This second rise helps create the soft, airy texture that makes homemade bread so delicious.
Meanwhile, preheat your oven to 180°C (350°F).
Step 6: Brush with egg wash
Beat one egg in a small bowl. Gently brush a thin layer over the tops of the rolls.
The egg wash gives the bread its beautiful glossy, golden-brown finish. If you prefer not to use egg, brush the rolls lightly with milk instead.
Step 7: Bake until golden
Place the baking tray in the preheated oven and bake for approximately 15–20 minutes, depending on the size of your rolls and your oven.
The caterpillar rolls are ready when they are puffed up and golden brown on top, with the centers fully baked.
If the tops begin browning too quickly, loosely cover them with foil for the remaining baking time.
Remove the tray from the oven and allow the rolls to cool on a wire rack until they are warm rather than hot.
Step 8: Add the chocolate eyes
Once the rolls have cooled slightly, gently press two small chocolate chips or pieces of chocolate into the front of each caterpillar to make the eyes.
You can use raisins instead if you prefer a less sweet decoration. If the bread is still very hot, the chocolate may melt, so waiting a little makes the eyes easier to position neatly.
Your homemade caterpillar bread rolls are now ready to serve!
Tips for Perfect Caterpillar Bread
Measure the flour carefully. Too much flour can make the dough dry and the rolls heavy. A kitchen scale gives the most consistent results.
Knead until smooth. Proper kneading develops the gluten that gives these rolls their soft, stretchy texture.
Do not rush the rising time. Well-risen dough produces lighter bread and helps the caterpillar shapes look fuller.
Keep the cuts shallow. Deep cuts can separate the segments during baking.
Add the eyes after baking. This prevents the chocolate from melting excessively or losing its shape.
Delicious Serving Ideas
These soft caterpillar rolls taste wonderful when served warm with butter, jam, honey, or chocolate spread. For a savory version, reduce the sugar slightly and serve the bread with cheese, scrambled eggs, or soup.
They are also a lovely addition to children’s birthday parties. Arrange several rolls on a platter with fresh fruit to create a playful snack table. For a sweeter variation, add a little vanilla extract to the dough or sprinkle the tops with pearl sugar before baking.
How to Store Homemade Caterpillar Rolls
Allow the rolls to cool completely before storing them in an airtight container. They are best enjoyed fresh but can generally be kept at room temperature for up to two days.
To keep them longer, freeze the cooled rolls in a freezer-safe bag for up to two months. Thaw at room temperature and warm briefly in a low oven before serving.
Avoid refrigerating the bread unnecessarily, as refrigeration can make it stale more quickly.
Frequently Asked Questions
Can I prepare the dough ahead of time?
Yes. After kneading, cover the dough and refrigerate it overnight. The following day, let it warm slightly, shape the caterpillars, and allow them to rise before baking. Rising times may vary depending on how cold the dough becomes.
Can I make these rolls without eggs?
Yes. You can replace the egg in the dough with approximately 45–50 ml additional milk, adjusting as needed to achieve a soft dough. Brush the tops with milk instead of egg wash.
Why did my caterpillar rolls turn out hard?
Common causes include adding too much flour, insufficient kneading, overbaking, or allowing the dough to dry out during rising. Keep the dough covered and remove the rolls from the oven once they are fully baked and golden.
Can I make them savory?
Absolutely. Reduce the sugar to 1–2 tablespoons and serve them with cheese or herbs. You can leave off the chocolate eyes or use suitable savory decorations after baking.
Final Thoughts
These homemade caterpillar bread rolls prove that baking can be both delicious and creative. Their soft, buttery texture, shiny golden crust, and cute little chocolate eyes make them a treat for children and adults alike.
With a simple yeast dough and a few easy shaping techniques, you can turn everyday bread ingredients into something special. Serve them fresh from the oven, share them with family and friends, and enjoy making your own adorable batch of caterpillar bread!
Recipe inspired by the uploaded photograph. Baking times and final appearance may vary depending on your oven, dough size, and shaping technique.

Leave a Reply