Soft Homemade Sandwich Bread
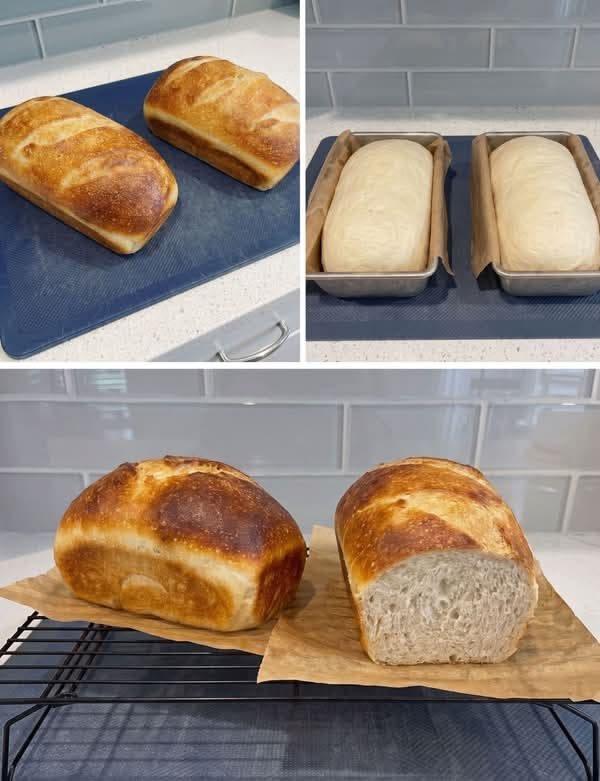
There is nothing quite like the smell of freshly baked homemade bread filling your kitchen. This homemade sandwich bread recipe produces two beautiful loaves with a golden-brown crust, a soft and fluffy interior, and a tender crumb that is perfect for everyday sandwiches, toast, or enjoying with a little butter.
Inspired by the bread in your photo, this recipe uses simple pantry ingredients and a straightforward method that even beginner bakers can follow. The dough is easy to work with, rises beautifully, and bakes into delicious loaves with a rustic, homemade appearance.
Whether you are making bread for your family, preparing breakfast toast, or looking for a reliable homemade bread recipe for your food blog, this recipe is one to keep.
Why You Will Love This Homemade Bread
- Soft and fluffy texture: Perfect for sandwiches, toast, and morning breakfast.
- Beautiful golden crust: A lovely bakery-style finish without complicated techniques.
- Simple ingredients: Made with everyday baking staples.
- Two full loaves: Ideal for families, meal preparation, or freezing for later.
- Beginner-friendly: Easy-to-follow instructions with helpful tips for success.
Recipe Details
Preparation
25 minutes
Rising time
1½–2 hours
Baking time
30–35 minutes
Yield
2 loaves
Total time: approximately 2½–3 hours, including rising and cooling preparation.
Ingredients
Honey Bagels | Beelal Honey
This recipe makes two medium sandwich loaves.
- 600 g bread flour or strong white flour (approximately 5 cups, depending on measuring method)
- 360 ml warm water (1½ cups)
- 7 g instant yeast (2¼ teaspoons)
- 25 g sugar (2 tablespoons)
- 10 g salt (1¾ teaspoons)
- 30 ml vegetable oil or olive oil (2 tablespoons)
- 20 g softened butter (optional, for a richer, softer loaf)
Optional for the crust: A little melted butter to brush over the bread after baking.
Important: Flour absorbs water differently depending on the brand and humidity. If the dough feels dry, add water a teaspoon at a time. If it is very sticky, allow it to rest before adding extra flour.
Step-by-Step Instructions
Pan de trigo rústico, receta fácil y rápida paso a paso
Step 1: Mix the ingredients
In a large mixing bowl, combine the flour, instant yeast, sugar, and salt. Add the warm water and oil, then mix until a rough dough forms. If using softened butter, add it during mixing. The dough should come together without being excessively dry or wet.
Bäcker knetet geschmeidigen Hefeteig in moderner Küche
Step 2: Knead until smooth
Transfer the dough to a lightly floured work surface. Knead for 8–10 minutes by hand, or approximately 5–7 minutes in a stand mixer fitted with a dough hook. The dough should become smooth, elastic, and slightly tacky. Proper kneading helps develop the gluten that gives sandwich bread its structure.
Постное дрожжевое тесто: пошаговый рецепт с фото и калорийностью — Открытая кухня
Step 3: Let the dough rise
Place the dough in a lightly oiled bowl and turn it once to coat the surface. Cover with a clean towel or plastic wrap and leave it in a warm, draft-free place for about 60–90 minutes, or until roughly doubled in size. Rising time will depend on your kitchen temperature.
Cafeteria – Vancouver Community College
Step 4: Divide and shape the loaves
Gently press the dough to release excess gas. Divide it into two equal portions. Flatten each portion into a rectangle, fold the sides inward, and roll it tightly into a loaf. Pinch the seam closed and place each loaf seam-side down into a lightly greased loaf pan.
Soft and Fluffy White Bread Loaf – Cloudy Kitchen
Step 5: Proof the shaped dough
Cover the pans loosely and leave the dough to rise for another 30–45 minutes. The loaves should look puffy and expand noticeably. A gentle indentation should spring back slowly when the dough is ready. Avoid letting the loaves overproof, as they may collapse during baking.
How To Check Bread For Doneness When You Can’t Find The Thermometer
Step 6: Bake until golden brown
Preheat your oven to 190°C (375°F). Bake the loaves for 30–35 minutes, until the tops are a rich golden brown and the bread sounds hollow when tapped. If you use a thermometer, the center should reach approximately 90–96°C (194–205°F). Tent loosely with foil if the tops brown too quickly.
Pão Caseiro Delicioso com Trigo, Leite e Ovo: Receita Simples – Receita | Gerador de Receitas
Step 7: Cool before slicing
Remove the loaves from their pans after about 5–10 minutes and transfer them to a wire rack. Let them cool for at least 45–60 minutes before slicing. This allows the inside to finish setting and helps prevent a gummy texture. Brush the tops with butter if you prefer a softer crust.
Tips for Perfect Homemade Sandwich Bread
- Use the right water temperature. Warm water should feel comfortable to the touch, around 35–40°C (95–104°F). Very hot water can damage the yeast and prevent proper rising.
- Measure flour accurately. Weighing flour gives more consistent results than measuring by cups. Too much flour can make bread dense and dry.
- Give the dough enough time to rise. Follow the dough’s appearance rather than the clock alone. A cool kitchen may require extra time.
- Shape tightly. Rolling the dough firmly helps create a uniform loaf with fewer large air pockets.
- Avoid cutting hot bread. Although tempting, slicing too early can crush the soft crumb and release excess moisture.
- Watch the crust. If you want a softer sandwich loaf, brush the baked tops with butter and cover loosely with a clean towel while cooling. For a crustier finish like the bread in your photo, leave the loaves uncovered.
How to Store Homemade Bread
Once completely cool, store the bread in an airtight bag or bread container at room temperature for approximately 3–4 days. Avoid refrigerating it because refrigeration can make bread stale faster.
For longer storage, slice the loaves and freeze them in a freezer-safe bag for up to 3 months for best quality. You can toast individual frozen slices directly or thaw them at room temperature.
Serving Ideas
Grandma sycamore white bread Nutrition
Toast With Butter And Jam: Complete Nutrition Guide – SnapCalorie
Delicious sandwich with toasted bread, lettuce, cheese and tomatoes. Healthy homemade snack
This homemade bread is wonderfully versatile. Use it for classic cheese sandwiches, chicken sandwiches, peanut butter toast, French toast, or simple slices served warm with butter and jam. It also makes excellent grilled sandwiches because the crumb is soft enough to bite through while remaining sturdy enough to hold fillings.
For a hearty breakfast, toast a thick slice and top it with scrambled eggs or avocado. You can also cut leftover bread into cubes for homemade croutons or use slightly stale slices to make bread pudding.
Frequently Asked Questions
Can I use all-purpose flour instead of bread flour?
Yes. All-purpose flour works well, although the bread may be slightly less chewy and structured. Adjust the water gradually because different flours absorb different amounts of moisture.
Why did my bread turn out dense?
Common reasons include adding too much flour, insufficient kneading, inactive yeast, or not allowing the dough to rise adequately. Make sure your yeast is fresh and the dough has time to become light and puffy.
Can I make the dough without a stand mixer?
Absolutely! Kneading by hand works very well. It takes a little more effort, but you can achieve a smooth, elastic dough with patience.
How can I make the crust darker?
Bake until the loaves reach a deep golden-brown color, keeping a close eye on them near the end. Oven temperatures vary, so use the appearance and internal temperature as guides rather than extending the baking time too much.
Final Thoughts
Homemade sandwich bread is a rewarding baking project that turns a handful of everyday ingredients into two delicious, golden loaves. With a little kneading, proper rising, and patience while cooling, you can create bread that looks beautiful, slices neatly, and tastes wonderful.
The best part is that you can adapt this recipe to your preferences. Add a little more butter for softness, use part whole-wheat flour for a heartier loaf, or keep it simple for everyday sandwiches. Once you master the basic method, freshly baked bread can become a regular part of your kitchen routine.
Give this recipe a try, save it for your next baking day, and enjoy the taste of fresh homemade bread!

Leave a Reply