There is something wonderfully satisfying about making your own ice cream at home. It is creamy, cold, sweet, and completely customizable—and the best part is that you do not need an expensive ice cream machine to make it.
This easy no-churn ice cream recipe creates a rich, smooth, scoopable dessert using just a few simple ingredients. The same creamy base can be transformed into different flavors, including strawberry, vanilla, mango, and other fruity variations.
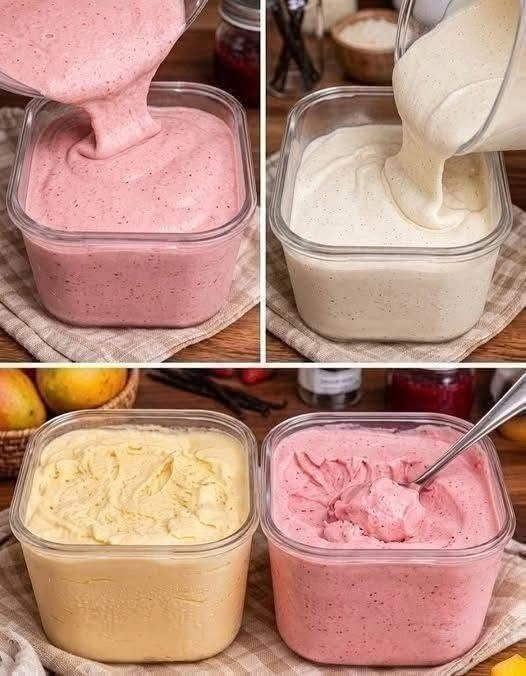
The beautiful pastel colors and creamy texture in the picture make this homemade ice cream perfect for family gatherings, summer parties, birthdays, or simply keeping a container in the freezer for when a sweet craving strikes.
Why You’ll Love This Homemade Ice Cream
Traditional ice cream can require an ice cream maker, special techniques, and plenty of time. This recipe takes a much simpler approach.
The secret is sweetened condensed milk combined with whipped cream. Whipping the cream incorporates air into the mixture, while condensed milk provides sweetness and helps give the finished ice cream its smooth, creamy texture.
You can prepare the base in minutes, add your favorite flavorings, transfer it to a container, and let the freezer do the rest.
This recipe is:
- Easy to prepare
- No-churn
- Made with simple ingredients
- Creamy and smooth
- Customizable with different flavors
- Perfect for make-ahead desserts
- Great for both kids and adults
Ingredients
For the Basic Ice Cream Base
- 2 cups heavy whipping cream, chilled
- 1 can (about 14 ounces) sweetened condensed milk
- 1 teaspoon vanilla extract
- Pinch of salt
That is all you need for the basic vanilla version.
For the fruity flavors, you can add fresh fruit puree, fruit jam, or a thick fruit sauce.
For Strawberry Ice Cream
- 1 cup fresh strawberries
- 2–3 tablespoons sugar, depending on sweetness
- 1 teaspoon lemon juice
For Mango Ice Cream
- 1 cup ripe mango puree
- 1–2 tablespoons sugar, if needed
- ½ teaspoon lemon or lime juice
For Other Flavors
You can experiment with:
- Banana
- Raspberry
- Blueberry
- Peach
- Pineapple
- Chocolate
- Coffee
- Pistachio
- Cookies and cream
How to Make No-Churn Ice Cream
Step 1: Prepare the Fruit
If you are making strawberry or mango ice cream, start by preparing the fruit.
For strawberry ice cream, wash and hull the strawberries before blending them into a smooth puree. Taste the puree and add a little sugar if the strawberries are tart. A small amount of lemon juice can also brighten the flavor.
For mango ice cream, simply peel and cut a ripe mango before blending it until completely smooth. If your mango is naturally very sweet, you may not need additional sugar.
For the smoothest ice cream, avoid adding too much watery fruit puree. Excess liquid can create ice crystals as the ice cream freezes.
Step 2: Whip the Cream
Pour the cold heavy cream into a large mixing bowl.
Using an electric mixer, beat the cream on medium-high speed until it forms soft to medium-stiff peaks.
This usually takes several minutes.
Be careful not to overbeat the cream. You want it thick and fluffy, but not grainy or separated.
For the best results, make sure the cream is very cold before whipping.
Step 3: Add the Condensed Milk
Once your cream is whipped, slowly fold in the sweetened condensed milk.
Add the vanilla extract and a tiny pinch of salt.
The salt will not make the ice cream taste salty a spatula rather than aggressively stirring. The goal is to keep as much air in the whipped cream. Instead, it helps balance the sweetness and makes the overall flavor more noticeable.
Fold gently with a spatula rather than aggressively stirring. The goal is to keep as much air in the whipped cream as possible.
Making Different Flavors
Now comes the fun part!
Divide the basic and stronger strawberry flavor, you can swirl a small amount of strawberry puree through the mixture instead of ice cream mixture into separate bowls if you want to make several flavors at once.
Strawberry
Fold the strawberry puree gently into one portion of the ice cream base.
For an attractive pink color and stronger strawberry flavor, you can swirl a small amount of strawberry puree through the mixture instead of mixing it completely.
You can also add finely chopped strawberries for little pieces of fruit throughout the ice cream.
Vanilla
For classic vanilla ice cream, simply leave one portion of the base as it is.
Add a little extra vanilla extract or vanilla bean paste if you want a stronger vanilla flavor.
Mango
Fold thick mango puree into another portion of the base.
The result should be naturally pale yellow with a sweet tropical flavor.
For an especially rich mango taste, use very ripe, fragrant mangoes.
Step 4: Transfer to Containers
Spoon each flavor into a clean, freezer-safe container.
A shallow container is ideal because the ice cream will freeze more quickly and evenly.
Smooth the surface with the back of a spoon or spatula.
If you want the ice cream to look like the colorful versions shown in the image, use clear glass or plastic containers. You can also layer two spoon vanilla ice cream into the container, add strawberry freezing time will depend on the size and depth of your container and the or more flavors for a beautiful swirled effect.
For example, spoon vanilla ice cream into the container, add strawberry ice cream, and gently swirl the two together with a knife.
Do not over-swirl, or the colors will blend completely.
Step 5: Freeze
Cover the container tightly with a lid or plastic wrap.
Place it in the freezer for approximately 6–8 hours, or preferably overnight.
The exact freezing time will depend on the size and depth of your container and the temperature of your freezer.
Once frozen, allow the ice cream to sit at room temperature for about 5–10 minutes before scooping.
This gives it just enough time to soften slightly and makes serving much easier.
Tips for Perfect Homemade Ice Cream
Use cold cream, fold gently. Overmixing can remove some of the air that gives fruit can make homemade ice cream icy. If your puree is particularly thin, simmer it gently in a saucepan for a few minutes to reduce some of the water. Cool it sweetness slightly. The mixture should taste a little sweeter than you ultimately cream
Cold heavy cream whips much more successfully than cream that has been sitting at room temperature.
Don’t overmix
When combining the condensed milk and whipped cream, fold gently. Overmixing can remove some of the air that gives no-churn ice cream its light texture.
Use thick fruit puree
Watery fruit can make homemade ice cream icy. If your puree is particularly thin, simmer it gently in a saucepan for a few minutes to reduce some of the water. Cool it completely before adding it to the ice cream.
Taste before freezing
Remember that freezing dulls sweetness slightly. The mixture should taste a little sweeter than you ultimately want the frozen ice cream to taste.
Store properly
Keep the ice cream in an airtight container to prevent freezer odors and reduce the formation of ice crystals.
For the best texture, enjoy homemade ice cream within about 2–3 weeks.
Delicious Topping Ideas
Once your homemade ice cream is ready, you can turn it into an impressive dessert with simple toppings.
For strawberry ice cream, try:
- Fresh strawberries
- Strawberry sauce
- White chocolate
- Crushed biscuits
For mango ice cream:
- Fresh mango cubes
- Toasted coconut
- Chopped nuts
- A little lime zest
For vanilla:
- Chocolate syrup
- Caramel sauce
- Sprinkles
- Chopped nuts
- Fresh berries
You can even create an ice cream bar and let everyone choose their own toppings.
Frequently Asked Questions
Can I make this without an electric mixer?
Yes. You can whip the cream by hand with a whisk, although it will take considerably more effort. A hand mixer makes the processened condensed milk is thick and sweet, while evaporated milk is thinner and unsweetened. Sub Mix melted and cooled chocolate, cocoa powder, chocolate chips, brownie pieces, this recipe is its versatility. Start with the simple vanilla base and divide it into several portions to make different flavors at the same time. A batch of pink strawberry, creamy vanilla, sunny mango, or chocolate ice cream can turn let it freeze overnight, and the next day you will have rich, creamy homemade ice cream ready to much faster.
Can I use evaporated milk instead of condensed milk?
Not directly. Sweetened condensed milk is thick and sweet, while evaporated milk is thinner and unsweetened. Substituting it will change both the sweetness and texture of the recipe.
Why is my ice cream icy?
The most common reasons are excess liquid, insufficiently whipped cream, or improper storage. Using thick fruit puree and an airtight container will help.
Can I add chocolate?
Absolutely! Mix melted and cooled chocolate, cocoa powder, chocolate chips, brownie pieces, or crushed cookies into the base.
Final Thoughts
Making homemade ice cream does not have to be complicated. With heavy cream, sweetened condensed milk, and your favorite flavorings, you can create a creamy frozen dessert without an ice cream machine.
The biggest advantage of this recipe is its versatility. Start with the simple vanilla base and divide it into several portions to make different flavors at the same time. A batch of pink strawberry, creamy vanilla, sunny mango, or chocolate ice cream can turn an ordinary dessert into something special.
The next time you are looking for an easy homemade treat, skip the store-bought tub and try this no-churn ice cream recipe instead. Prepare it in the evening, let it freeze overnight, and the next day you will have rich, creamy homemade ice cream ready to scoop.
One simple base, endless flavors, and no ice cream machine required!

Leave a Reply