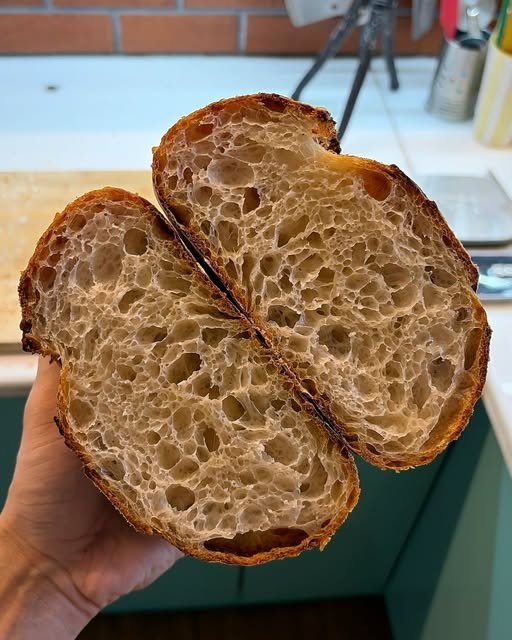
There is something special about slicing into a beautifully fermented sourdough loaf and discovering a delicate network of golden, irregular air pockets inside. This style of bread, often called open-crumb sourdough, has a crisp, deeply caramelized crust and a light, chewy interior filled with a mixture of small, medium, and large holes.
The loaf shown here has many of the characteristics bakers look for in a well-fermented artisan sourdough: strong oven spring, a dark golden crust, excellent volume, and an airy crumb. While achieving this texture takes practice, the process becomes much easier once you understand how hydration, fermentation, gluten development, shaping, and baking work together.
This recipe is designed for one large loaf and uses a relatively high hydration to encourage an open crumb while remaining manageable for a home baker.
Ingredients
- 500 g strong bread flour
- 375 g water, divided
- 100 g active sourdough starter
- 10 g fine sea salt
- Extra rice flour or bread flour for dusting
This recipe uses approximately 78% hydration, including the water and flour contained in the sourdough starter. If you are new to high-hydration dough, you can reduce the water slightly to 350–360 g for an easier dough.
For the best results, use an active starter that has been fed recently and is capable of doubling or tripling in volume within several hours.
Step 1: Prepare Your Sourdough Starter
Before beginning the dough, make sure your starter is active and bubbly.
A healthy starter should have a pleasant mildly acidic aroma and plenty of bubbles throughout. Ideally, use it around its peak, when it has risen substantially and the surface is still slightly domed.
If your starter has been sitting in the refrigerator, give it one or two regular feedings before making the bread.
The activity of your starter has a major influence on fermentation. A weak starter can leave you with a dense loaf even if every other part of the recipe is followed correctly.
Step 2: Autolyse the Flour
Place the bread flour in a large bowl.
Add approximately 350 g of the water, reserving the remaining 25 g for later. Mix until all of the flour is hydrated and no dry patches remain.
Cover the bowl and let it rest for 30–60 minutes.
This resting period is called an autolyse. It gives the flour time to absorb water and allows gluten development to begin naturally. The dough should feel noticeably smoother after this rest.
Step 3: Add the Starter and Salt
Add your active sourdough starter to the dough.
Mix thoroughly using your hands. Pinch and fold the dough repeatedly until the starter is evenly distributed.
Dissolve the salt in the remaining water and gradually incorporate it into the dough.
At first the dough may feel wet and somewhat messy. Resist the temptation to add flour. With time and folding, the dough will become stronger.
Cover the bowl and allow the dough to rest for approximately 30 minutes.
Step 4: Build Strength With Stretch and Folds
This is one of the most important stages for creating the beautiful open crumb seen in the loaf.
Instead of aggressively kneading the dough, use a series of gentle stretch-and-folds.
With damp hands, grab one side of the dough, stretch it upward without tearing it, and fold it over the center. Rotate the bowl and repeat on the remaining sides.
Complete one set every 30 minutes for the first 2–3 hours.
During the first few sets, the dough may spread quickly after being folded. As gluten strength develops, it should become increasingly elastic and hold its shape for longer.
Be gentle. Your goal is to strengthen the gluten while preserving the gas bubbles that are beginning to form.
Step 5: Bulk Fermentation
After your stretch-and-fold sessions, leave the dough covered at room temperature to continue fermenting.
The total bulk fermentation time can vary considerably depending on the temperature of your kitchen and the strength of your starter. At around 24–25°C, it may take approximately 4–6 hours from the time you first mix the dough.
Don’t rely solely on the clock.
Instead, watch the dough.
You are looking for:
- A noticeable increase in volume
- Bubbles developing along the sides
- A smoother, more elastic surface
- A slightly domed appearance
- A light, airy feeling when the bowl is gently shaken
The dough does not necessarily need to double in size.
Over-fermentation can make shaping difficult and may cause the dough to spread rather than rise.
Step 6: Pre-Shape the Dough
Lightly flour your work surface and gently turn the dough onto it.
Try to handle it as little as possible.
Using a dough scraper, gently shape the dough into a loose round. Allow it to rest uncovered for approximately 20–30 minutes.
This bench rest allows the gluten to relax before the final shaping.
If the dough immediately spreads completely flat, it may need more strength or may have fermented too far. If it holds its shape reasonably well, you’re ready for final shaping.
Step 7: Final Shape
Dust a proofing basket generously with rice flour.
Gently shape the dough by folding the edges toward the center. Turn the dough over and use your hands or a bench scraper to create surface tension.
The goal is to create a smooth outer skin without squeezing out all the fermentation gases.
Place the shaped loaf into the proofing basket with the seam facing upward.
Cover it and place it in the refrigerator for a cold final proof of approximately 8–16 hours.
This overnight fermentation is convenient and also allows the dough to develop additional flavor.
Step 8: Preheat the Oven
The next day, place a Dutch oven or covered baking vessel inside your oven.
Preheat to 250°C / 480°F for at least 45 minutes.
A thoroughly heated baking vessel is essential for strong oven spring.
The combination of high heat and trapped steam allows the loaf to expand dramatically during the early stages of baking before the crust sets.
Step 9: Score the Dough
Take the cold dough directly from the refrigerator.
Turn it onto a piece of parchment paper.
Using a very sharp bread lame or razor blade, make one confident slash across the surface.
The cut should be relatively deep and angled slightly rather than simply scratched across the dough.
Good scoring gives the expanding loaf a controlled place to open.
The dramatic split along the loaf in the photograph is an example of how the dough can expand around the scoring line during baking.
Step 10: Bake
Carefully transfer the dough into the preheated Dutch oven.
Immediately cover it with the lid.
Bake at 250°C / 480°F for approximately 20 minutes.
Then remove the lid and reduce the temperature to 230°C / 450°F.
Continue baking for another 20–25 minutes, or until the crust is a deep golden brown.
For the dark, caramelized crust shown in the photograph, don’t be afraid to let the loaf become richly browned. A pale crust generally means the bread could have benefited from additional baking.
If your oven allows it, leave the finished loaf inside for another 5 minutes with the oven switched off and the door slightly open. This can help dry the crust.
Step 11: Cool Completely
Transfer the bread to a wire rack immediately after baking.
This is one step that shouldn’t be rushed.
Allow the loaf to cool for at least 2 hours before slicing.
Although the crust may look finished when it comes out of the oven, the crumb is still setting internally. Cutting too soon can compress the delicate structure and create a gummy interior.
Once completely cool, use a sharp serrated knife to slice the loaf.
You should see an irregular, airy crumb with a combination of small and larger holes.
Tips for a More Open Crumb
Use an active starter
A strong starter provides the fermentation power necessary for good oven spring and a light interior.
Don’t overwork the dough
Aggressive handling can knock out the gas you’ve spent hours developing. Gentle folds and careful shaping are preferable.
Don’t automatically chase huge holes
An open crumb isn’t simply about creating the biggest holes possible. A good loaf should have a balanced structure that is airy but still strong enough to hold butter, toppings, and sandwiches.
Watch fermentation carefully
Under-fermentation can produce a dense crumb with large isolated holes, while over-fermentation can result in a flat loaf with weak structure.
Use wet hands
High-hydration sourdough is naturally sticky. Wetting your hands makes handling much easier without adding unnecessary flour.
Bake until deeply colored
A dark golden crust contributes both flavor and texture. Don’t remove the loaf as soon as it reaches a light brown color.
How to Enjoy Your Sourdough
Once cooled, this bread is wonderful simply toasted with butter. Its chewy crumb also makes an excellent base for avocado toast, eggs, roasted vegetables, cheese, or sandwiches.
For something simple, tear off a piece and dip it into good olive oil with a little salt. You can also turn leftover slices into croutons or breadcrumbs.
The best part of making sourdough is that every loaf teaches you something. Pay attention to how the dough feels, how quickly it rises, how much strength it develops, and how the finished crumb looks.
With a little practice, you’ll learn to recognize when your dough is perfectly fermented without depending entirely on a timer.
Final Thoughts
This open-crumb sourdough requires patience, but the ingredients themselves are remarkably simple: flour, water, salt, and a healthy sourdough starter.
The real recipe is in the process.
Give the flour time to hydrate, develop gluten gently, allow fermentation to happen naturally, shape without destroying the air inside, and bake in a thoroughly heated oven.
The result is a rustic loaf with a crisp, deeply browned crust and a beautifully airy interior—the kind of homemade bread that makes the time and patience completely worthwhile.

Leave a Reply