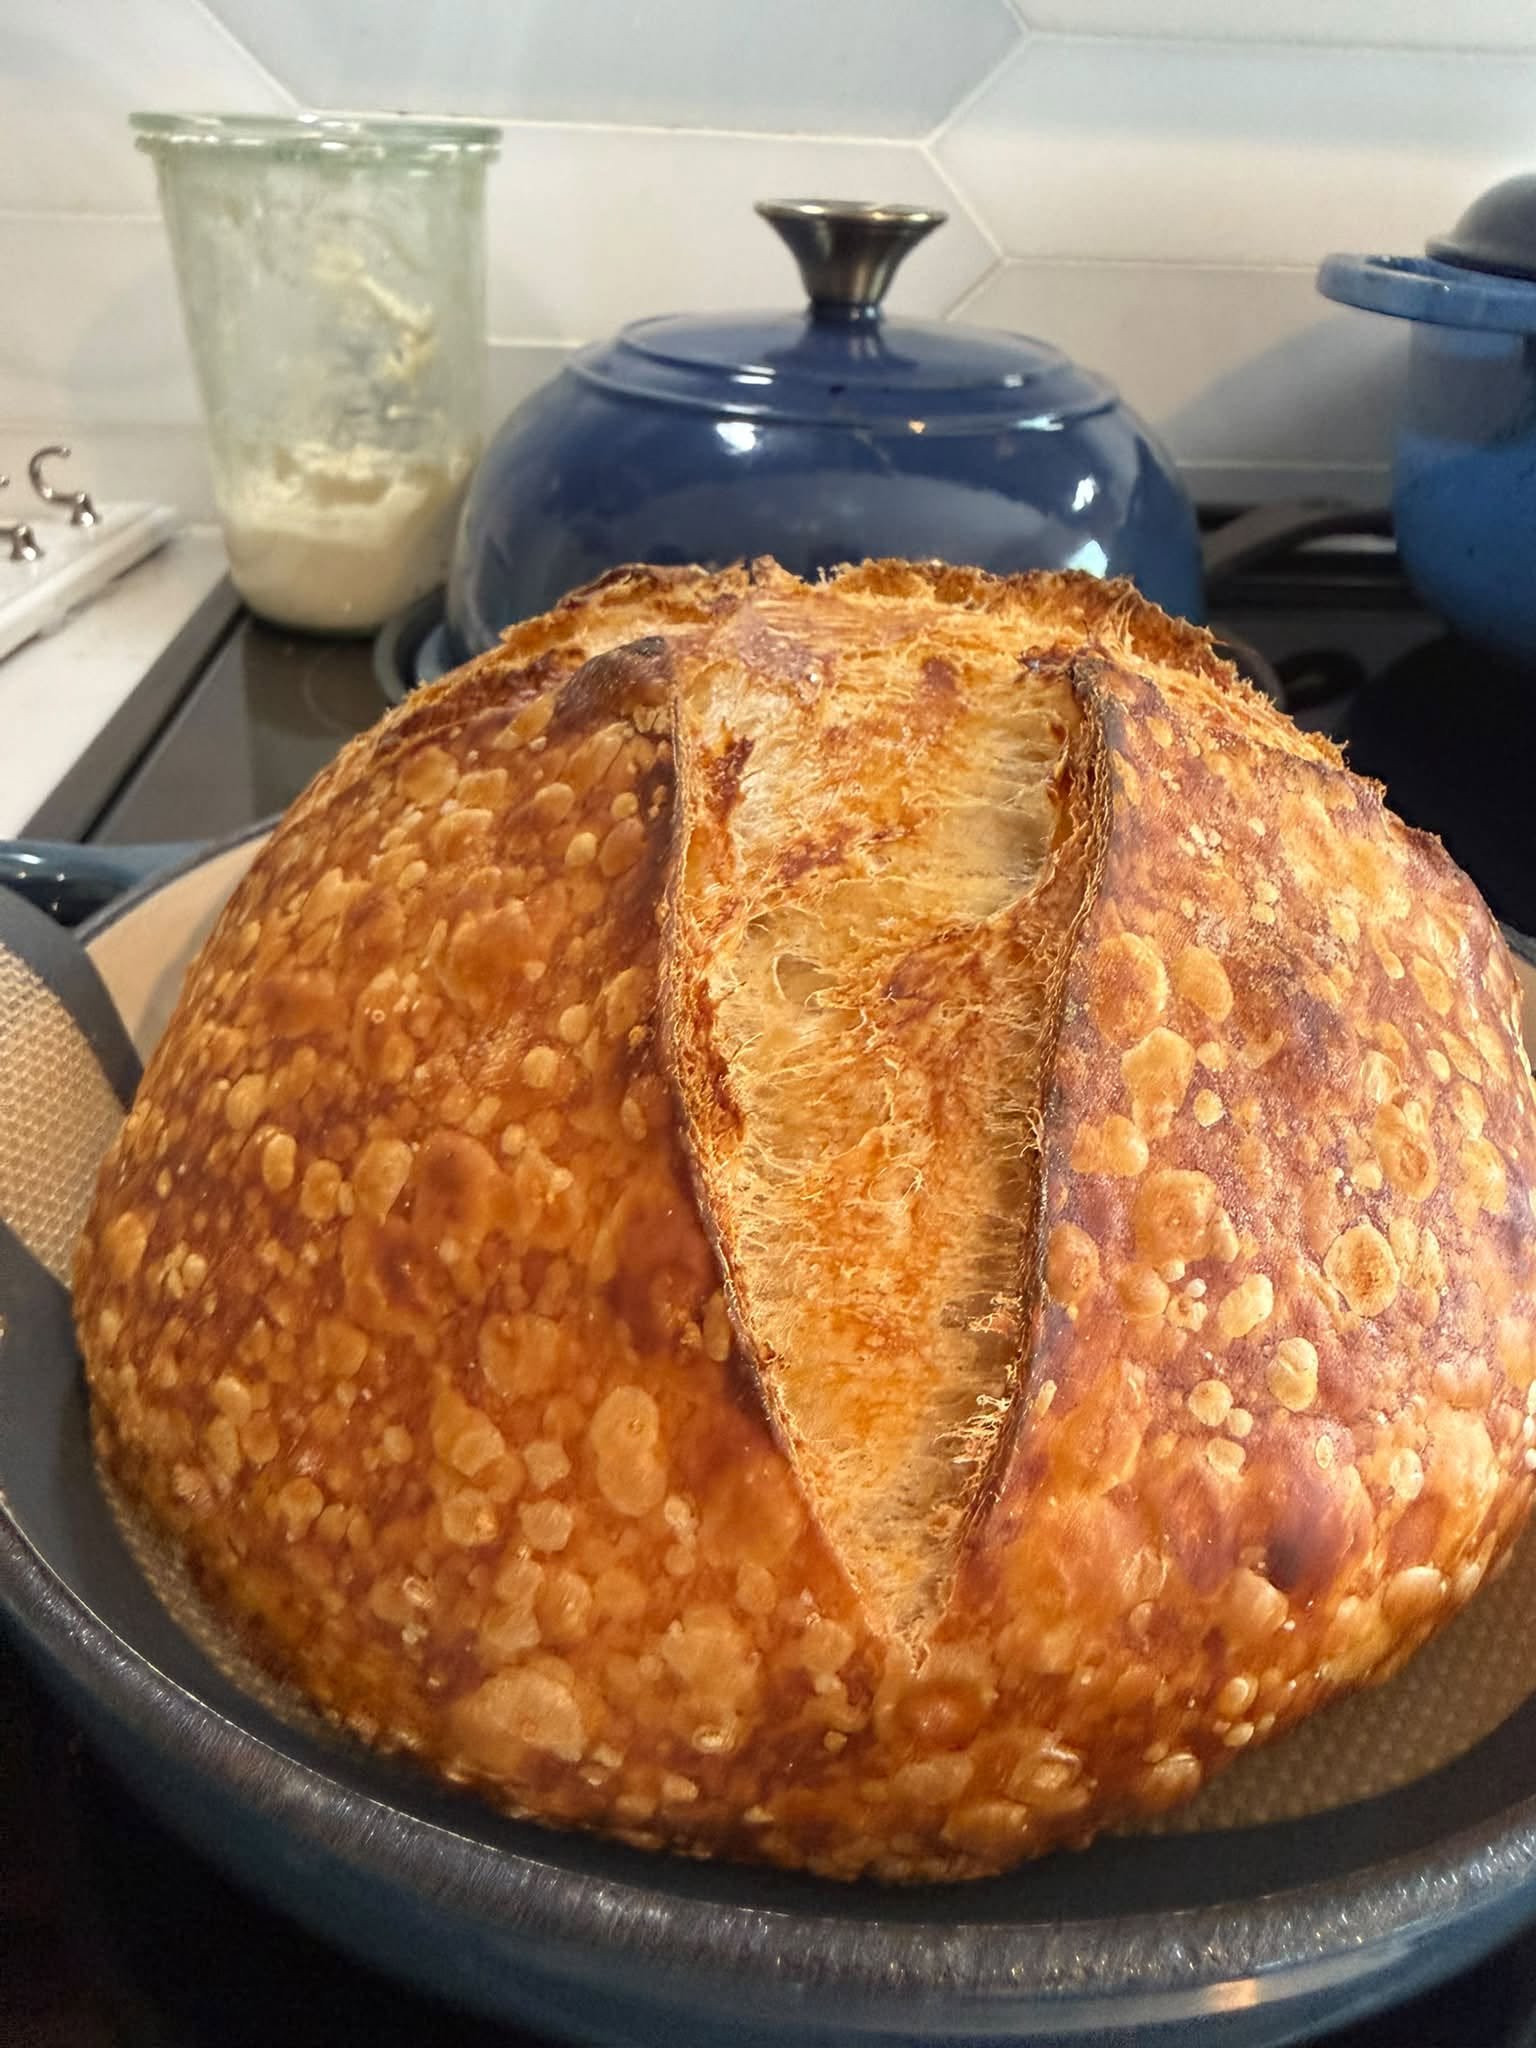
There is something incredibly satisfying about a beautifully baked sourdough loaf. The moment it comes out of the oven, the deeply golden crust, dramatic scoring, and crisp, blistered surface tell you that all those hours of fermentation were worth it. This rustic loaf has a wonderfully substantial crust, a soft and chewy interior, and plenty of natural flavor from a long fermentation.
The loaf pictured has a gorgeous dark-golden exterior with a distinctive central score that has opened beautifully during baking. The small golden patches across the crust give it an especially rustic, artisan appearance. This recipe focuses on developing those characteristics using a high-hydration dough, an active sourdough starter, careful fermentation, and a very hot Dutch oven.
The recipe makes one large round loaf and is suitable for an overnight baking schedule.
Rustic Sourdough Bread
Prep Time: 30 minutes
Fermentation: 8–16 hours
Bake Time: 45–50 minutes
Total Time: Approximately 10–18 hours
Yield: 1 large loaf
Ingredients
- 500 g strong bread flour
- 350–375 g water
- 100 g active sourdough starter
- 10 g fine sea salt
- Rice flour or bread flour, for dusting
For an easier dough to handle, begin with 350 g of water. If you’re comfortable working with wet sourdough, increase the water toward 375 g. The higher hydration will encourage a lighter, more open crumb.
Make sure your sourdough starter is active, bubbly, and recently fed before beginning.
Step 1: Get Your Starter Ready
A successful sourdough loaf starts with a healthy starter.
Feed your starter several hours before you plan to mix the dough. You want it to become active, rise significantly, and develop plenty of bubbles.
The exact timing depends on the temperature of your kitchen and the strength of your starter. In a warm environment, it may peak relatively quickly, while a cooler kitchen can take considerably longer.
For the best results, use the starter when it is near its peak rather than after it has completely collapsed.
A strong starter gives the dough the fermentation power it needs to develop volume, flavor, and an airy crumb.
Step 2: Mix the Flour and Water
Add the bread flour to a large mixing bowl.
Pour in approximately 350 g of the water and mix until the flour is completely hydrated. There should be no dry flour remaining.
Cover the bowl and let the mixture rest for 30–60 minutes.
This stage is commonly called an autolyse. During this resting period, the flour absorbs the water and gluten development begins naturally.
You will notice that the dough becomes smoother and more extensible after resting.
If you’re using 375 g total water, reserve the final 25 g for later.
Step 3: Add the Starter and Salt
Add 100 g of active sourdough starter to the dough.
Using wet hands, squeeze and fold the dough repeatedly until the starter is evenly incorporated.
Next, dissolve the salt in the reserved water and work it into the dough.
At this point, the dough will probably feel sticky and somewhat loose. That’s completely normal.
Avoid adding large amounts of flour. The wet dough is part of what helps produce a light, open crumb.
Cover the bowl and let the dough rest for approximately 30 minutes.
Step 4: Strengthen the Dough
Instead of traditional kneading, strengthen this dough using stretch-and-folds.
With damp hands, grab one side of the dough and gently stretch it upward. Fold it over the center. Turn the bowl and repeat with the other three sides.
Complete one set of folds every 30 minutes for the first 2 hours.
As you continue, the dough should become increasingly smooth and elastic.
Initially, it may spread across the bowl soon after each fold. After several rounds, it should hold its shape much better.
Be gentle during this process. You want to develop gluten while retaining the air that fermentation is creating.
Step 5: Bulk Fermentation
After the final stretch-and-fold, cover the dough and let it continue fermenting at room temperature.
This can take approximately 4–6 hours, although the actual time depends heavily on your starter and kitchen temperature.
Rather than relying only on the clock, watch the dough.
It should become:
- Noticeably larger
- Smoother and more elastic
- Slightly domed
- Bubbly around the edges
- Lighter and more aerated
The dough does not necessarily need to double.
If it becomes extremely loose, collapses easily, or develops a very strong fermented smell, it may have gone too far.
Step 6: Pre-Shape
Once bulk fermentation is complete, lightly flour your work surface.
Gently turn the dough out of the bowl.
Try not to press the dough down. You want to preserve as much of the fermentation gas as possible.
Use a bench scraper to gently form the dough into a loose round.
Allow it to rest for 20–30 minutes.
This bench rest gives the gluten time to relax, making the final shaping easier.
Step 7: Shape the Loaf
Dust a round proofing basket generously with rice flour.
Gently stretch the dough into a rough round and fold the edges toward the center.
Turn the dough over so the seam is underneath.
Using your hands and a bench scraper, gently drag the dough across the counter to create surface tension.
You want a smooth, taut outer surface without aggressively squeezing out the air inside.
Place the shaped dough into the proofing basket with the seam facing upward.
Cover it and refrigerate overnight for approximately 8–16 hours.
The cold fermentation develops additional flavor and makes the dough easier to score and transfer to the oven.
Step 8: Preheat the Oven
The next day, place a Dutch oven or heavy covered baking pot inside your oven.
Preheat to 250°C / 480°F for at least 45 minutes.
Don’t rush this step.
A thoroughly heated Dutch oven provides the intense heat needed for excellent oven spring. The enclosed environment also traps steam from the dough, helping the crust remain flexible during the first part of baking.
That combination of heat and steam is one of the secrets behind the dramatic crust seen in artisan sourdough.
Step 9: Score the Dough
Take the chilled dough from the refrigerator and turn it onto a sheet of parchment paper.
Dust away any excess flour if necessary.
Using a very sharp bread lame or razor blade, make a deep, confident score down the top of the loaf.
A long central score works particularly well for a round loaf like the one pictured.
Don’t make numerous shallow cuts. One strong score allows the bread to expand predictably while baking.
As the dough enters the hot oven, the scored section should open dramatically, creating the beautiful raised ridge characteristic of artisan sourdough.
Step 10: Bake
Carefully transfer the dough into the preheated Dutch oven.
Cover immediately with the lid.
Bake at 250°C / 480°F for 20 minutes.
After 20 minutes, remove the lid and reduce the oven temperature to 230°C / 450°F.
Continue baking for another 20–25 minutes, until the loaf develops a deep golden-brown crust.
For the rich color and substantial crust shown in the photograph, allow the bread to become deeply browned rather than removing it when it is still pale.
If your oven has particularly strong bottom heat, place the Dutch oven on a slightly higher rack during the uncovered portion.
Step 11: Cool Before Slicing
Once the bread is finished, carefully remove it from the Dutch oven and place it on a wire rack.
Listen closely—you may hear the crust crackle as the loaf cools.
Resist cutting into it immediately.
Allow the loaf to cool for at least 1–2 hours.
The crumb continues to set as the bread cools. Cutting it too early can result in a gummy or compressed interior.
Once completely cool, slice it using a sharp serrated bread knife.
Tips for a Beautiful Crust
The crust is one of the highlights of this loaf, and several factors contribute to its appearance.
Use plenty of heat. A thoroughly preheated Dutch oven gives the dough an immediate burst of energy.
Don’t skip the steam. Keeping the lid on during the first part of baking allows the loaf to expand before the crust hardens.
Bake until deeply colored. A richly browned crust provides a more developed flavor and satisfying crunch.
Score confidently. A clean, deep score gives the loaf a controlled place to expand.
Don’t rush fermentation. Flavor and structure come from time. A properly fermented dough will generally produce better volume and a more interesting crumb than dough that is hurried through the process.
How to Serve Homemade Sourdough
This loaf is delicious in its simplest form. Slice it thickly and serve with salted butter while the bread is still slightly warm.
It also makes an excellent base for avocado toast, eggs, grilled cheese, bruschetta, or hearty sandwiches.
For a quick appetizer, toast slices until crisp, rub them lightly with garlic, drizzle with olive oil, and finish with a little sea salt.
If you have leftovers after a few days, don’t waste them. Older sourdough makes excellent croutons, breadcrumbs, French toast, or rustic stuffing.
Final Thoughts
A beautiful artisan sourdough loaf isn’t created by complicated ingredients. It comes from understanding the dough and giving it enough time to develop.
With just flour, water, salt, and an active sourdough starter, you can create a loaf with a deeply golden crust, dramatic oven spring, and a wonderfully chewy interior.
The key is patience: allow the starter to become active, develop the dough gently, watch the fermentation rather than relying entirely on the clock, shape carefully, and bake in a thoroughly heated Dutch oven.
Once you become comfortable with the process, this basic recipe can become your everyday sourdough foundation. You can experiment with whole-grain flour, seeds, herbs, roasted garlic, or different flour combinations while keeping the same basic method.
And when you finally pull that beautifully browned loaf from the oven, let it cool, slice through the crisp crust, and see the soft interior inside, you’ll understand why homemade sourdough is such a rewarding baking project.

Leave a Reply