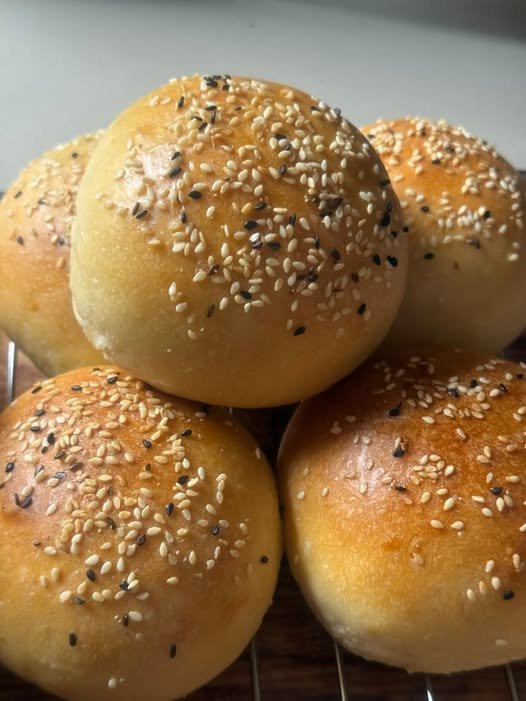
These homemade Sourdough Buns are soft, fluffy, golden, and wonderfully versatile. They have a lightly crisp exterior, a tender center, and the subtle tang that makes naturally leavened bread so special. Whether you use them for burgers, sandwiches, breakfast rolls, or simply serve them warm with butter, these buns are a delicious way to use an active sourdough starter.
Unlike many commercial buns, homemade sourdough buns can be made with simple ingredients and plenty of time for natural fermentation. The process may take longer than a quick yeast recipe, but most of the time is hands-off. Once you understand the dough, shaping and baking become surprisingly easy.
Ingredients
For the Dough
- 120 g active sourdough starter
- 240 g warm milk
- 1 large egg
- 30 g honey
- 35 g softened unsalted butter
- 450 g bread flour
- 8 g salt
For the Topping
- 1 egg, beaten
- 1 tablespoon water
- Sesame seeds
- Black sesame seeds, optional
Preparing the Dough
Begin by making sure your sourdough starter is active and bubbly. A starter that has recently risen, looks airy, and smells pleasantly tangy will give the buns the best rise and flavor. Add the starter, warm milk, egg, and honey to a large mixing bowl. Whisk until the ingredients are evenly combined.
Add the bread flour and salt. Mix with a wooden spoon or dough whisk until a rough dough forms and no large pockets of dry flour remain. Cover the bowl and let the dough rest for about 20 to 30 minutes. This short rest gives the flour time to hydrate and makes the dough easier to work with.
After the rest, begin incorporating the softened butter. Add it gradually, squeezing and folding the dough until the butter is completely absorbed. The dough may feel sticky at first, but avoid adding large amounts of extra flour. A soft dough produces softer buns.
Instead of traditional long kneading, you can strengthen the dough with a series of stretch-and-folds. Every 30 minutes, gently pull one side of the dough upward and fold it over the center. Turn the bowl and repeat on all four sides. Complete three or four rounds, allowing the dough to rest between each round.
Bulk Fermentation
Cover the bowl and let the dough ferment at room temperature until it becomes noticeably puffy and increases in volume. Depending on the strength of your starter and the temperature of your kitchen, this can take approximately four to six hours or longer.
Do not rely only on the clock. Watch the dough. It should look smoother, feel lighter, and show small bubbles around the sides or underneath. When you gently shake the bowl, the dough should have a soft, airy movement.
If your kitchen is cool, fermentation may take longer. If it is warm, the dough may rise more quickly. Natural sourdough baking depends on temperature, starter activity, and flour, so observing the dough is more reliable than following a fixed time.
Shaping the Buns
When the dough has completed bulk fermentation, lightly flour your work surface. Turn the dough out gently and divide it into eight equal portions. For very large buns, divide the dough into six pieces; for smaller dinner-style buns, divide it into ten pieces.
Take one portion and gently pull the edges toward the center to create surface tension. Turn it over so the smooth side is facing upward. Cup your hand around the dough and move it in small circles against the work surface. This helps create a smooth, rounded bun.
Repeat with the remaining pieces. Place the shaped buns on a parchment-lined baking sheet, leaving enough space between them for expansion.
Cover the tray loosely with a clean towel or reusable cover. Allow the buns to proof until they become visibly puffy. Depending on your starter and room temperature, the second rise can take one to three hours.
An optional overnight proof can make scheduling easier. After shaping, cover the buns and place them in the refrigerator. The next day, allow them to sit at room temperature until they become puffy before baking. Cold fermentation can also deepen the sourdough flavor.
Preparing for the Oven
When the buns are ready, preheat your oven to 400°F (200°C). If you have a baking stone or steel, you can preheat it as well, although these buns bake beautifully on a regular sheet pan.
Whisk one egg with a tablespoon of water to make an egg wash. Brush the tops of the buns gently. Sprinkle them with sesame seeds, black sesame seeds, or another topping of your choice.
Bake the buns for approximately 18 to 23 minutes, or until they are puffed and beautifully golden brown. Baking times vary according to bun size and individual ovens, so watch the color carefully.
When the buns are finished, remove them from the oven and transfer them to a wire rack. Allow them to cool before slicing. The interior continues setting as the buns cool, so cutting them while extremely hot can make the crumb appear gummy.
Tips for Soft Sourdough Buns
The first important tip is to use a strong starter. Your starter should be active enough to double in size after feeding. A weak starter may produce slow fermentation and dense buns.
The second tip is to avoid adding too much flour. Sticky dough can feel difficult at first, but extra flour can make the finished buns heavy. Instead, lightly wet or oil your hands when handling the dough.
Pay attention to fermentation. Under-fermented dough can create dense buns, while over-fermented dough may lose strength and spread. Look for a dough that has become airy and elastic.
Another useful tip is to shape the buns firmly enough to create surface tension without crushing the air inside. Gentle shaping helps produce rounded buns with a beautiful smooth top.
Flavor Variations
These sourdough buns are easy to customize. Add a tablespoon of dried herbs to the dough for savory sandwich rolls. Rosemary, oregano, garlic powder, or Italian seasoning can work beautifully.
For a sweeter breakfast bun, increase the honey slightly and add cinnamon. Raisins or dried cranberries can also be folded into the dough.
You can replace some of the bread flour with whole-wheat flour for a heartier flavor. Start by replacing about 50 to 75 grams rather than changing the entire flour amount, because whole-wheat flour can create a denser texture.
For extra crunch, top the buns with sunflower seeds, pumpkin seeds, poppy seeds, or a mixture of sesame seeds.
How to Serve Sourdough Buns
These buns are incredibly versatile. Slice them in half and fill them with burgers, grilled chicken, pulled meat, vegetables, cheese, or your favorite sandwich fillings. Their soft texture makes them excellent for classic burgers.
For breakfast, toast the cut sides and serve with eggs, avocado, cheese, or smoked salmon. You can also spread them with butter, cream cheese, peanut butter, or jam.
Warm buns are especially delicious alongside soups and stews. They can be used for dipping into sauces or simply served as a homemade bread basket at dinner.
Storage
Once completely cool, store the buns in an airtight container or bread bag at room temperature for two to three days. If you want to keep them longer, freeze them.
To freeze, place cooled buns in a freezer-safe bag and remove as much air as possible. Freeze them individually or separate them with parchment paper. Thaw at room temperature, then warm them briefly in the oven before serving.
If you are new to sourdough, start by making the recipe exactly as written before experimenting. Keep notes about how long your dough takes to rise, especially if your kitchen temperature changes. Over time, you will learn when your starter is strongest and how your dough should look at every stage. That experience makes future batches easier and helps you consistently achieve light, fluffy buns with a beautiful golden finish and a pleasantly chewy, flavorful crumb every time you bake.
Final Thoughts
Homemade sourdough buns are one of those recipes that are worth the patience. The process takes longer than commercial yeast buns because sourdough relies on natural fermentation, but the reward is a beautiful texture and subtle flavor that is difficult to replicate.
The buns shown in the photo have the ideal qualities to aim for: a smooth golden surface, generous sesame topping, and a soft interior. With an active starter, careful fermentation, and gentle shaping, you can create the same style of bakery-worthy buns in your own kitchen.
The recipe is also flexible enough to fit many meals. Make them for burger night, prepare them for sandwiches, serve them alongside soup, or bake a batch for weekend breakfasts. Once you become comfortable with the dough, you can experiment with different flours, toppings, and flavors.
Most importantly, remember that sourdough baking is about learning to read the dough. Weather, flour, starter strength, and room temperature can all change fermentation time. Instead of becoming frustrated when the timing changes, use the appearance and feel of the dough as your guide.
With a little practice, these soft sourdough buns can become a dependable homemade staple. Their golden crust, tender crumb, and naturally fermented flavor make them a delicious upgrade to store-bought bread. Once you pull a fresh batch from the oven, the aroma alone will make the waiting worthwhile.

Leave a Reply