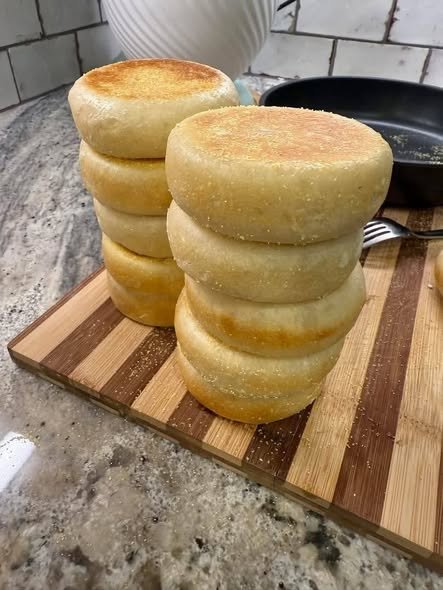
There is something incredibly satisfying about making your own bread at home, especially when the result is a stack of beautifully golden, thick, and fluffy rounds like the ones in the photo. These homemade English muffins have a lightly crisp, toasted exterior, a soft and tender center, and just enough texture to make them perfect for breakfast, sandwiches, or an afternoon snack.
Unlike traditional bread that is baked entirely in the oven, these English muffins are cooked on a skillet or griddle. That cooking method gives them their characteristic golden-brown tops and bottoms while keeping the inside wonderfully soft.
The best part? You don’t need any special equipment or complicated bread-making techniques. With a few basic ingredients, some patience while the dough rises, and a heavy skillet, you can make a batch of impressive homemade muffins right in your kitchen.
Why You’ll Love This Recipe
These homemade English muffins are:
- Soft and fluffy inside
- Golden and lightly crisp outside
- Delicious toasted with butter
- Excellent for breakfast sandwiches
- Made with simple pantry ingredients
- Cooked on the stovetop
- Freezer-friendly
- Perfect for making in large batches
They are also much more satisfying than store-bought versions because you can control the thickness, texture, and level of browning.
Ingredients
For approximately 10–12 thick English muffins, you’ll need:
For the dough
- 4 cups (500 g) all-purpose flour or bread flour
- 2 teaspoons instant yeast
- 2 tablespoons granulated sugar
- 1½ teaspoons salt
- 1¼ cups (300 ml) warm milk
- 2 tablespoons melted butter
- 1 large egg
- ½ cup (120 ml) warm water, approximately
For shaping and cooking
- Cornmeal, semolina, or fine flour for dusting
- 1–2 tablespoons butter or neutral oil for the skillet
The cornmeal or semolina is optional, but it gives the muffins a lovely slightly grainy coating and helps prevent them from sticking to the cooking surface.
How to Make Homemade English Muffins
Step 1: Prepare the Dough
Start by warming your milk until it is comfortably warm but not hot. Extremely hot liquid can damage the yeast, so aim for something similar to warm bath water.
In a large mixing bowl, combine the flour, sugar, salt, and instant yeast. Mix everything together so the ingredients are evenly distributed.
Add the warm milk, melted butter, and egg. Begin mixing with a wooden spoon or spatula.
Gradually add the warm water. You may not need the entire amount, so add it little by little until you have a soft dough.
The dough should be slightly sticky but should still come together into a ball.
If it feels extremely wet, add a tablespoon of flour at a time. If it feels very dry or difficult to knead, add a small splash of water.
Step 2: Knead the Dough
Transfer the dough onto a lightly floured work surface.
Knead it for approximately 8–10 minutes by hand.
You are looking for a dough that becomes smoother, softer, and more elastic as you knead. Don’t worry if it feels slightly sticky at first. Avoid adding too much flour because that can make the finished muffins heavy rather than soft.
If using a stand mixer, knead with the dough hook for about 5–7 minutes on low to medium speed.
Once the dough is smooth, place it into a lightly greased bowl.
Cover the bowl with plastic wrap, a clean kitchen towel, or a lid.
Step 3: Let the Dough Rise
Place the covered bowl somewhere warm and allow the dough to rise for approximately 1 to 1½ hours.
The dough should become noticeably larger—ideally close to double its original size.
The exact rising time depends on the temperature of your kitchen. On a warm day, the dough may rise quickly. In a cooler kitchen, it can take longer.
Don’t rush this step. Proper fermentation is one of the secrets to achieving light, fluffy muffins.
Step 4: Divide and Shape
Once the dough has risen, gently press it down to remove some of the excess air.
Transfer it to your work surface and divide it into 10–12 equal pieces.
For the thick, substantial muffins shown in the photo, divide the dough into fewer, larger portions rather than making very small muffins.
Shape each portion into a smooth ball.
Then gently flatten each ball with your palm until it resembles a thick disk.
Don’t flatten them too much. The goal is to create substantial, chunky rounds that will puff slightly during the second rise and cooking.
Sprinkle a tray or baking sheet with cornmeal or semolina.
Place the shaped muffins on the tray, leaving some space between them. Sprinkle the tops lightly with more cornmeal or semolina.
Step 5: Second Rise
Cover the shaped muffins loosely with a clean towel.
Let them rest for another 30–45 minutes.
This second rise is important because it allows the dough to become lighter before cooking.
You should notice that the muffins become slightly puffier and softer to the touch.
Step 6: Cook the Muffins
Heat a large heavy-bottomed skillet, cast-iron pan, or griddle over low to medium-low heat.
Add a small amount of butter or oil and spread it over the cooking surface.
Carefully place the muffins into the skillet.
Do not overcrowd the pan. Give each muffin enough room so you can easily turn it over.
Cook for approximately 7–10 minutes on the first side.
The exact cooking time will depend on the thickness of your muffins and the heat of your pan.
You want the bottom to become a beautiful golden brown without burning.
Carefully flip each muffin.
Continue cooking for another 7–10 minutes.
If the outside is becoming dark too quickly while the center is still uncooked, reduce the heat. Thick English muffins need gentle cooking so the heat has enough time to reach the center.
For especially thick muffins, you can cover the skillet with a lid for part of the cooking process. This helps the interior cook through while maintaining moisture.
How to Know When They’re Done
The muffins should feel firm but slightly springy when gently pressed.
If you’re unsure, carefully split one muffin open and check the center. It should be fully cooked, soft, and fluffy rather than sticky or doughy.
If the center needs more cooking, return the muffins to the skillet over very low heat for several additional minutes.
Let the finished muffins cool on a wire rack before cutting them.
The Best Way to Serve Them
These homemade English muffins are at their best when toasted.
Slice one horizontally using a serrated knife and place both halves in a toaster or under a grill until the edges become crisp and golden.
Then add plenty of butter.
You can also serve them with:
- Honey
- Jam
- Peanut butter
- Cream cheese
- Scrambled eggs
- Fried eggs
- Cheese
- Chicken
- Turkey
- Avocado
- Fresh tomatoes
For breakfast sandwiches, try layering a toasted muffin with a fried egg, cheese, and a sausage or chicken patty.
Tips for Perfect English Muffins
Keep the heat low
This is probably the most important tip. High heat can brown the outside quickly while leaving the inside raw.
Don’t add too much flour
A slightly soft dough produces lighter muffins. Excess flour can make them dense and dry.
Give the dough enough time to rise
Yeast needs time to create the air bubbles that give the muffins their soft texture.
Make them evenly sized
Try to divide the dough into equal portions so everything cooks at roughly the same rate.
Don’t press them while cooking
Avoid squashing the muffins with a spatula. You want to preserve the airiness created during fermentation.
Let them cool before slicing
Although it can be tempting to cut into them immediately, allowing them to cool for a few minutes helps the interior finish setting.
Storage and Freezing
Once completely cool, store the muffins in an airtight container or reusable food bag.
They should remain good at room temperature for approximately 2–3 days.
For longer storage, freeze them.
Slice the muffins horizontally before freezing and place parchment paper between them if desired. Store them in a freezer-safe bag for up to 2–3 months.
When you’re ready to eat one, you can toast it directly from frozen. This makes them particularly convenient for quick breakfasts.
Frequently Asked Questions
Can I use whole-wheat flour?
Yes. You can replace part of the all-purpose flour with whole-wheat flour. Start by replacing about 25% of the flour. Using too much whole-wheat flour can make the muffins heavier, so you may need slightly more water as well.
Can I make the dough the night before?
Absolutely. After kneading, cover the dough and refrigerate it overnight. The slow fermentation can develop additional flavor. Allow the dough to warm slightly before shaping.
Why are my muffins raw in the middle?
The most common reason is excessive cooking temperature. English muffins are relatively thick, so they need gentle, gradual heat. Reduce the skillet temperature and cook them for longer.
Can I make them thinner?
Yes. Simply divide the dough into more portions and flatten the rounds slightly more before the second rise.
Final Thoughts
Making homemade English muffins may look intimidating at first, but the process is actually quite straightforward. The key is patience: give the yeast enough time to develop the dough, shape the muffins gently, and cook them slowly over moderate heat.
The result is a wonderful stack of golden homemade muffins with a beautifully toasted exterior and a soft, tender middle. They are ideal for breakfast, brunch, sandwiches, or simply toasted with butter and a drizzle of honey.
Once you’ve made them successfully, you’ll probably want to keep a batch in the freezer so you can enjoy homemade English muffins whenever you like.
Recipe at a glance: Prepare the dough → knead → first rise → divide and shape → second rise → cook slowly on a skillet → cool → toast and serve.
Yield: 10–12 thick muffins
Prep time: 25 minutes
First rise: 1–1½ hours
Second rise: 30–45 minutes
Cooking time: 15–20 minutes per batch
Total time: Approximately 2½–3 hours
Difficulty: Intermediate
Best served: Warm and toasted with butter, jam, honey, or eggs.

Leave a Reply