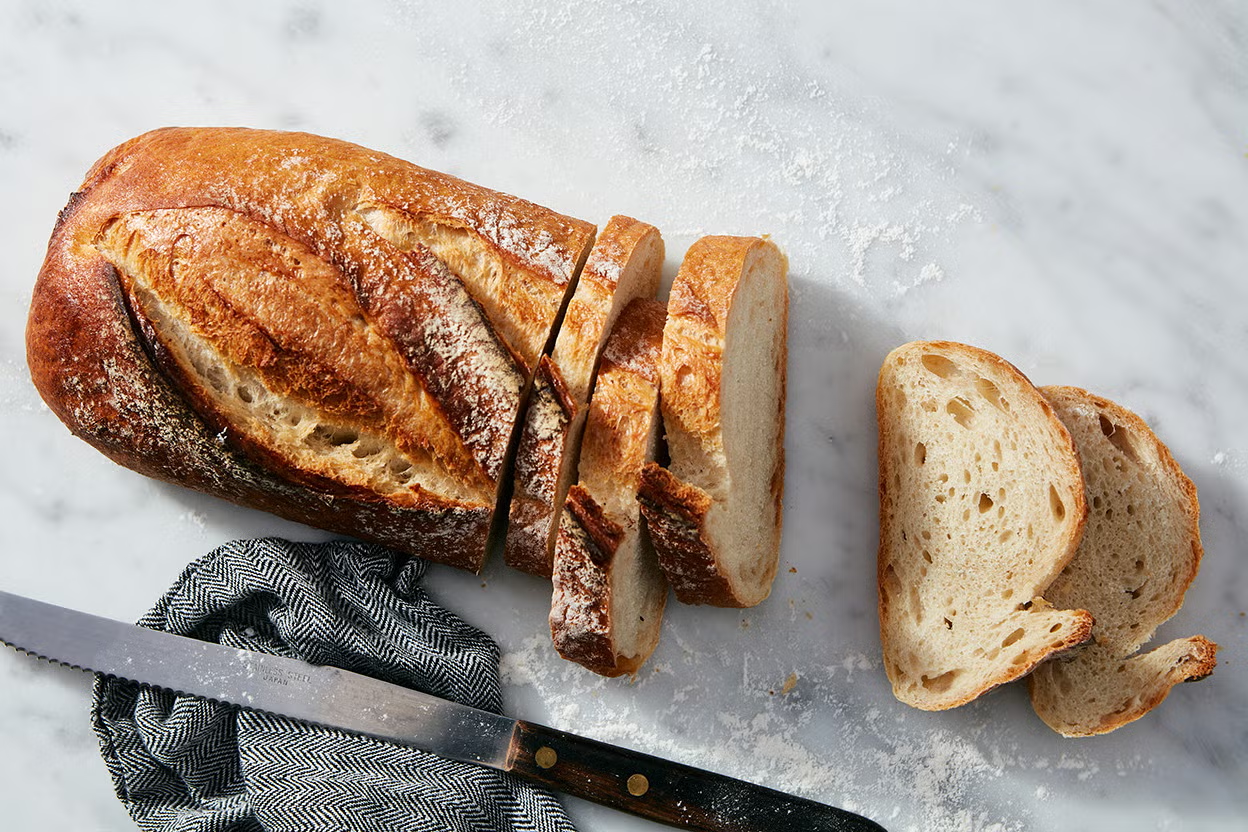
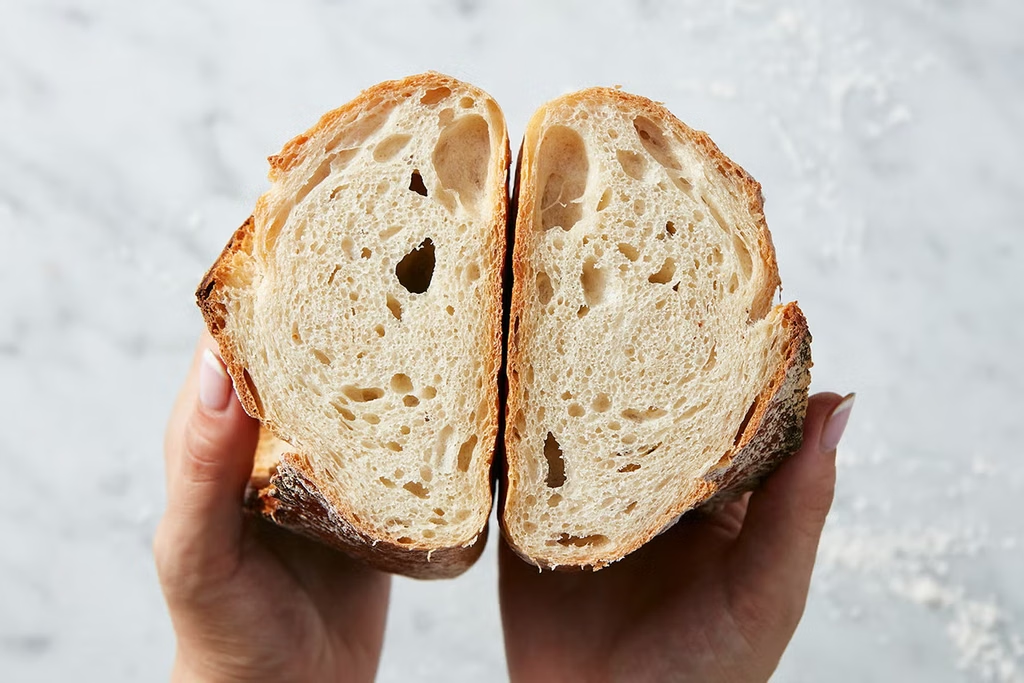
There is nothing quite like the smell of freshly baked homemade bread filling your kitchen. With its golden, crispy crust, soft and chewy interior, and beautiful open holes, artisan sourdough bread is a favorite among bread lovers. Whether you enjoy it with butter, serve it alongside soup, or use it to make delicious sandwiches, this rustic loaf is a wonderful addition to your kitchen.
The bread in the picture features a beautifully browned crust, a flour-dusted surface, and a tender crumb with naturally formed air pockets. You can achieve a similar result at home with a few simple ingredients, some patience, and the right baking technique.
In this recipe blog, you will learn how to make homemade artisan sourdough bread step by step, including how to prepare the dough, develop its structure, allow it to rise, and bake it until perfectly golden.
Why You Will Love This Artisan Bread Recipe
This homemade bread recipe is ideal for anyone who appreciates traditional bakery-style bread.
- Crispy crust: Baking in a covered Dutch oven helps create a beautifully crisp exterior.
- Soft and chewy interior: Proper fermentation gives the bread a tender, flavorful crumb.
- Simple ingredients: You only need flour, water, salt, and an active sourdough starter.
- Versatile serving options: Enjoy it for breakfast, lunch, dinner, or as a snack.
- Rustic bakery appearance: Flour dusting and decorative scoring give the loaf its classic artisan look.
Preparation Time and Servings
Preparation
30 minutes
Bulk fermentation
4–6 hours
Final proof
2–12 hours
Baking time
40–45 minutes
Yield: 1 medium-large loaf (approximately 8–10 slices)
Note: The total time depends on your kitchen temperature, the strength of your starter, and whether you choose an overnight refrigerator proof.
Ingredients for Homemade Artisan Sourdough Bread
The secret to delicious artisan bread is using good-quality ingredients and measuring them accurately. A kitchen scale is especially helpful when baking sourdough.
Ingredients
- 500 g bread flour
- 350 g lukewarm water
- 100 g active sourdough starter
- 10 g salt
- Extra flour or rice flour for dusting
Optional: Use a small amount of whole-wheat flour in place of some bread flour for a deeper, nuttier flavor.
What Is a Sourdough Starter?
A sourdough starter is a fermented mixture of flour and water containing naturally occurring yeast and beneficial bacteria. It helps the bread rise and contributes to its distinctive tangy flavor.
For the best results, use a starter that has been recently fed, looks bubbly, and has risen noticeably. A weak or inactive starter may cause your dough to rise slowly or produce a dense loaf.
If you do not have a sourdough starter, you can make a similar rustic loaf with commercial yeast, but the fermentation method and flavor will be different.
Step-by-Step Instructions
Step 1: Mix the Dough
Add the bread flour and water to a large mixing bowl. Mix until no dry flour remains. Cover the bowl and allow the mixture to rest for 30 minutes.
This resting period hydrates the flour and begins gluten development, which helps create a stronger dough.
Next, add the active sourdough starter and salt. Mix thoroughly using your hands or a sturdy spoon until the ingredients are evenly incorporated.
The dough will feel sticky at first, but avoid adding too much extra flour. A slightly wet dough helps produce the soft, open crumb associated with artisan bread.
Step 2: Develop the Gluten
After mixing, cover the bowl and let the dough rest for approximately 30 minutes.
Perform a series of stretch-and-folds. Gently pull one side of the dough upward and fold it toward the center. Rotate the bowl and repeat on all four sides.
Complete three or four sets of stretch-and-folds at 30-minute intervals.
This technique strengthens the dough without requiring extensive kneading. As you repeat the process, the dough should become smoother, stretchier, and easier to handle.
Step 3: Allow the Dough to Rise
Cover the bowl and leave the dough at room temperature for bulk fermentation.
Depending on your starter and kitchen temperature, this stage may take approximately four to six hours or longer. Instead of relying only on the clock, look for visible signs of fermentation.
The dough should become puffier, develop bubbles along the sides, and increase in volume by roughly 50–75 percent.
Avoid allowing it to over-ferment, as excessively fermented dough can become weak and difficult to shape.
Step 4: Shape the Loaf
Lightly flour your work surface and carefully transfer the dough onto it.
Fold the edges toward the center, then turn the dough over so the seam is underneath. Gently pull the dough toward yourself across the work surface to create surface tension.
The finished dough should form a rounded ball with a smooth, slightly taut exterior.
Place the shaped loaf seam-side up in a floured proofing basket or a bowl lined with a clean, well-floured kitchen towel.
Step 5: Proof the Bread
Cover the dough and allow it to proof for another one to two hours at room temperature, or refrigerate it for approximately eight to twelve hours.
An overnight refrigerator proof is convenient because it slows fermentation and makes the dough easier to score before baking. It can also contribute to a more developed flavor.
The dough should look slightly expanded and feel airy. If it is already very delicate and spreading, avoid handling it excessively.
Step 6: Preheat the Oven
Place a Dutch oven with its lid inside your oven and preheat to 240°C (465°F) for at least 30 minutes.
Preheating the Dutch oven thoroughly is important because the hot cooking vessel helps the bread rise quickly and develop a crisp crust.
Always handle the hot pot carefully and use heat-resistant oven gloves.
Step 7: Score and Bake
Carefully turn the dough onto a piece of baking parchment, with the smooth side facing upward.
Use a sharp bread lame or razor blade to make one confident slash across the top, approximately 1–2 cm deep. You can add a few decorative cuts if desired.
Carefully transfer the dough into the preheated Dutch oven and cover it with the lid.
Bake for 20 minutes covered. Then remove the lid, reduce the temperature to approximately 220°C (430°F), and continue baking for another 20–25 minutes until the crust is deep golden brown.
The uncovered baking stage allows moisture to escape and encourages the crust to become crisp and richly colored.
Step 8: Cool Before Slicing
Remove the bread from the Dutch oven and place it on a wire rack.
Allow it to cool for at least one hour before slicing. Although the aroma may tempt you to cut into it immediately, cooling allows the interior crumb to finish setting.
Cutting too early can make the bread seem gummy or cause the soft interior to compress.
Once cooled, slice the loaf with a serrated bread knife to reveal its tender crumb and airy texture.
Tips for Perfect Artisan Sourdough Bread
A few small adjustments can make a noticeable difference in the final loaf.
1. Use an active starter. Your starter should be bubbly and recently fed. This helps produce a better rise.
2. Measure accurately. Weighing flour and water provides more consistent results than measuring by volume.
3. Watch the dough, not just the clock. Fermentation depends on temperature and starter strength, so visual signs are important.
4. Avoid adding too much flour. Excess flour can make the loaf dense and dry.
5. Preheat your Dutch oven thoroughly. A hot baking vessel encourages oven spring and crust development.
6. Let the bread cool completely. This helps preserve the loaf’s texture and makes slicing easier.
How to Serve Artisan Sourdough Bread
Fresh artisan sourdough bread is delicious on its own, but it can also be enjoyed in many different ways.
- For breakfast: Toast a slice and spread it with butter, honey, jam, or peanut butter.
- For lunch: Use thick slices to prepare sandwiches with cheese, vegetables, eggs, or grilled chicken.
- With soup: Serve warm slices alongside tomato soup, lentil soup, or creamy vegetable soup.
- As an appetizer: Drizzle slices with olive oil and serve with herbs, olives, or a dipping sauce.
- For a simple snack: Toast the bread and top it with mashed avocado, sliced tomatoes, and a pinch of salt.
The bread’s crisp crust and chewy center make it suitable for both sweet and savory toppings.
How to Store Homemade Bread
Store the cooled loaf in a paper bread bag or a bread box at room temperature for approximately two to three days. Avoid sealing a warm loaf in plastic, as trapped moisture can soften the crust.
For longer storage, slice the bread and freeze it in an airtight freezer bag for up to about three months for best quality. You can toast slices directly from frozen or allow them to thaw before serving.
If the crust becomes soft after storage, place slices in a toaster or warm them briefly in the oven to restore some crispness.
Frequently Asked Questions
Can I make artisan bread without a Dutch oven?
Yes. Bake the loaf on a preheated baking stone or heavy baking tray. A separate oven-safe pan containing hot water can help create steam, but take care to avoid burns. The crust may differ slightly from bread baked in a covered Dutch oven.
Why is my sourdough bread dense?
Common reasons include an inactive starter, insufficient fermentation, weak gluten development, or cutting the loaf before it cools. Check the starter’s activity and observe the dough carefully during fermentation.
Can I prepare the dough overnight?
Yes. After shaping, cover the loaf and refrigerate it for approximately eight to twelve hours. Bake it the next day, scoring it just before it enters the oven.
How can I get a darker, crispier crust?
Bake uncovered until the crust reaches your preferred color. Ensure the oven is properly preheated, and allow the loaf to cool on a wire rack after baking.
Final Thoughts
Homemade artisan sourdough bread is a rewarding baking project that combines simple ingredients with traditional techniques. From mixing and folding the dough to watching it rise and develop a golden crust in the oven, every stage contributes to the finished loaf.
With a little practice, you can create bread that looks beautiful, tastes delicious, and makes your kitchen feel like a neighborhood bakery. Serve it fresh with butter, turn it into a hearty sandwich, or enjoy a toasted slice with your favorite toppings.
Try this artisan sourdough bread recipe at home and enjoy the simple pleasure of freshly baked bread!

Leave a Reply