Homemade Cranberry Walnut Bread Recipe (Moist, Sweet & Delicious)
Homemade Autumn Cranberry Bread Loaf
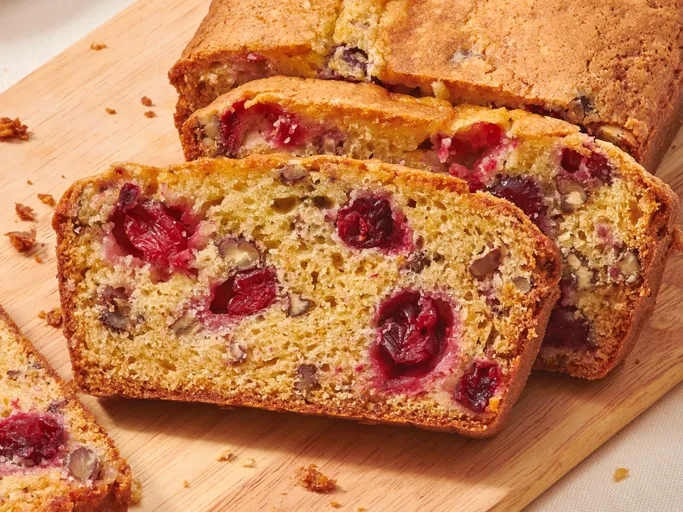
If you love homemade baked goods that combine fruity sweetness with a satisfying crunch, this cranberry walnut bread is a recipe you will want to make again and again. It features a soft, moist interior filled with bright red cranberries and crunchy walnuts, all wrapped in a beautifully golden-brown crust. Every slice offers a delicious balance of sweet, tart, and nutty flavors.
This homemade cranberry walnut bread is perfect for breakfast, afternoon tea, holiday gatherings, or a quick snack whenever you crave something comforting. Unlike traditional yeast bread, this recipe uses baking powder and baking soda to help the loaf rise, making it simple enough for beginners. There is no kneading or long rising time required.
Whether you use fresh or frozen cranberries, this easy quick bread delivers wonderful flavor and texture. Serve it plain, spread it with butter, or enjoy a slice with your favorite hot drink.
Why You Will Love This Cranberry Walnut Bread
There are plenty of reasons to add this recipe to your baking collection.
- Moist and tender: The batter creates a soft crumb that stays delicious for several days when stored properly.
- Sweet and tangy: Cranberries provide a refreshing tartness that balances the sweetness of the bread.
- Crunchy walnuts: Chopped walnuts add texture and a rich, nutty flavor.
- Easy preparation: Simple mixing techniques make this recipe beginner-friendly.
- Perfect for sharing: The loaf slices beautifully and makes a lovely homemade treat for family and friends.
- No yeast required: Baking powder and baking soda do the work of helping the bread rise.
Preparation and Cooking Time
- Preparation time: 15 minutes
- Baking time: 50–65 minutes
- Cooling time: 15–20 minutes in the pan, followed by additional cooling
- Total time: Approximately 1 hour 30 minutes
- Servings: 10–12 slices
- Course: Breakfast, snack, or dessert
- Difficulty: Easy
Ingredients for Cranberry Walnut Bread
Gather the following ingredients before beginning.
- 2 cups (250 g) all-purpose flour
- ¾ cup (150 g) granulated sugar
- 1 teaspoon baking powder
- ½ teaspoon baking soda
- ½ teaspoon salt
- 2 large eggs
- ½ cup (120 ml) milk
- ⅓ cup (80 ml) vegetable oil or melted butter
- 1 teaspoon vanilla extract
- 1 tablespoon orange zest (optional)
- 1½ cups (150–170 g) fresh or frozen cranberries
- ¾ cup (85 g) chopped walnuts
For extra flavor, you can also add ½ teaspoon ground cinnamon. If your cranberries are particularly tart, increase the sugar slightly to suit your taste.
How to Make Cranberry Walnut Bread
Step 1: Prepare the Oven and Pan
Preheat your oven to 350°F (175°C). Grease a standard 9 × 5-inch loaf pan with butter or oil, then line it with parchment paper if desired.
Leave a little parchment hanging over the sides to make removing the finished loaf easier. Preparing the pan first ensures that your batter can go directly into the oven once mixed.
Step 2: Combine the Dry Ingredients
In a large mixing bowl, add the flour, sugar, baking powder, baking soda, and salt. Whisk everything together until evenly combined.
Mixing the dry ingredients first helps distribute the raising agents throughout the flour, allowing the loaf to rise more evenly.
If you are adding cinnamon, whisk it in at this stage.
Step 3: Mix the Wet Ingredients
In a separate bowl, crack the eggs and whisk them until smooth. Add the milk, vegetable oil or melted butter, vanilla extract, and orange zest if using.
Whisk until the mixture is well combined. The orange zest adds a fresh citrus aroma that complements the tart cranberries and rich walnuts beautifully.
Make sure melted butter has cooled slightly before mixing it with the eggs.
Step 4: Combine the Wet and Dry Mixtures
Pour the wet ingredients into the bowl containing the dry ingredients. Stir gently with a spatula or wooden spoon until the flour is just incorporated.
The batter should be thick but moist. Avoid overmixing because excessive stirring can develop the gluten and produce a tougher loaf.
A few small lumps in the batter are perfectly fine.
Step 5: Add the Cranberries and Walnuts
Gently fold the cranberries and chopped walnuts into the batter. Distribute them as evenly as possible without crushing the fruit.
If you are using frozen cranberries, add them directly from the freezer without thawing. This helps reduce excess moisture and prevents the berries from becoming too soft before baking.
For a more attractive loaf, reserve a small handful of cranberries and walnuts to sprinkle over the top before placing the pan in the oven.
Step 6: Transfer the Batter to the Pan
Pour the batter into the prepared loaf pan. Use a spatula to spread it evenly into the corners.
Smooth the top gently, then add the reserved cranberries and walnuts if desired.
Tap the pan lightly on the counter to remove any large air pockets. Do not bang it too hard, as this can disturb the batter.
Step 7: Bake Until Golden Brown
Place the pan on the center rack of the preheated oven. Bake for approximately 50–65 minutes.
The top should become golden brown, and the loaf should feel set in the center. If it begins browning too quickly, loosely cover the top with aluminum foil for the final portion of baking.
To check whether it is done, insert a toothpick into the center of the loaf. It should come out clean or with a few moist crumbs. Avoid testing directly through a cranberry, as fruit can leave moisture on the toothpick.
If the center is still wet, continue baking for another 5–10 minutes and check again.
Step 8: Cool the Bread
Remove the pan from the oven and let the loaf rest for 15–20 minutes. Carefully lift it out using the parchment paper or turn it out onto a wire rack.
Allow it to cool further before slicing. This gives the crumb time to set and helps you achieve neat slices without crumbling.
For the best texture, wait until the loaf is mostly cool before cutting.
Tips for Perfect Cranberry Walnut Bread
Measure the flour correctly. Too much flour can make the bread dry and dense. For the best results, weigh it or spoon it into your measuring cup and level the top.
Do not overmix the batter. Stir only until the ingredients come together for a tender texture.
Choose your cranberries. Fresh cranberries offer a bright, tart flavor, while frozen cranberries work just as well. Dried cranberries can also be used, but they are sweeter and less juicy.
Toast the walnuts for extra flavor. Lightly toasting the walnuts in a dry pan before adding them to the batter brings out their natural nuttiness. Let them cool before mixing them in.
Check the center carefully. Quick breads can look done on the outside while remaining underbaked in the middle. A toothpick test helps prevent this problem.
Let it cool before slicing. Cutting the loaf too early can make the slices fragile and the center gummy.
Delicious Ways to Serve Cranberry Walnut Bread
This bread is versatile enough to enjoy throughout the day.
- Breakfast: Serve a slice with coffee, tea, or a glass of milk.
- With butter: Spread softened butter over a slightly warm slice.
- For afternoon tea: Pair it with tea or coffee for a simple homemade treat.
- As a dessert: Serve with a spoonful of whipped cream or vanilla yogurt.
- For holiday gatherings: Arrange slices on a serving platter for a festive breakfast or brunch.
- Toasted: Lightly toast a slice and add butter for a warm, crunchy snack.
The tart cranberries and crunchy walnuts make each serving flavorful without needing elaborate toppings.
How to Store Cranberry Walnut Bread
Allow the bread to cool completely before storing it.
At room temperature: Place the loaf in an airtight container and store it for up to 3 days in a cool environment.
In the refrigerator: Store it in an airtight container for up to 1 week. Refrigeration may make the crumb slightly firmer, so allow slices to come to room temperature or warm them before serving.
In the freezer: Wrap individual slices or the whole cooled loaf tightly in plastic wrap, then place in a freezer-safe bag. Freeze for up to 3 months for best quality.
To serve frozen slices, thaw them at room temperature or warm them gently in a toaster oven.
Variations to Try
Once you have mastered the basic recipe, try a few simple variations.
- Orange cranberry walnut bread: Add extra orange zest for a bright citrus flavor.
- Chocolate cranberry bread: Fold in ½ cup of chocolate chips for a sweeter treat.
- Cinnamon walnut bread: Add cinnamon and a pinch of nutmeg for a warm, spiced flavor.
- Lemon cranberry bread: Replace the orange zest with lemon zest for a fresh, tangy aroma.
- Dried cranberry bread: Use dried cranberries when fresh fruit is unavailable, reducing the sugar slightly if desired.
Frequently Asked Questions
Can I use frozen cranberries?
Yes. Add frozen cranberries directly to the batter without thawing. This helps keep the fruit intact and limits excess moisture.
Why is my cranberry walnut bread dry?
Too much flour, overbaking, or overmixing can make the loaf dry. Measure carefully and begin checking for doneness around the 50-minute mark.
Can I make this recipe without walnuts?
Absolutely. Simply leave them out or replace them with pecans, sunflower seeds, or extra cranberries.
Can I prepare the batter ahead of time?
It is best to bake the batter soon after mixing because the baking powder and baking soda begin working once the wet and dry ingredients are combined.
How do I know when the loaf is fully baked?
The top should be golden brown, and a toothpick inserted into the center should come out clean or with a few moist crumbs.
Final Thoughts
Homemade cranberry walnut bread is a delicious combination of sweet, tangy, and nutty flavors wrapped in a soft, golden loaf. Its simple preparation makes it ideal for beginner bakers, while its beautiful appearance makes it suitable for family breakfasts, afternoon snacks, and special occasions.
With juicy cranberries, crunchy walnuts, and a tender crumb, every slice offers something special. Enjoy it fresh from the oven, spread with butter, or toasted alongside your favorite hot drink.
Try this easy cranberry walnut bread recipe and bring the comforting aroma of homemade baking into your kitchen!

Leave a Reply