Homemade Soft Dinner Rolls Recipe – Fluffy, Golden, and Delicious
Introduction
There is nothing quite like the smell of freshly baked bread filling your kitchen. These homemade soft dinner rolls are golden on the outside, fluffy on the inside, and wonderfully delicious. Their beautiful, rustic appearance and soft texture make them perfect for family dinners, festive gatherings, breakfast, or afternoon tea.
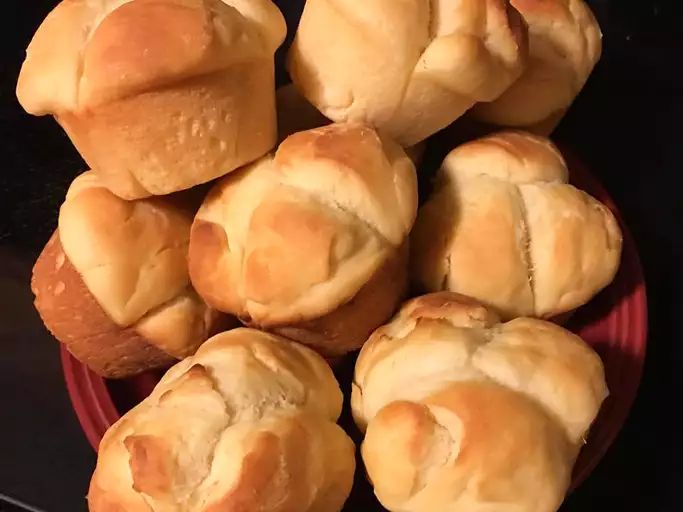
As shown in the picture, these rolls have a lovely golden-brown crust with soft, pillowy centers. They are easy to make with simple pantry ingredients and do not require any special baking equipment. Whether you are a beginner or an experienced home baker, this recipe will help you prepare bakery-style dinner rolls right in your own kitchen.
Serve them warm with butter, jam, honey, or your favorite savory dishes. Once you try these homemade rolls, you may never want to buy packaged bread again!
Recipe Information
- Preparation Time: 25 minutes
- Rising Time: 1 hour 30 minutes to 2 hours
- Baking Time: 20–25 minutes
- Total Time: Approximately 2 hours 30 minutes
- Servings: 10–12 dinner rolls
- Difficulty: Easy
- Cuisine: Homemade bakery-style bread
Ingredients
To make these soft and fluffy dinner rolls, you will need the following ingredients:
- 3 cups (375 g) all-purpose flour or bread flour
- 2¼ teaspoons (7 g) instant yeast
- 2 tablespoons sugar
- 1 teaspoon salt
- ¾ cup (180 ml) warm milk
- 1 large egg, at room temperature
- 3 tablespoons (42 g) unsalted butter, softened
- 1–2 tablespoons extra flour, if needed
- 1 tablespoon milk or beaten egg, for brushing
- 1 tablespoon melted butter, for finishing (optional)
Important tip: The milk should be warm, not hot. Very hot milk can damage the yeast and prevent the dough from rising properly.
Step-by-Step Instructions
Step 1: Prepare the Yeast Mixture
In a large mixing bowl, combine the warm milk and sugar. Add the instant yeast and stir gently.
If you are using instant yeast, you can proceed directly to mixing the dough. If you are using active dry yeast, let the mixture stand for 5–10 minutes until it becomes foamy.
This step helps ensure that your yeast is ready to make the bread soft and airy.
Step 2: Mix the Dough
Add the egg, softened butter, salt, and most of the flour to the yeast mixture. Stir everything together using a wooden spoon or spatula until a rough dough forms.
Gradually add the remaining flour as needed. The dough should feel soft and slightly tacky, rather than dry or stiff.
Avoid adding too much flour at this stage. A slightly sticky dough usually produces softer dinner rolls.
Step 3: Knead Until Smooth
Transfer the dough to a lightly floured surface. Knead it for approximately 8–10 minutes by hand, or 5–7 minutes using a stand mixer with a dough hook.
As you knead, the dough will become smoother, more elastic, and easier to handle.
To check whether it is ready, gently stretch a small piece of dough. If it stretches into a thin membrane before tearing, it has developed good gluten structure.
Proper kneading is one of the secrets to achieving the soft, fluffy texture seen in bakery-style rolls.
Step 4: Let the Dough Rise
Place the kneaded dough in a lightly greased bowl. Turn it once so the surface is lightly coated with oil or butter.
Cover the bowl with a clean kitchen towel or plastic wrap. Leave it in a warm, draft-free place for about 60–90 minutes, or until the dough has doubled in size.
The exact rising time depends on the temperature of your kitchen.
Do not rush this step. Allowing the dough to rise properly creates the airy interior that makes these rolls so delicious.
Step 5: Shape the Dinner Rolls
Once the dough has doubled in size, gently press it down to release excess gas.
Transfer it to a work surface and divide it into 10–12 equal portions. For evenly sized rolls, weigh the dough portions if you have a kitchen scale.
Shape each portion into a smooth ball by folding the edges underneath and gently rolling it against the work surface.
Arrange the shaped rolls on a lightly greased baking tray, leaving a little space between them. You can also place them closer together if you prefer soft-sided rolls that rise into one another.
For a rustic appearance similar to the rolls in the picture, shape each portion into a round ball and use a sharp knife or blade to make a shallow slit across the top.
Step 6: Allow the Rolls to Rise Again
Cover the shaped rolls loosely with a clean towel and let them rise for another 30–45 minutes.
They should look noticeably puffier and feel light when gently touched.
During this second rise, the dough develops its final volume and soft texture.
Meanwhile, preheat your oven to 375°F (190°C) for a conventional oven.
Step 7: Brush and Bake
Lightly brush the tops of the rolls with milk for a simple golden finish. For a deeper shine, use a beaten egg mixed with a teaspoon of water.
Place the tray in the preheated oven and bake for 20–25 minutes, or until the rolls are golden brown and cooked through.
If your oven browns unevenly, rotate the tray carefully near the end of baking.
Keep an eye on the tops during the final few minutes. Oven temperatures vary, so the color and doneness of the rolls are more reliable than timing alone.
Step 8: Brush with Butter and Serve
Remove the rolls from the oven and brush their tops with melted butter while they are still warm.
This adds flavor, softens the crust, and gives the rolls a beautiful finish.
Let them cool for 5–10 minutes before serving. Break one open to reveal the soft, fluffy interior, then enjoy it with butter, honey, jam, or your favorite meal.
Tips for Perfect Soft Dinner Rolls
1. Use the right amount of flour. Adding too much flour can make the rolls dense and dry. The dough should remain soft and slightly tacky.
2. Check your yeast. Always check the expiration date. If using active dry yeast, make sure it becomes foamy when activated.
3. Knead thoroughly. Proper kneading creates the gluten structure needed for a light, airy crumb.
4. Give the dough enough time to rise. Rising times vary with room temperature. Look for the dough to double rather than relying only on the clock.
5. Avoid overbaking. Remove the rolls when they are golden brown and fully cooked. Baking them for too long can dry them out.
6. Add butter after baking. Brushing the warm rolls with melted butter gives them a softer crust and richer flavor.
Delicious Serving Suggestions
These homemade dinner rolls are incredibly versatile. Serve them alongside creamy soups, roasted chicken, grilled meat, vegetable curries, or pasta dishes.
For breakfast, slice a roll in half and spread it with butter, honey, fruit jam, or chocolate spread. You can also use the rolls to make mini sandwiches filled with cheese, eggs, chicken, or vegetables.
For a special dinner, arrange the warm rolls in a basket lined with a clean cloth and serve them with flavored butter or garlic butter.
Storage and Reheating
Store completely cooled rolls in an airtight container or food-safe bag at room temperature for up to 2–3 days.
To freeze them, place the cooled rolls in a freezer-safe bag and freeze for up to 2–3 months. Thaw at room temperature before reheating.
For a fresh-from-the-oven texture, warm the rolls in a 300°F (150°C) oven for about 5–8 minutes. You can also microwave an individual roll for approximately 10–15 seconds, although microwaving for too long may make it chewy.
Frequently Asked Questions
Why are my dinner rolls dense?
Dense rolls can result from too much flour, insufficient kneading, inactive yeast, or inadequate rising time. Keep the dough soft and allow it to rise until visibly doubled.
Can I make the dough ahead of time?
Yes. After kneading, place the covered dough in the refrigerator for an overnight rise. The next day, allow it to warm slightly, shape the rolls, and let them rise until puffy before baking.
Can I make these rolls without eggs?
Yes. You can omit the egg and add approximately 2–3 tablespoons of extra milk as needed. The texture may be slightly different, but the rolls can still turn out soft and delicious.
How do I know when the rolls are fully baked?
The tops should be golden brown, and the rolls should feel light and sound slightly hollow when tapped. If using a thermometer, the center of a roll should generally reach about 190°F (88°C).
Conclusion
These homemade soft dinner rolls are a wonderful addition to any meal. With their golden tops, tender centers, and buttery flavor, they look beautiful on the table and taste even better when served warm.
The best part is that you do not need complicated ingredients or professional baking skills to make them. Follow the simple steps, give the dough enough time to rise, and avoid adding too much flour for the best results.
Try this easy dinner roll recipe for your next family gathering, holiday meal, or weekend baking session. Serve them fresh from the oven, share them with loved ones, and enjoy the comforting taste of homemade bread!
If you try this recipe, share your experience and let us know how your homemade dinner rolls turned out. Happy baking!

Leave a Reply