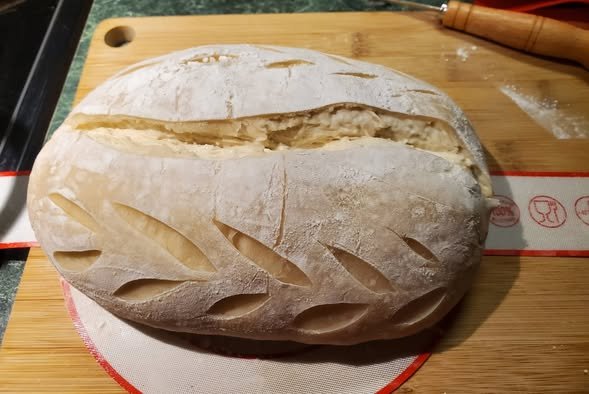
There is something special about a homemade sourdough loaf with a deeply golden crust, beautiful scoring, and a soft, airy center. This Classic Sourdough Bread is a simple, traditional loaf made with an active sourdough starter, flour, water, and salt. The long fermentation gives the bread its naturally tangy flavor, chewy texture, and beautiful structure.
This recipe is perfect if you want to make bakery-style sourdough at home. The process takes time, but most of that time is hands-off while the dough ferments and develops flavor. With a little patience and a few simple techniques, you can create a loaf with a crisp crust and impressive oven spring.
Why You’ll Love This Recipe
This sourdough bread has everything you want from a classic artisan loaf. The crust becomes crisp and golden in a hot Dutch oven, while the inside stays soft, chewy, and airy.
The long fermentation develops a deeper flavor than ordinary quick breads. You can make the dough during the day, allow it to ferment, shape it in the evening, and let it proof overnight in the refrigerator. The next morning, the loaf is ready to bake.
The recipe also gives you plenty of opportunities to practice sourdough techniques such as stretch-and-folds, shaping, scoring, and creating oven spring.
Ingredients
For one large loaf, you will need:
- 100 g active sourdough starter
- 350 g bread flour
- 50 g whole wheat flour
- 280–300 g water
- 10 g salt
- Rice flour or bread flour, for dusting
The amount of water can be adjusted slightly depending on your flour. Start with the lower amount and add more if the dough feels too firm.
The most important ingredient is an active sourdough starter. Your starter should be bubbly, active, and capable of rising significantly after feeding.
Prepare the Dough
Begin by combining the bread flour and whole wheat flour in a large mixing bowl.
Add approximately 280 g of water and mix until the flour is completely hydrated. The dough will look rough and shaggy, which is perfectly normal.
Cover the bowl and let the mixture rest for about 30–45 minutes. This resting period is often called an autolyse. It gives the flour time to absorb the water and helps develop the dough’s gluten structure.
After resting, add the active sourdough starter. Use your hands to gently squeeze and fold the dough until the starter is evenly distributed.
Add the salt and mix again. If the dough feels very stiff, gradually add some of the remaining water.
The dough should feel soft and slightly sticky but should not be completely runny.
Stretch and Fold
Instead of kneading the dough aggressively, sourdough relies on gentle stretch-and-fold techniques to develop strength.
Cover the bowl and let the dough rest for about 30 minutes.
Then perform your first stretch and fold. Grab one side of the dough, gently stretch it upward, and fold it over the center. Rotate the bowl and repeat on all four sides.
Cover the dough again and let it rest for another 30 minutes.
Repeat this process approximately 3–4 times during the first two hours of fermentation.
As you continue folding, the dough should become smoother, stronger, and more elastic. It should begin holding its shape instead of spreading across the bowl.
Bulk Fermentation
After the final stretch and fold, leave the dough covered at room temperature for bulk fermentation.
The exact fermentation time depends on the temperature of your kitchen and the strength of your starter. It may take approximately 4–7 hours.
Instead of relying only on the clock, look for signs that the dough is ready.
The dough should become noticeably larger and puffier. You may see bubbles along the sides and underneath the surface. It should also have a slightly domed appearance.
The dough does not necessarily need to double in size. Depending on the flour and temperature, an increase of around 50–75% can be enough.
Avoid over-fermenting the dough because an excessively fermented dough can become weak and difficult to shape.
Shape the Loaf
Once bulk fermentation is complete, lightly flour your work surface.
Gently turn the dough out of the bowl. Try not to completely flatten it because you want to preserve the air bubbles that have developed during fermentation.
Shape the dough into a loose round by gently folding the edges toward the center.
Let the dough rest for approximately 15–20 minutes.
Then perform the final shaping. Gently pull and fold the dough until you create enough surface tension to form a smooth, tight loaf.
Do not use excessive flour during shaping. Too much flour can prevent the dough from sealing properly.
Place the shaped loaf seam-side up into a well-floured banneton.
Overnight Proof
Cover the banneton with a reusable cover or plastic wrap and place it in the refrigerator.
Let the dough cold-proof for approximately 8–14 hours.
Cold fermentation helps develop sourdough flavor and makes the dough much easier to score before baking.
It also allows you to prepare the loaf ahead of time. You can shape it at night and bake it the following morning.
Score the Bread
When you are ready to bake, preheat your oven to 450°F (230°C) with a Dutch oven inside.
Allow the Dutch oven to heat for at least 30–45 minutes.
Take the cold dough directly from the refrigerator and carefully turn it onto a piece of parchment paper.
Dust away any excess flour if necessary.
Using a sharp bread lame or razor blade, score the top of the dough. A long, slightly curved slash works beautifully and can create the dramatic raised edge often seen on artisan sourdough.
You can also add decorative shallow cuts around the main score.
Scoring gives the expanding bread a controlled place to open during baking.
Bake
Carefully transfer the dough into the preheated Dutch oven.
Cover with the lid and bake at 450°F for approximately 20 minutes.
The covered environment traps steam, which helps the loaf expand dramatically and develop a thin, crisp crust.
After 20 minutes, carefully remove the lid.
Reduce the oven temperature to approximately 425°F (220°C) and continue baking for another 20–25 minutes.
The loaf should become deeply golden brown with a crisp, well-developed crust.
If you prefer a darker crust, allow it to bake for a few additional minutes, but watch carefully toward the end.
Cool Completely
Once the bread is finished, carefully remove it from the Dutch oven and place it on a wire rack.
This is one of the most important parts of the recipe: let the loaf cool completely before slicing.
Although the smell of fresh sourdough makes it tempting to cut immediately, the crumb continues setting as the bread cools.
Allow at least 1–2 hours of cooling time before slicing.
Use a serrated bread knife and gently saw through the crust rather than pressing straight down.
Tips for Better Oven Spring
For impressive oven spring, start with a strong, active sourdough starter.
Do not let the dough over-ferment during bulk fermentation.
Build enough gluten strength with regular stretch-and-folds.
Create good surface tension during final shaping.
Cold-proof the shaped dough so it is firm and easier to score.
Use a very hot Dutch oven to create steam and strong initial heat.
Finally, make a confident score with a sharp blade. A clean, decisive cut allows the loaf to expand beautifully in the oven.
How to Store Sourdough
Once completely cool, store the loaf in a bread bag or wrap it loosely in a clean kitchen towel.
It is best enjoyed within the first few days when the crust is crisp and the crumb remains soft.
For longer storage, slice the loaf and freeze it in an airtight freezer bag. You can toast individual slices directly from frozen whenever you want fresh-tasting sourdough.
Avoid refrigerating the bread unless necessary, as cold temperatures can make the crumb stale more quickly.
Serving Ideas
Fresh sourdough is delicious simply toasted with butter. You can also top it with avocado, eggs, cream cheese, smoked salmon, or your favorite sandwich fillings.
For a simple breakfast, toast a thick slice and serve it with scrambled eggs.
You can also use day-old slices for French toast, grilled cheese sandwiches, or crunchy homemade croutons.
Final Thoughts
This Classic Sourdough Bread is a rewarding recipe for anyone who loves homemade bread. With a crisp golden crust, soft chewy crumb, beautiful scoring, and naturally developed sourdough flavor, it has all the qualities of a bakery-style artisan loaf.
The secret is patience. Give your starter time to become active, allow the dough to ferment properly, build strength through gentle folds, and let the shaped loaf rest overnight.
Once you become comfortable with the process, this recipe can easily become your go-to everyday sourdough loaf.

Leave a Reply