How to Bake Sourdough Bread: A Step-by-Step Guide – Fresh Acres
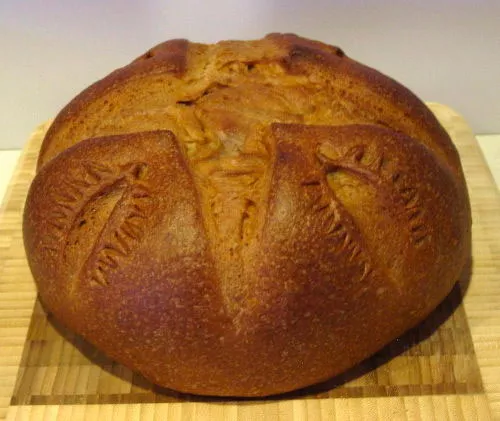
There is something truly special about baking a beautiful loaf of homemade bread from scratch. With its deep golden-brown crust, soft interior, and rustic appearance, traditional sourdough bread is a wonderful addition to any homemade meal. Its rich flavor and chewy texture make it perfect for breakfast, sandwiches, soups, or simply enjoying with butter.
This rustic bread has an attractive crust with decorative scoring that gives it a traditional bakery-style appearance. Although sourdough baking requires patience, the process is rewarding, and the ingredients are surprisingly simple. Flour, water, salt, and an active sourdough starter come together to create a delicious loaf without commercial yeast.
In this recipe, you will learn how to prepare, shape, score, and bake a beautiful round sourdough loaf at home. Whether you are a beginner or already enjoy baking bread, this recipe will help you create a flavorful loaf with a crisp crust and a tender crumb.
Why You Will Love This Rustic Sourdough Bread
Homemade sourdough bread is popular because of its distinctive flavor, satisfying texture, and traditional baking method.
- Beautiful crust: The loaf develops a deep golden-brown crust with an appealing rustic finish.
- Rich flavor: Natural fermentation gives sourdough its characteristic tangy taste.
- Simple ingredients: You only need four basic ingredients to prepare the dough.
- No commercial yeast: An active sourdough starter provides the fermentation needed for the bread to rise.
- Versatile serving options: Enjoy it with butter, cheese, eggs, soups, or your favorite sandwich fillings.
- Homemade goodness: Baking bread at home lets you control the ingredients and enjoy a freshly baked loaf.
Preparation and Cooking Time
- Preparation time: 30 minutes
- First rise and fermentation: 4–6 hours, depending on temperature and starter activity
- Final proofing: 1–3 hours, or overnight in the refrigerator
- Baking time: 40–50 minutes
- Cooling time: At least 1 hour
- Servings: 8–10 slices
- Difficulty: Intermediate
Fermentation times can vary significantly depending on your starter, flour, and kitchen temperature.
Ingredients for Homemade Sourdough Bread
For one medium-sized round loaf, gather the following ingredients:
- 500 g bread flour or strong all-purpose flour
- 350 g water, preferably at room temperature
- 100 g active sourdough starter
- 10 g salt
You will also need a little extra flour for shaping and a piece of parchment paper for baking.
Important: Your sourdough starter should be active and bubbly. Ideally, it should have risen noticeably after feeding and show plenty of bubbles before you mix the dough.
How to Make Traditional Sourdough Bread
Step 1: Mix the Flour and Water
Place the flour in a large mixing bowl and add the water. Mix with your hands or a wooden spoon until no dry flour remains.
The mixture will look rough and sticky at this stage. Cover the bowl and let it rest for approximately 30 minutes. This resting period, known as autolyse, allows the flour to absorb the water and helps develop the dough’s structure.
Step 2: Add the Sourdough Starter
Add the active sourdough starter to the rested dough. Use your hands to pinch, fold, and mix until the starter is evenly incorporated.
The dough may feel sticky, but avoid adding too much extra flour. Proper hydration helps create a tender interior and an attractive open crumb.
Cover the bowl and let the dough rest for about 20–30 minutes.
Step 3: Add the Salt
Sprinkle the salt over the dough. If necessary, wet your hands slightly to make mixing easier.
Work the salt into the dough by gently squeezing and folding it until evenly distributed. Cover the bowl and allow the dough to rest again.
Salt adds flavor, strengthens the dough, and helps regulate fermentation.
Step 4: Begin Bulk Fermentation
Leave the dough in a covered bowl at room temperature for approximately 4–6 hours, adjusting the time according to its activity.
During the first 2 hours, perform a series of stretch-and-folds every 30 minutes. To do this, lift one side of the dough, stretch it gently upward, and fold it over the center. Turn the bowl and repeat on the remaining sides.
These folds strengthen the gluten and help the dough hold its shape.
As fermentation continues, the dough should become smoother, airier, and more elastic. Look for an increase in volume of roughly 30–50%, along with visible bubbles. It does not always need to double in size.
Step 5: Shape the Dough
Lightly flour your work surface and gently transfer the dough onto it.
Fold the edges toward the center, then turn the dough over so the smoother side faces upward. Using your hands or a dough scraper, gently rotate the dough against the work surface to create surface tension.
Shape it into a round loaf without pressing out too much of the air. The surface should feel smooth and slightly taut.
Allow the dough to rest for approximately 15–20 minutes if it resists shaping.
Step 6: Complete the Final Proof
Place the shaped dough seam-side up in a floured proofing basket or a bowl lined with a clean, well-floured kitchen towel.
Cover it and let it proof for approximately 1–3 hours at room temperature, depending on its development. Alternatively, refrigerate it for 8–14 hours for a slower final proof and more convenient baking.
The dough should look slightly expanded and feel airy. Avoid overproofing, as excessively fermented dough may spread and lose its shape.
Step 7: Preheat the Oven
Place a Dutch oven with its lid inside the oven and preheat to 475°F (245°C) for approximately 30–45 minutes.
A properly heated Dutch oven helps trap steam around the loaf, encouraging oven spring and producing a crisp crust.
Handle the hot cookware carefully, using suitable oven mitts.
Step 8: Score the Bread
Turn the dough onto a piece of parchment paper, keeping the smooth side facing upward.
Using a sharp bread lame or a clean, sharp blade designed for scoring dough, make a confident main slash approximately ½ inch (1–1.5 cm) deep.
For a decorative finish similar to a traditional rustic loaf, add smaller curved or leaf-like cuts on either side. Keep decorative cuts shallower than the main slash so they create patterns without weakening the loaf excessively.
Scoring directs the bread’s expansion as it bakes and gives the finished loaf its distinctive artisan appearance.
Step 9: Bake Until Golden Brown
Carefully transfer the dough, along with the parchment paper, into the preheated Dutch oven. Cover with the lid and bake for 20 minutes.
Remove the lid, reduce the oven temperature to 450°F (230°C), and bake for another 20–25 minutes, or until the crust becomes deeply golden brown.
The exact time will depend on your oven and loaf size. For a fully baked loaf, the internal temperature should generally reach approximately 205–210°F (96–99°C).
Step 10: Cool Before Slicing
Remove the bread from the Dutch oven and place it on a wire rack. Allow it to cool for at least 1 hour before cutting.
Although the aroma may be tempting, slicing too early can leave the interior gummy because the crumb is still setting.
Once cooled, slice the bread and enjoy its flavorful crust and soft, chewy center.
Tips for Perfect Sourdough Bread
Use an active starter. A weak or inactive starter can produce a dense loaf with limited oven spring.
Watch the dough, not just the clock. Temperature affects fermentation, so look for bubbles, increased volume, and an airy texture.
Build surface tension while shaping. A well-shaped loaf holds its form and develops a more attractive appearance.
Use a hot baking vessel. Preheated cookware helps the bread rise and develop a crisp crust.
Score with confidence. A clean, decisive cut works better than several hesitant cuts in the same spot.
Let the loaf cool completely. This helps the interior finish setting and makes slicing easier.
What to Serve with Rustic Sourdough Bread
This homemade bread tastes wonderful with both simple snacks and full meals.
- Spread softened butter over a warm slice.
- Serve alongside creamy tomato soup or vegetable soup.
- Make sandwiches with chicken, cheese, lettuce, and tomatoes.
- Pair it with scrambled eggs or an omelet for breakfast.
- Serve with olive oil, garlic butter, or a selection of cheeses.
- Toast slices and top them with avocado, eggs, or fresh tomatoes.
Its hearty texture also makes it excellent for dipping into rich sauces and soaking up flavorful gravies.
How to Store Homemade Sourdough Bread
Once the loaf has cooled completely, store it in a paper bread bag or bread box at room temperature for approximately 2–3 days. Keeping the cut side facing down on a cutting board can also help preserve moisture.
Avoid refrigerating sourdough bread because refrigeration can make it stale more quickly.
For longer storage, slice the cooled loaf and freeze the slices in an airtight freezer bag for up to 3 months for best quality. You can toast frozen slices directly or allow them to thaw at room temperature.
Frequently Asked Questions
Can beginners make sourdough bread?
Yes, but sourdough requires more attention to fermentation than many quick bread recipes. Following the steps and observing how the dough changes will help you improve with practice.
Why is my sourdough bread dense?
Common reasons include an inactive starter, insufficient fermentation, weak dough structure, or cutting the bread before it has cooled completely.
Can I use all-purpose flour instead of bread flour?
Yes. Strong all-purpose flour can work well, although the dough may have slightly less strength depending on the flour’s protein content.
Why is my crust too hard?
The loaf may have baked for too long, or it may have lost too much moisture while cooling. Adjust the uncovered baking time and let the bread cool naturally on a wire rack.
Can I make the dough ahead of time?
Yes. Refrigerating the shaped dough overnight is a convenient way to develop flavor and prepare the bread for baking the following day.
Final Thoughts
Traditional homemade sourdough bread is a rewarding baking project that combines simple ingredients with the beauty of natural fermentation. Its deep golden crust, decorative scoring, and soft, chewy interior make it a wonderful centerpiece for the family table.
With patience, an active sourdough starter, and careful attention to fermentation, you can create a bakery-style loaf in your own kitchen. Serve it fresh with butter, transform it into delicious sandwiches, or pair it with your favorite soups and meals.
Try this rustic sourdough bread recipe and enjoy the wonderful taste and aroma of freshly baked homemade bread!

Leave a Reply