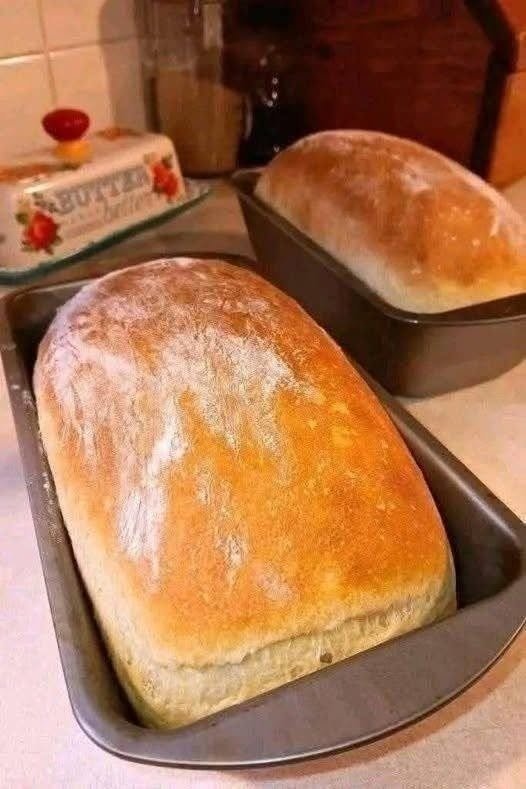
If you have ever wanted to make fresh homemade bread but avoided it because kneading, eggs, butter, and complicated steps seemed like too much work, this No-Knead Homemade Sandwich Bread is the recipe to try. It is soft, fluffy, golden on top, and made with simple ingredients that are usually already in the kitchen. There is no kneading, no eggs, and no butter, making this one of the easiest and most affordable breads you can bake at home.
The best thing about this recipe is how little effort it requires. Instead of spending a long time kneading dough by hand, you simply mix the ingredients, let the dough rise, transfer it into a loaf pan, and bake. The result is a beautiful homemade loaf with a soft interior and lightly golden crust.
Why You’ll Love This Bread
There is something special about homemade bread. The smell filling the kitchen while it bakes is comforting, and the first slice while the loaf is still slightly warm is hard to resist. This recipe keeps that experience simple and inexpensive.
Traditional bread recipes often call for eggs, butter, milk, or extensive kneading. This version uses basic ingredients such as flour, yeast, water, sugar, salt, and a little oil. Because there is no butter or egg, the ingredient list stays simple while the finished loaf remains soft and delicious.
The dough is intentionally sticky and soft. That is exactly what you want for a no-knead bread. Instead of trying to create a perfectly smooth dough with your hands, you allow time and yeast to do most of the work.
Ingredients
For two medium loaves, you will need:
- 4 cups all-purpose flour
- 2 teaspoons instant yeast
- 2 tablespoons granulated sugar
- 1 1/2 teaspoons salt
- 1 3/4 cups warm water
- 2 tablespoons vegetable oil or olive oil
- Extra flour for dusting
- A little oil for greasing the loaf pans
Make sure the water is warm rather than hot. Very hot water can damage the yeast and prevent the dough from rising properly. The water should feel comfortably warm when touched.
Preparing the Dough
Begin by taking a large mixing bowl. Add the flour, instant yeast, sugar, and salt. Stir the dry ingredients together with a wooden spoon or whisk so the yeast and salt are distributed evenly.
Pour the warm water into the bowl, followed by the oil. Using a sturdy wooden spoon or spatula, mix everything together. Continue stirring until there are no large dry patches of flour remaining.
The dough will look sticky and rough at this stage. Do not worry about its appearance. You do not need to knead it, and you should resist the temptation to keep adding flour simply because the dough feels sticky.
Cover the bowl tightly with plastic wrap, a clean kitchen towel, or a lid. Place it somewhere warm and allow the dough to rise for approximately one to one and a half hours. The exact time depends on the temperature of your kitchen.
When the dough has doubled in size, it is ready for the next step. You should notice that it looks airy and contains bubbles. This is a sign that the yeast has been working.
Shaping the Loaves
Lightly grease two loaf pans with oil. You can use standard loaf pans, although the exact size is flexible.
Sprinkle a small amount of flour onto your work surface. Carefully turn the risen dough onto the surface. Because this is a no-knead dough, handle it gently. Divide the dough into two approximately equal portions.
Shape each portion into a rough loaf. You do not need to make it perfectly smooth. Fold the dough gently toward the center and place it seam-side down into the prepared loaf pan.
If the dough sticks to your hands, lightly oil or flour your hands. Avoid adding large amounts of flour because this can make the finished bread heavier and less tender.
Cover the loaf pans again with a clean towel and allow the dough to rise for another thirty to forty-five minutes. During this second rise, the dough should become noticeably puffier and begin approaching the top of the pans.
Baking the Bread
While the dough completes its second rise, preheat your oven to 375°F (190°C).
Once the loaves have risen, place the pans carefully into the preheated oven. Bake for approximately 30 to 35 minutes, or until the tops are beautifully golden brown.
The bread should sound slightly hollow when tapped gently on top. If you have an instant-read thermometer, the center of the loaf should generally reach around 190°F to 200°F (88°C to 93°C).
Remove the pans from the oven and allow the bread to cool for about ten minutes. Carefully remove the loaves from the pans and transfer them to a wire rack.
Although it may be tempting to cut the bread immediately, allowing it to cool before slicing gives the crumb time to set. Cutting very hot bread can make the inside appear gummy or compressed.
How to Get Soft Homemade Bread
The amount of flour is important. Different brands of flour absorb water differently, so avoid adding extra flour unless the dough is extremely wet. A slightly sticky dough is normal for this recipe.
The temperature of the water also matters. Water that is too hot can prevent the yeast from working, while very cold water will slow the rising process. Warm water is ideal.
Do not rush the rising process. Yeast needs time to create air pockets inside the dough. If your kitchen is cool, the first rise may take longer than expected. Instead of relying only on the clock, look at the dough. When it has roughly doubled in volume, it is ready.
Fresh yeast also makes a difference. If your yeast has been stored for a long time, test it before making the recipe if you are unsure whether it is still active.
No Kneading Required
One of the biggest advantages of this recipe is that you do not have to knead the dough. Traditional bread recipes often require ten or fifteen minutes of kneading, which can be tiring and messy.
In this recipe, time replaces much of the physical work. As the dough rests, the flour absorbs the water and the yeast develops the structure needed for a soft loaf.
This makes the recipe especially useful for beginners. You do not need to know how to stretch, fold, or knead dough perfectly. Simply mix, rest, shape, rise, and bake.
Serving Suggestions
This bread is incredibly versatile. Serve warm slices with jam, honey, or your favorite spread for breakfast. It is also excellent for sandwiches, toast, grilled cheese, or simple bread-and-soup dinners.
For a savory breakfast, toast a slice and top it with avocado, eggs, tomatoes, or cheese. For something sweet, add peanut butter and banana, cream cheese and berries, or a little honey and cinnamon.
The bread can also be cubed and toasted to make homemade croutons. Slightly stale slices are perfect for French toast, bread pudding, or breadcrumbs.
Storage Tips
Once completely cooled, store the bread in an airtight container or bread bag. Keep it at room temperature for a few days. Avoid storing freshly baked bread in the refrigerator unless necessary because refrigeration can make bread lose its softness more quickly.
For longer storage, slice the cooled loaf and freeze the slices in a freezer-safe bag. Place parchment paper between slices if you want to remove individual pieces easily.
When you want bread, simply thaw a slice at room temperature or toast it directly from frozen.
Easy Variations
You can easily change this basic recipe according to your taste. Replace a portion of the all-purpose flour with whole-wheat flour for a heartier loaf. Keep in mind that whole-wheat flour absorbs more liquid and can produce a denser texture.
Add sunflower seeds, pumpkin seeds, sesame seeds, or flaxseeds for extra texture. You can also mix in dried herbs such as rosemary, oregano, or Italian seasoning for a savory loaf.
For a slightly sweeter bread, increase the sugar modestly and add a teaspoon of cinnamon. You could also add raisins or dried cranberries for a breakfast-style loaf.
Final Thoughts
This No-Knead Homemade Sandwich Bread proves that making bread at home does not have to be difficult, expensive, or time-consuming. With no eggs, no butter, and no kneading, the preparation is remarkably simple. A handful of basic ingredients transforms into two beautiful homemade loaves with a golden crust and soft, fluffy center.
Once you try this method, you may find yourself making homemade bread more often. There is no need to buy an expensive specialty loaf when flour, yeast, water, oil, salt, and sugar can create something so satisfying in your own kitchen.
The secret is patience rather than hard work. Mix the dough, give it enough time to rise, shape it gently, and let the oven do the rest. The finished bread is perfect for breakfast, sandwiches, toast, snacks, and family meals.
Slice it while warm, spread it with your favorite topping, or use it to build a delicious sandwich. However you enjoy it, this simple homemade loaf brings the comforting taste and aroma of freshly baked bread to your kitchen without complicated techniques.

Leave a Reply