
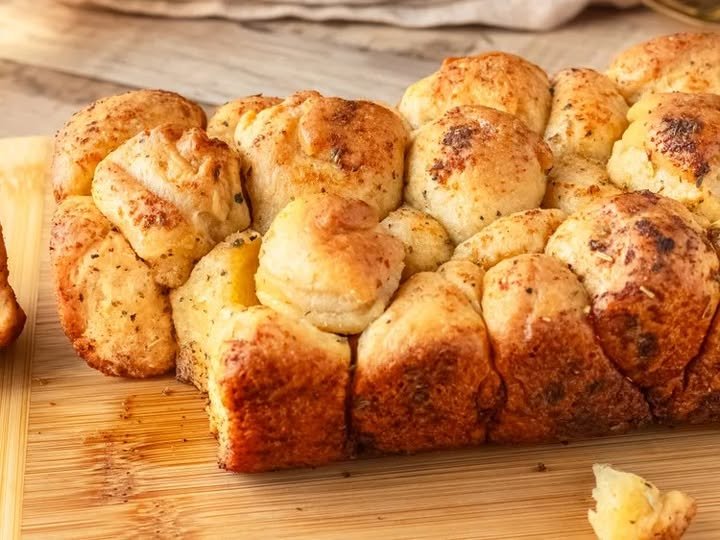
There is something incredibly comforting about a basket of warm, homemade bread fresh from the oven. These Soft Garlic Herb Pull-Apart Bread Rolls are golden on the outside, fluffy and tender inside, and packed with buttery garlic and herb flavor. Each little roll can be pulled apart easily, making this bread perfect for family dinners, holiday gatherings, weekend breakfasts, or simply enjoying with a cup of tea or coffee.
This recipe creates a beautiful pull-apart loaf where individual rolls bake closely together. As they rise, they become soft and pillowy, while the tops turn beautifully golden brown. A generous brushing of garlic butter before and after baking gives the bread an irresistible aroma and rich flavor.
Why You’ll Love This Recipe
These homemade garlic rolls are much easier to make than they look. The dough uses simple ingredients that are easy to find, and the preparation does not require any special baking equipment.
The best part is the texture. The outside develops a lightly crisp, golden crust, while the inside stays wonderfully soft. Garlic butter adds savory richness, and dried or fresh herbs give every bite a delicious homemade flavor.
These rolls are also versatile. Serve them alongside soup, pasta, roasted chicken, grilled meat, vegetables, or salads. You can even use the rolls for small sandwiches.
Ingredients
For the Dough
- 3 cups all-purpose flour
- 2 ¼ teaspoons active dry yeast
- 2 tablespoons granulated sugar
- 1 teaspoon salt
- ¾ cup warm milk
- ¼ cup warm water
- 1 large egg
- 3 tablespoons unsalted butter, melted
For the Garlic Herb Butter
- 4 tablespoons unsalted butter, melted
- 3 cloves garlic, finely minced
- 1 tablespoon fresh parsley, chopped
- ½ teaspoon dried oregano
- ½ teaspoon dried Italian herbs
- ¼ teaspoon black pepper
- A small pinch of salt
For the Topping
- 1 tablespoon melted butter
- 1 teaspoon chopped fresh parsley
- A little grated Parmesan, optional
How to Make Soft Garlic Herb Pull-Apart Bread Rolls
1. Activate the Yeast
Begin by warming the milk and water. The liquid should feel warm but not hot. Very hot liquid can damage the yeast, while liquid that is too cool may slow down the rising process.
Pour the warm milk and water into a bowl. Add the sugar and active dry yeast. Stir gently and let the mixture sit for about 5–10 minutes.
When the yeast becomes slightly foamy, it is ready to use. If there is no activity at all, check the freshness of your yeast before continuing.
2. Prepare the Dough
Add the flour and salt to a large mixing bowl. Make a well in the center and pour in the yeast mixture.
Add the egg and melted butter. Mix everything together with a wooden spoon or spatula until a soft dough begins to form.
Transfer the dough to a lightly floured surface. Knead for approximately 8–10 minutes, or until it becomes smooth and elastic.
You can also use a stand mixer fitted with a dough hook. Knead on low to medium speed until the dough becomes soft and stretchy.
The dough should feel slightly soft and tacky but should not be extremely sticky. If necessary, add flour one tablespoon at a time. Avoid adding too much flour because this can make the finished rolls dense.
3. Let the Dough Rise
Place the dough into a lightly greased bowl. Cover it with a clean kitchen towel or plastic wrap.
Leave it in a warm, draft-free area for approximately 1 hour, or until it has doubled in size.
The exact rising time can vary depending on the temperature of your kitchen. A warmer environment will generally allow the dough to rise faster.
4. Make the Garlic Herb Butter
While the dough is rising, prepare the flavorful butter.
Combine melted butter, minced garlic, parsley, oregano, Italian herbs, black pepper, and a small pinch of salt in a bowl.
Stir well and set aside.
Fresh garlic provides a stronger flavor, but garlic powder can be used if you prefer a milder taste. Fresh parsley adds brightness and a beautiful color to the finished bread.
5. Shape the Rolls
Once the dough has doubled in size, gently press it down to release excess air.
Transfer it to a lightly floured surface and divide it into approximately 15–18 equal pieces.
Roll each piece gently between your palms to form a smooth ball.
Brush each dough ball lightly with the garlic herb butter. Arrange the rolls closely together in a greased baking dish or on a lined baking tray.
The rolls should be close enough to touch as they rise, creating that attractive pull-apart appearance.
6. Second Rise
Cover the shaped rolls again and let them rest for about 25–35 minutes.
During this second rise, the dough will become noticeably puffy. This step is important because it helps create a soft, airy interior.
While the rolls are rising, preheat your oven to 375°F (190°C).
7. Bake Until Golden
Brush the tops generously with the remaining garlic herb butter.
Place the baking dish in the preheated oven and bake for approximately 20–25 minutes.
The rolls should become beautifully golden brown on top. The exact baking time can vary depending on the size of your rolls and your oven.
Keep an eye on the bread during the final few minutes. You want a golden surface without allowing the garlic to burn.
8. Finish With More Garlic Butter
As soon as the bread comes out of the oven, brush the hot rolls with another layer of melted garlic butter.
Sprinkle fresh parsley over the top. If you love cheesy garlic bread, add a small amount of finely grated Parmesan while the rolls are still warm.
Allow the bread to cool for about 5–10 minutes before serving.
Tips for Perfect Homemade Rolls
Use warm—not hot—liquid: The milk and water should be comfortably warm. Excessive heat can prevent the yeast from working properly.
Do not overload the dough with flour: A slightly soft dough produces lighter, fluffier bread. Too much flour can result in heavy rolls.
Give the dough enough time to rise: Yeast dough needs time to develop its structure and texture. Let the dough rise until it has visibly doubled rather than relying only on the clock.
Keep the rolls close together: For a pull-apart loaf, arrange the dough balls so they are almost touching. This helps them rise upward and creates the connected appearance shown in the finished bread.
Brush with butter after baking: This final step keeps the crust flavorful and adds a beautiful shine.
Easy Variations
You can customize these garlic herb rolls in many ways.
For cheesy garlic rolls, place a small cube of mozzarella or cheddar inside each dough ball before shaping.
For rosemary garlic rolls, replace the Italian herbs with finely chopped fresh rosemary.
For spicy garlic rolls, add a pinch of red pepper flakes to the butter.
For Parmesan herb rolls, mix grated Parmesan directly into the garlic butter and sprinkle extra cheese over the top before baking.
You can also add finely chopped green onions, basil, thyme, or chives for a different flavor.
What to Serve With Garlic Pull-Apart Rolls
These rolls are wonderful with almost any savory meal. Serve them alongside creamy tomato soup, chicken soup, vegetable soup, or lentil soup.
They are also delicious with pasta dishes such as creamy chicken pasta, spaghetti, lasagna, or baked pasta. The soft bread is perfect for soaking up sauces.
For dinner, serve them with roasted chicken, grilled steak, baked fish, roasted vegetables, or a fresh green salad.
They can also be served as an appetizer. Simply place the warm bread in the center of the table and allow everyone to pull off a piece.
How to Store Leftovers
Allow leftover bread to cool completely before storing it.
Place the rolls in an airtight container or wrap them tightly in foil. They can remain at room temperature for approximately 2 days.
For longer storage, freeze the baked rolls in a freezer-safe bag or container. When ready to eat, thaw them and warm them in the oven until soft and heated through.
Avoid microwaving for too long because it can make bread chewy or tough.
Frequently Asked Questions
Can I prepare the dough ahead of time?
Yes. You can prepare the dough and allow it to rise, then refrigerate it overnight. Bring it closer to room temperature before shaping and baking.
Can I use instant yeast?
Yes. Instant yeast can be used in place of active dry yeast. You can mix it directly with the dry ingredients, although following the package instructions is always helpful.
Why are my rolls dense?
Dense rolls can happen when too much flour is added, the yeast is inactive, or the dough does not receive enough rising time. Make sure your yeast is fresh and allow the dough to become noticeably puffy before baking.
Can I make these without herbs?
Absolutely. Garlic butter alone creates delicious rolls. You can also use your favorite herbs according to your taste.
Final Thoughts
These Soft Garlic Herb Pull-Apart Bread Rolls are the kind of homemade bread that can turn an ordinary meal into something special. Their golden tops, fluffy centers, buttery garlic flavor, and irresistible aroma make them a favorite for both everyday dinners and special occasions.
The recipe is simple enough for beginner bakers while still producing bakery-style results. Once you learn the basic dough technique, you can experiment with cheese, herbs, spices, and other fillings to create your own signature version.
Serve them warm from the oven with plenty of garlic butter, and watch how quickly they disappear from the table. Whether you’re making them for a holiday dinner, a cozy weekend meal, or simply because you’re craving fresh bread, these pull-apart rolls are guaranteed to bring homemade comfort to every bite.
Recipe at a Glance
Prep Time: 25 minutes
Rising Time: 1 hour 30 minutes
Bake Time: 20–25 minutes
Total Time: About 2 hours 20 minutes
Servings: 15–18 rolls
Difficulty: Easy to Moderate
Final Tip: For the softest and most flavorful results, serve these rolls warm and brush them with fresh garlic herb butter immediately after they come out of the oven.

