
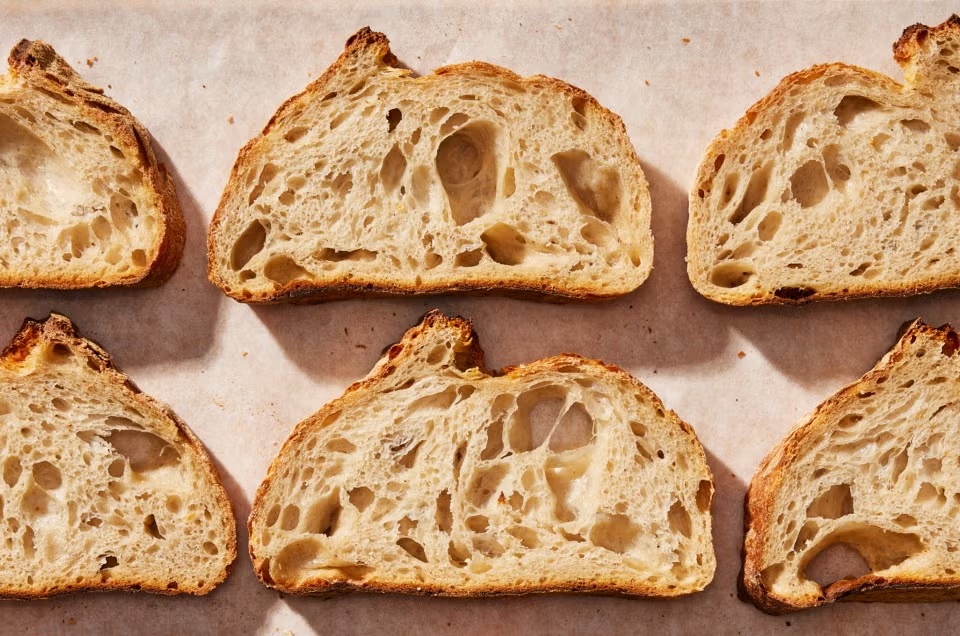
There is something incredibly satisfying about making a beautiful loaf of sourdough bread at home. With its crisp, golden-brown crust, chewy texture, and wonderfully airy crumb, homemade sourdough looks impressive but is made from surprisingly simple ingredients. The slices in the photo show exactly what makes sourdough so special: an open crumb filled with irregular holes, a deeply browned crust, and a rustic appearance that makes every loaf unique.
This sourdough recipe is perfect for a relaxed weekend of baking. It does require patience because natural fermentation takes time, but most of the process is hands-off. Once you understand the basic steps, you can make sourdough regularly and adjust the recipe to suit your preferred texture and flavor.
Why You’ll Love This Sourdough Recipe
This recipe produces a loaf with a crunchy crust and a soft, chewy interior. The natural fermentation gives the bread a slightly tangy flavor while also creating the characteristic bubbles throughout the crumb.
The ingredients are simple: flour, water, salt, and an active sourdough starter. There is no commercial yeast required. The starter provides the natural fermentation that makes sourdough rise.
The key to success is not rushing the dough. Fermentation time can vary depending on the temperature of your kitchen, the strength of your starter, and the type of flour you use.
Ingredients
For one large loaf, you will need:
500 g bread flour
350 g water
100 g active sourdough starter
10 g fine sea salt
A little rice flour or bread flour for dusting
For the best results, use an active starter that has recently been fed and is bubbly, lively, and capable of doubling in size.
Step 1: Mix the Dough
Begin by combining the flour and water in a large mixing bowl. Mix until all of the flour is hydrated and there are no obvious dry patches.
Cover the bowl and let the mixture rest for about 30 minutes. This resting period, often called an autolyse, gives the flour time to absorb the water and begins developing gluten naturally.
After the rest, add the active sourdough starter and salt. Mix everything thoroughly using your hands or a sturdy dough scraper. The dough will initially feel sticky and somewhat loose, but don’t worry. It will become smoother and stronger as fermentation and folding continue.
Step 2: Stretch and Fold
Cover the bowl and allow the dough to rest for another 30 minutes.
Now begin a series of stretch-and-folds. With slightly wet hands, grab one side of the dough, gently stretch it upward, and fold it over the center. Turn the bowl and repeat on all four sides.
Perform a set of folds every 30 minutes for the first two hours.
You should notice the dough becoming increasingly elastic and smooth. It will also begin holding its shape better.
Avoid adding excessive flour during this stage. A sticky dough is normal, and adding too much flour can make the finished bread dense instead of light and airy.
Step 3: Bulk Fermentation
After the folding process, cover the bowl and leave the dough to ferment at room temperature.
This stage can take approximately 4 to 6 hours, although the exact time depends heavily on your kitchen temperature and starter activity.
Instead of relying only on the clock, look for signs that the dough is ready. It should become noticeably larger, feel airy, and have bubbles developing around the edges. When you gently shake the bowl, the dough should have a soft, jiggly appearance.
If your kitchen is cool, fermentation may take longer. If your kitchen is warm, the dough may ferment much faster.
Step 4: Shape the Loaf
Lightly flour your work surface and carefully turn the dough onto it.
Gently shape the dough into a loose round, being careful not to completely deflate the air bubbles you have developed during fermentation.
Let it rest uncovered for about 20 minutes.
Next, perform the final shaping. Fold the edges toward the center and create enough surface tension to form a smooth, tight loaf. Place the shaped dough seam-side up into a well-floured proofing basket or a bowl lined with a floured kitchen towel.
The dough should feel soft and elastic but should still hold its shape.
Step 5: Cold Proof
Cover the shaped dough and place it in the refrigerator for approximately 8 to 14 hours.
This overnight proof is one of the easiest ways to make sourdough baking convenient. The long, cold fermentation develops flavor while also making the dough easier to score and bake.
You can prepare the dough in the evening and bake it the following morning.
Step 6: Prepare the Oven
When you’re ready to bake, preheat your oven to 230°C (450°F) with a Dutch oven or other heavy, oven-safe covered baking pot inside.
Allow the oven and pot to heat thoroughly for at least 30 to 45 minutes.
Carefully turn the chilled dough onto a sheet of parchment paper. Dust away excess flour if necessary.
Using a sharp bread lame or very sharp knife, make one decisive slash across the top of the loaf. This score gives the expanding bread a controlled place to open during baking.
You can keep the design simple or experiment with decorative scoring once you’re comfortable with the process.
Step 7: Bake the Sourdough
Carefully transfer the dough into the hot Dutch oven.
Cover with the lid and bake for approximately 20 minutes. The steam trapped inside the pot helps the bread expand and creates the beautiful crust associated with artisan sourdough.
Remove the lid and continue baking for another 20 to 25 minutes, or until the crust is deeply golden brown.
For an especially crisp crust, you can leave the bread in the switched-off oven with the door slightly open for a few additional minutes.
Step 8: Let It Cool
This is perhaps the hardest step: waiting.
Remove the bread from the Dutch oven and place it on a wire rack. Allow it to cool completely before slicing, ideally for at least one hour.
Cutting into sourdough too early can result in a gummy interior because the crumb is still setting as the loaf cools.
Once cooled, slice it with a serrated bread knife. You should see a soft, chewy interior with a mixture of small and large air pockets, similar to the beautiful open crumb shown in the photo.
Tips for Perfect Sourdough
Use an active starter. Your starter should be bubbly and strong before you begin. A weak starter can result in a loaf that barely rises.
Watch the dough, not just the clock. Temperature changes fermentation speed, so learn to recognize visual and textural signs of properly fermented dough.
Don’t over-handle the dough. Gentle folding and shaping help preserve the air bubbles that create an open crumb.
Don’t rush the cooling process. A beautiful crust is tempting, but allowing the loaf to cool completely gives you a better texture.
Experiment gradually. Once you’ve mastered this basic recipe, try replacing some bread flour with whole-wheat or rye flour, adjusting hydration, or adding ingredients such as seeds, herbs, cheese, or roasted garlic.
How to Serve Homemade Sourdough
Fresh sourdough is delicious simply sliced and spread with butter. It also makes an excellent base for avocado toast, grilled cheese sandwiches, bruschetta, or breakfast toast topped with eggs.
For a simple appetizer, toast thick slices until golden and rub them with a fresh garlic clove. Drizzle with olive oil and sprinkle with sea salt.
You can also use slightly older sourdough for croutons, breadcrumbs, French toast, or a hearty bread pudding.
Final Thoughts
Making sourdough bread is as much about learning to read the dough as it is about following a recipe. Every kitchen, starter, flour, and season can produce slightly different results. Don’t be discouraged if your first loaf isn’t perfect.
With practice, you’ll learn exactly when your dough is ready, how much tension to create during shaping, and how fermentation affects the final crumb.
The reward is a loaf that looks beautifully rustic, smells incredible, and tastes far better than most store-bought bread. With only four basic ingredients and a little patience, you can create the golden, crusty, open-crumb sourdough loaf you’ve been dreaming of.
Happy baking—and don’t forget to save a few slices for tomorrow’s toast!

