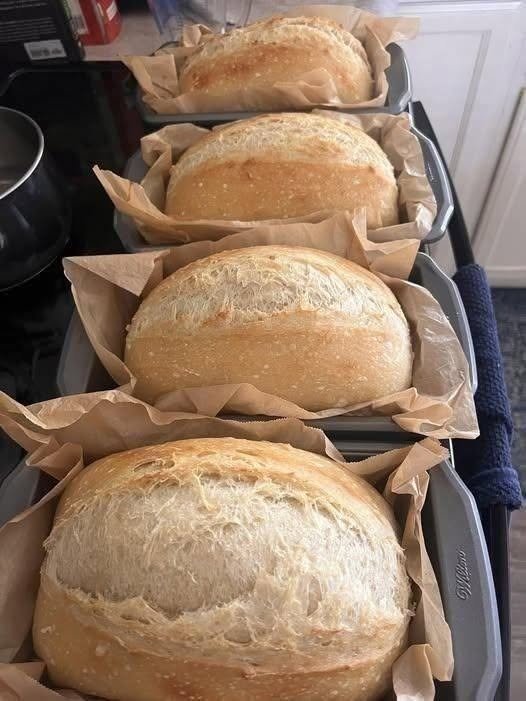
There is something incredibly satisfying about pulling a beautiful loaf of homemade bread from the oven. These rustic sourdough loaves have everything you want in a classic artisan bread: a golden, crisp crust, a soft and airy interior, and that unmistakable slightly tangy flavor that makes sourdough so special.
The loaves in the photo have a gorgeous rustic appearance, with beautifully expanded tops and delicate scoring across the surface. They are perfect for sandwiches, toast, breakfast, or simply tearing apart and enjoying while still slightly warm.
Making sourdough bread does take patience, but the process is surprisingly simple once you understand the basics. Most of the work happens while the dough rests and ferments, so you don’t need to spend hours actively working in the kitchen.
Why You’ll Love This Sourdough Bread
This recipe is perfect for anyone who wants to make bakery-style bread at home. The dough requires only a few basic ingredients, yet the finished loaf has incredible flavor and texture.
The long fermentation gives the bread its characteristic sourdough taste while also helping develop a wonderfully chewy crumb. A properly fermented dough will rise beautifully in the oven, creating the rounded shape and golden crust seen in the photo.
Another great thing about sourdough is that you can make multiple loaves at once. If you’re already going through the fermentation process, preparing several loaves makes the effort worthwhile.
Ingredients
For two medium-sized artisan loaves, you’ll need:
- 700 g bread flour
- 100 g whole wheat flour
- 560 g water
- 150 g active sourdough starter
- 16 g fine sea salt
- Extra flour for shaping and dusting
- Rice flour, optional, for proofing baskets
For the best results, use a sourdough starter that has been recently fed and is active, bubbly, and capable of rising significantly after feeding.
Step 1: Prepare Your Sourdough Starter
Before beginning the dough, make sure your starter is active.
Feed your starter several hours before you plan to mix the dough. It should become bubbly and expand noticeably. A healthy starter should have a pleasant fermented aroma and plenty of bubbles throughout.
If your starter is sluggish, give it another feeding before beginning. The strength of your starter has a major impact on how well the bread rises.
Step 2: Mix the Dough
Add the water and active sourdough starter to a large mixing bowl. Stir until the starter is mostly dispersed throughout the water.
Add the bread flour and whole wheat flour. Mix everything together using your hands, a dough whisk, or a sturdy spoon until there are no obvious dry patches.
The dough will look rough and sticky at this stage. That’s completely normal.
Cover the bowl and allow the mixture to rest for approximately 30 minutes.
This resting period allows the flour to absorb the water and begins developing the gluten naturally.
Step 3: Add the Salt
After the initial rest, sprinkle the salt over the dough.
Wet your hands slightly and gently work the salt into the dough. Pinch, fold, and squeeze the dough until the salt is evenly incorporated.
The dough may still feel sticky, but it should gradually become smoother and more elastic.
Step 4: Bulk Fermentation
Cover the bowl and let the dough ferment at room temperature.
During the first few hours, perform a series of stretch-and-folds. Every 30 minutes or so, grab one side of the dough, gently stretch it upward, and fold it toward the center. Rotate the bowl and repeat on all four sides.
Perform approximately 3–4 rounds of folds.
As fermentation continues, you’ll notice the dough becoming smoother, stronger, and more elastic. It should also begin to rise and develop bubbles.
The exact fermentation time depends heavily on room temperature and starter strength. A warmer kitchen will generally speed up fermentation, while a cooler environment will slow it down.
Rather than relying only on the clock, look for visual signs that the dough is ready.
Step 5: Divide the Dough
Once the dough has expanded and looks airy, gently transfer it onto a lightly floured work surface.
Divide the dough into two approximately equal portions.
Try not to completely deflate the dough. You want to preserve as much of the fermentation-created air as possible.
Step 6: Shape the Loaves
Take one portion of dough and gently shape it into a round.
Fold the edges toward the center, creating surface tension as you shape. Turn the dough over so the seam is underneath, then gently pull it toward yourself across the counter.
Repeat with the second piece.
The goal is to create a smooth, tight outer surface without aggressively pressing the air out of the dough.
Step 7: Final Proof
Place each shaped loaf into a well-floured proofing basket, bowl, or suitable bread-proofing container.
Cover the loaves and allow them to proof.
For deeper flavor, you can place the shaped dough in the refrigerator for an overnight cold fermentation. This slow proofing process can make the bread easier to score and gives the finished loaf a wonderfully developed flavor.
The dough should look slightly puffed and airy when it is ready to bake.
Step 8: Preheat the Oven
Place a Dutch oven or another suitable covered baking vessel into the oven and preheat it thoroughly to approximately 450°F (230°C).
Allow the oven and baking vessel to heat for at least 30–45 minutes.
A thoroughly preheated baking vessel helps create strong oven spring and a beautiful crust.
Step 9: Score the Bread
Carefully turn one loaf onto a piece of parchment paper.
Dust the surface lightly with flour if desired.
Using a very sharp bread lame or razor blade, make one confident slash across the top of the dough. You can also create decorative patterns if you prefer.
The scoring gives the expanding bread a controlled place to open during baking.
The beautiful textured tops seen on rustic sourdough loaves are created through a combination of fermentation, shaping, scoring, and high-heat baking.
Step 10: Bake
Carefully transfer the dough into the preheated Dutch oven.
Cover and bake for approximately 20 minutes.
Then remove the lid and continue baking for another 20–25 minutes, or until the loaf develops a rich golden-brown crust.
If you prefer a darker, more deeply caramelized crust, allow it to bake a few additional minutes while keeping a close eye on it.
Repeat the process with the second loaf.
Step 11: Cool Completely
This step requires patience!
Place the freshly baked loaf on a wire rack and allow it to cool completely before slicing.
Although warm bread smells irresistible, cutting into sourdough too early can result in a gummy interior. Allowing it to cool gives the crumb time to finish setting.
Once cooled, use a serrated bread knife to slice through the crust.
You should see a soft, airy crumb with irregular holes throughout.
Tips for Perfect Sourdough Bread
Use an active starter. A strong starter is one of the most important ingredients in sourdough baking.
Watch the dough, not just the clock. Fermentation varies depending on temperature, flour, and starter strength.
Don’t add too much flour during shaping. Excess flour can make the dough difficult to shape and may prevent the outer surface from becoming properly hydrated.
Build surface tension. Proper shaping helps the loaf hold its structure and rise upward rather than spreading outward.
Preheat thoroughly. A hot Dutch oven helps create excellent oven spring and a crisp crust.
Don’t skip the cooling period. Letting the loaf cool completely produces a better texture when sliced.
How to Store Homemade Sourdough
Once completely cooled, store the loaf at room temperature in a bread bag, paper bag, or wrapped in a clean kitchen towel.
Avoid storing fresh sourdough in the refrigerator because refrigeration can make the bread stale more quickly.
For longer storage, slice the cooled loaf and freeze the slices in an airtight freezer-safe bag. You can toast individual slices directly from frozen whenever you want fresh-tasting sourdough.
Serving Ideas
Fresh sourdough is incredibly versatile.
Serve thick slices with butter and honey for breakfast, or toast them and top with avocado, eggs, or your favorite vegetables. It also makes excellent grilled cheese sandwiches, French toast, croutons, and hearty sandwiches.
For a simple snack, drizzle toasted sourdough with olive oil and sprinkle with salt and herbs.
You can also serve a rustic loaf alongside soups, stews, pasta, or salads.
Final Thoughts
Homemade sourdough bread is one of those recipes that becomes more enjoyable every time you make it. Once you learn how your starter behaves and how dough changes throughout fermentation, the process becomes much easier.
These rustic loaves are proof that a few simple ingredients can create something truly special. With a crisp golden crust, soft interior, and naturally fermented flavor, this homemade sourdough is perfect for filling your kitchen with that irresistible fresh-bread aroma.
Whether you’re making one loaf for the weekend or several beautiful loaves to share with family and friends, this recipe is a wonderful addition to your baking routine. Slice it thick, add your favorite topping, and enjoy the simple pleasure of freshly baked artisan sourdough.

Leave a Reply