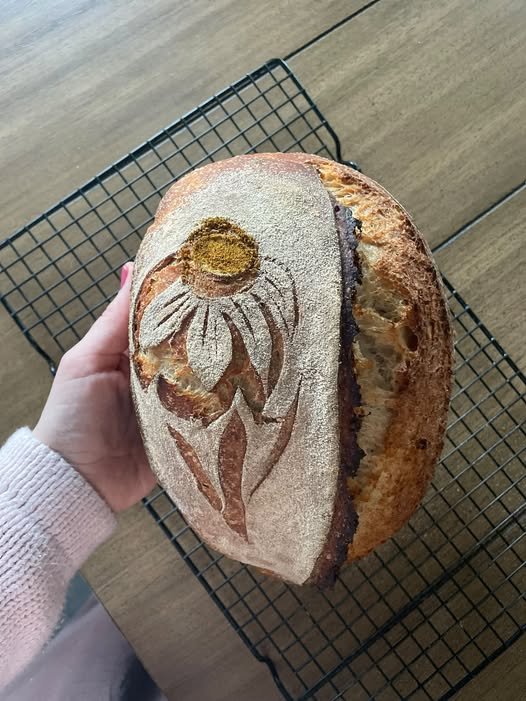
There’s something incredibly satisfying about taking a simple loaf of sourdough and turning it into a beautiful piece of edible art. This decorative sourdough loaf is a perfect example of how fancy scoring can transform an ordinary loaf into something truly special. With a golden, rustic crust and a delicate floral design carved into the surface, this bread feels almost too pretty to eat.
And yes, you eventually do eat the bread—but that doesn’t mean the time spent decorating it is wasted! Baking sourdough is often about more than simply making food. It can be a relaxing creative process, and scoring gives you an opportunity to personalize every loaf.
This recipe produces a naturally fermented sourdough loaf with a crisp crust, chewy interior, and plenty of flavor. The decorative scoring is optional, but if you want to celebrate the end of summer with something beautiful, it’s absolutely worth trying.
Why Fancy Score Sourdough?
One of the most common questions among sourdough bakers is: “Is fancy scoring a waste of time if you’re just going to eat the bread?”
The answer really depends on why you bake.
If you’re baking purely for speed and convenience, a simple slash across the top is perfectly fine. But if you enjoy the creative side of baking, decorative scoring can be incredibly rewarding.
The dough becomes your canvas. You can create flowers, leaves, wheat stalks, hearts, stars, seasonal patterns, or completely original designs.
And once the loaf goes into the oven, the scoring isn’t just decorative. Proper scoring gives the expanding dough a controlled place to open during oven spring.
So fancy scoring can be both functional and artistic.
Ingredients
For one large sourdough boule, you’ll need:
- 100 g active sourdough starter
- 350 g filtered or bottled water
- 500 g bread flour
- 10 g fine sea salt
- Rice flour, for dusting
- Bread flour, for shaping
For decorative scoring:
- Extra rice flour
- A small amount of bread flour
- Sourdough scoring lame or razor blade
The ingredient list is intentionally simple. Great sourdough doesn’t require a long list of ingredients. The flavor comes from fermentation, quality flour, and time.
Step 1: Make Sure Your Starter Is Active
Before beginning, make sure your sourdough starter is healthy and active.
A mature starter should be bubbly and airy and should rise noticeably after feeding. Ideally, use it when it is near its peak activity.
If your starter is sluggish, your dough may take considerably longer to ferment.
For the best results, feed your starter several hours before beginning the dough and wait until it is active and bubbly.
Step 2: Mix the Dough
Add the water and active sourdough starter to a large mixing bowl.
Stir until the starter is mostly dissolved.
Add the bread flour and mix until there are no obvious dry patches remaining.
Cover the bowl and let the dough rest for about 30–60 minutes.
This resting period allows the flour to absorb the water and begins gluten development.
After the rest, add the salt.
Use your hands to gently squeeze and fold the dough until the salt is evenly distributed.
The dough may initially feel sticky, but don’t worry. Sourdough dough often becomes smoother and stronger as fermentation progresses.
Step 3: Bulk Fermentation
Cover the bowl and allow the dough to ferment at room temperature.
Depending on the temperature of your kitchen and the strength of your starter, bulk fermentation may take approximately 4–7 hours.
During the first few hours, perform several sets of stretch-and-folds.
To do this, gently grab one side of the dough, stretch it upward, and fold it over the center. Rotate the bowl and repeat on all four sides.
Perform a set every 30 minutes for the first 2 hours.
As fermentation continues, the dough should become smoother, stronger, and noticeably more aerated.
You don’t necessarily need to wait for the dough to double in size. Look for a noticeable increase in volume, bubbles around the edges, and a lighter, slightly jiggly texture.
Step 4: Shape the Loaf
Lightly flour your work surface and gently turn the dough onto it.
Try not to aggressively deflate the dough because you want to preserve the fermentation bubbles.
Shape the dough into a loose round and let it rest uncovered for approximately 15–20 minutes.
Then perform the final shaping.
Gently pull the outer edges toward the center and create surface tension by dragging the dough carefully across the counter.
Place the shaped loaf seam-side up into a well-floured banneton.
Rice flour is particularly helpful because it doesn’t absorb moisture as quickly as wheat flour, making it easier to release the dough from the basket.
Step 5: Cold Proof
Cover the banneton and place it in the refrigerator.
Allow the dough to cold-proof for approximately 8–16 hours.
Overnight fermentation is convenient because you can prepare the dough in the evening and bake it the following morning.
Cold dough is also much easier to score, especially when you’re creating detailed decorative designs.
Step 6: Prepare for Decorative Scoring
When you’re ready to bake, preheat your Dutch oven and oven to approximately 475°F (245°C).
Place a sheet of parchment paper over the dough and carefully turn the loaf out of the banneton.
Dust the surface lightly with rice flour.
This creates the pale background that makes the decorative scoring stand out.
Now comes the creative part.
For a summer-inspired design like the loaf in the image, you can create a simple flower with leaves and curved petals.
Use a small razor or scoring blade and begin with your main design.
Make shallow cuts for decorative details. Deeper cuts should be reserved for the main expansion score because these allow the loaf to open during baking.
Creating a Floral Design
You don’t need to be an expert artist to create a beautiful sourdough design.
Start with a small circular center for the flower.
Add curved petals around it using shallow strokes.
Then create several leaves extending downward from the flower.
You can add veins to the leaves using extremely light cuts.
For a more dramatic appearance, dust the surface with rice flour before scoring. Areas where you remove the flour will become darker during baking, creating contrast between the design and the surrounding crust.
Remember that the dough will expand in the oven, so don’t make the design too crowded.
Simple shapes often create the most beautiful results.
Step 7: Add the Main Expansion Score
Even if you’ve created a beautiful decorative pattern, don’t forget the functional score.
Add one deeper slash along a side of the loaf or incorporate a deeper curved line into your design.
This gives the dough a controlled area to expand during oven spring.
Your decorative cuts should generally remain shallower so they create visual details without excessively weakening the dough structure.
Step 8: Bake
Carefully transfer the scored loaf into your preheated Dutch oven.
Cover with the lid and bake at 475°F (245°C) for approximately 20 minutes.
Remove the lid and reduce the oven temperature to around 450°F (230°C).
Continue baking for another 20–25 minutes, or until the loaf is deeply golden brown.
The exact baking time depends on your oven and the size of your loaf.
Once baked, remove the sourdough from the Dutch oven and place it on a wire rack.
Step 9: Let It Cool
This step can be difficult because the freshly baked loaf smells incredible!
However, try to wait at least 1–2 hours before slicing.
The interior continues to set as the loaf cools. Cutting into it too early can result in a gummy crumb.
Once completely cooled, use a sharp bread knife to slice through the crust.
You should see a beautifully open, chewy interior surrounded by a crisp, caramelized crust.
Tips for Beautiful Sourdough Scoring
Use cold dough: Refrigerated dough is firmer and easier to score.
Use a sharp blade: A dull blade can drag through the dough and ruin fine details.
Dust lightly with rice flour: It helps create contrast and prevents sticking.
Keep decorative cuts shallow: Deep decorative cuts can cause the dough to spread.
Practice on paper: If you’re nervous about scoring, sketch your design first.
Keep it simple: Flowers, leaves, wheat stalks, and geometric shapes are great beginner designs.
Don’t overthink it: Every loaf is unique, and small imperfections make homemade sourdough beautiful.
Is Fancy Scoring Really Worth It?
If your only goal is to produce a loaf of bread as quickly as possible, then fancy scoring certainly isn’t necessary.
But baking isn’t always about efficiency.
Sometimes it’s about slowing down, experimenting, creating something with your hands, and enjoying the process.
That beautiful flower on top of the loaf may eventually be sliced, toasted, buttered, and eaten—but the time spent creating it can still be part of the joy of baking.
And that’s what makes decorative sourdough scoring so much fun.
How to Store Sourdough
Once completely cooled, store your sourdough loaf in a paper bag, bread box, or breathable container at room temperature.
Avoid sealing freshly baked sourdough in an airtight plastic bag because the trapped moisture can soften the crust.
For longer storage, slice the loaf and freeze it in an airtight freezer-safe bag.
Individual slices can be toasted directly from frozen, making homemade sourdough convenient even on busy mornings.
Final Thoughts
This decorative sourdough loaf is a wonderful way to celebrate the end of summer and the creativity that comes with homemade baking.
The recipe itself is simple: flour, water, sourdough starter, and salt. But with fermentation, patience, and a little creativity, those basic ingredients become a beautifully golden loaf with a crisp crust and flavorful, chewy crumb.
And when it comes to the question, “Is fancy scoring a waste of time?”—for anyone who enjoys the artistic side of baking, the answer is that the process can be just as enjoyable as the final slice.
You may eventually eat the flower, leaves, and every last crumb—but that doesn’t make creating them pointless. Sometimes the little details are what make baking memorable.
So grab your razor, dust your dough with flour, and celebrate the season with a loaf that’s not only delicious but also uniquely yours. 🌻

Leave a Reply