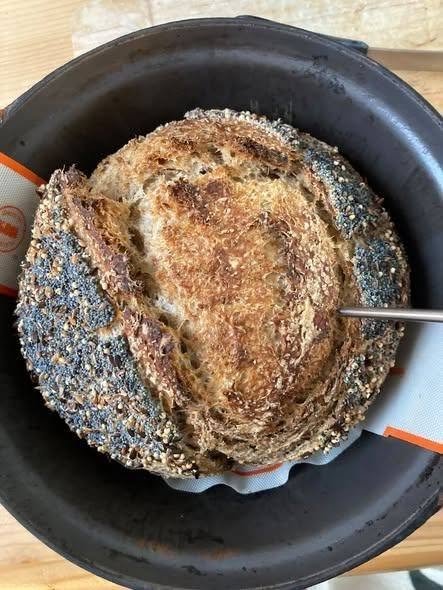
There is something incredibly satisfying about baking a rustic olive sourdough loaf with a deeply golden crust, open crumb, and little pockets of salty olives throughout. This recipe is especially interesting because it uses a simple starter-building schedule that can be helpful when your refrigerated starter is not ready early enough for your usual Saturday bake.
The method begins with just 10 grams of refrigerated sourdough starter, which is gradually built into a bubbly levain overnight. By Saturday morning, you have a lively mixture ready to turn into bread dough. The dough itself requires very little handling: just one coil fold after 30 minutes, followed by a four-hour bulk fermentation at a cool room temperature.
The result is a beautiful, rustic loaf with a crisp crust, tender chewy crumb, and plenty of olive flavor.
Why This Method Works
A refrigerated starter does not always become active quickly enough after a single feeding. Instead of trying to force a sleepy starter to become ready immediately, this method gives it multiple opportunities to feed and multiply.
Whole-wheat flour is particularly useful for building an active levain. Whole-grain flour can provide additional nutrients that encourage fermentation, and bakers commonly use whole wheat or rye to help strengthen a sluggish starter. (King Arthur Baking)
The important thing is to judge the starter by its activity rather than simply following the clock. A baking-ready starter should be bubbly, expanded, and vigorous; many sourdough guides recommend using it around its peak, when it has doubled and is beginning to show signs of slowing. (King Arthur Baking)
Ingredients
Overnight Levain
- 10 g refrigerated mature sourdough starter
- 60 g water
- 60 g whole-wheat flour
Second Levain Build
- 120 g of the first feeding
- 200 g water
- 200 g whole-wheat flour
Final Dough
- 520 g bubbly prepared levain
- 140 g water
- 310 g bread flour
- 10 g salt
- 100–150 g pitted olives, roughly chopped
Green olives, Kalamata olives, or a mixture of varieties all work beautifully. If your olives are packed in brine, drain them well and pat them dry before adding them to the dough.
Friday Evening: First Feeding
At approximately 6:00 PM on Friday, remove your small jar of mature starter from the refrigerator.
Measure 10 grams of starter into a clean container. Add 60 grams of water and 60 grams of whole-wheat flour.
Mix thoroughly until there are no dry patches of flour remaining. Cover the container loosely and leave it at room temperature.
At around 10:00 PM, check the mixture. It may show some bubbles and activity but may not yet be strong enough to make your final dough. That is exactly where the second build comes in.
Friday Night: Build the Levain
Measure 120 grams of the first feeding into a larger bowl.
Add 200 grams of water and 200 grams of whole-wheat flour.
Mix until completely combined. Cover the bowl and leave it overnight at room temperature.
This larger feeding gives the developing culture plenty of fresh flour and water to work through while you sleep.
By approximately 6:30 AM Saturday, the mixture should ideally be visibly bubbly, expanded, and active.
Do not worry if your timing is slightly different. Room temperature has a major effect on fermentation speed. Cooler environments can slow a starter considerably, while warmer temperatures accelerate it. (King Arthur Baking)
Saturday Morning: Make the Dough
Once the levain is beautifully bubbly, place the entire 520 grams of prepared starter into a large mixing bowl.
Add 140 grams of water and mix gently.
Next, add 310 grams of flour and 10 grams of salt.
Mix until the flour is fully hydrated and the dough comes together. It may look rough and sticky at first, but resist the temptation to keep kneading aggressively.
This method is intentionally low handling.
Add the Olives
Add your drained, chopped olives directly to the dough.
Gently work them through the dough until they are reasonably distributed. Try not to crush the olives or aggressively squeeze the dough.
The olives bring salt, moisture, and fat to the dough, so drying them thoroughly before adding them is helpful. Excess brine can change the dough consistency and make it harder to handle.
If you love a particularly olive-forward loaf, you can increase the amount slightly. A mixture of green olives and Kalamata olives gives the bread an especially interesting flavor.
One Coil Fold
Allow the mixed dough to rest for approximately 30 minutes.
Then perform one gentle coil fold.
With slightly wet hands, slide your hands underneath the center of the dough, lift it gently, and allow the ends to fold underneath themselves. Rotate the bowl and repeat once or twice.
You do not need to perform repeated stretch-and-fold sessions throughout the bulk fermentation.
After this single coil fold, cover the dough and leave it undisturbed.
Four-Hour Bulk Fermentation
Let the dough bulk ferment on the counter for approximately 4 hours at around 18°C (64°F).
This is a relatively cool fermentation environment, so the dough may move more slowly than it would in a warmer kitchen.
Instead of focusing only on the clock, watch the dough. You want to see fermentation activity, increased volume, a softer texture, and some bubbles developing.
Avoid pressing the dough down or repeatedly handling it. The goal is to preserve the gas created during fermentation.
Shape Without Degassing
Once bulk fermentation is complete, gently turn the dough onto your work surface.
The key here is no aggressive degassing.
You want to preserve as much of the fermentation structure as possible. Carefully shape the dough into a round boule by creating gentle surface tension.
Use your hands or a bench scraper to tuck the edges underneath. Try not to flatten the dough.
Place the shaped loaf seam-side up into a well-floured banneton or prepared proofing basket.
Final Proof
Cover the dough and allow it to continue proofing until it looks puffy and aerated.
The exact time will depend on your starter strength and room temperature. Because sourdough fermentation is affected by temperature, flour, starter activity, and dough composition, visual cues are more useful than following an exact number of minutes.
When the dough feels lighter and holds its shape while remaining slightly springy, it is ready for baking.
Score and Bake
Preheat your Dutch oven thoroughly to approximately 450°F (230°C).
Carefully turn the dough onto parchment or a bread sling.
Dust away excess flour if necessary, then score the surface with a sharp bread lame or razor. A confident score allows the loaf to expand where you want it to during oven spring.
Transfer the dough into the preheated Dutch oven and cover with the lid.
Bake covered for approximately 20–25 minutes.
Remove the lid and continue baking for another 20–25 minutes, or until the loaf develops a rich golden-brown crust.
For a fully baked loaf, the internal temperature is commonly around 205–210°F (96–99°C). (King Arthur Baking)
Cool Before Slicing
Remove the bread from the Dutch oven and place it on a wire rack.
This part requires patience.
Allow the loaf to cool completely before slicing. Cutting sourdough too early can make the crumb appear gummy because the interior is still finishing its setting process.
Once cool, slice with a serrated bread knife.
You should see a beautifully textured crumb with little pieces of olive distributed throughout the loaf.
Are There Risks With This Starter Method?
For a healthy, established sourdough culture, the main concern with a schedule like this is usually fermentation control rather than the fact that the starter is being built in stages.
The method works because you are essentially creating a larger levain from a small amount of mature starter. Feeding ratios can be adjusted to change how quickly the starter reaches peak activity; larger feeds relative to the seed starter generally take longer to mature. (King Arthur Baking)
The important safety point is to use a mature, healthy culture and clean equipment, and to monitor it for normal sourdough characteristics such as pleasant acidic or fermented aromas and active bubbling. If you ever see unusual mold or clearly abnormal discoloration, discard the culture rather than trying to rescue it.
Final Thoughts
This olive sourdough method is a wonderful example of how flexible sourdough baking can be. Instead of maintaining a large starter on the counter, you can keep a small amount refrigerated and build exactly what you need when baking day arrives.
Starting with just 10 grams of starter, feeding it Friday evening, building it again overnight, and using the bubbly levain Saturday morning creates a practical schedule for weekend baking.
The final dough is intentionally simple: 520 grams of active levain, water, flour, salt, and olives, followed by one coil fold and a gentle bulk fermentation. Most importantly, there is no need to repeatedly manipulate or degas the dough.
With a little practice, you can adjust the timing to suit your kitchen temperature and starter. The result is a rustic olive sourdough with a crisp, deeply browned crust and a flavorful, naturally fermented crumb—perfect for slicing thickly and enjoying with butter, cheese, soup, or simply on its own.

Leave a Reply