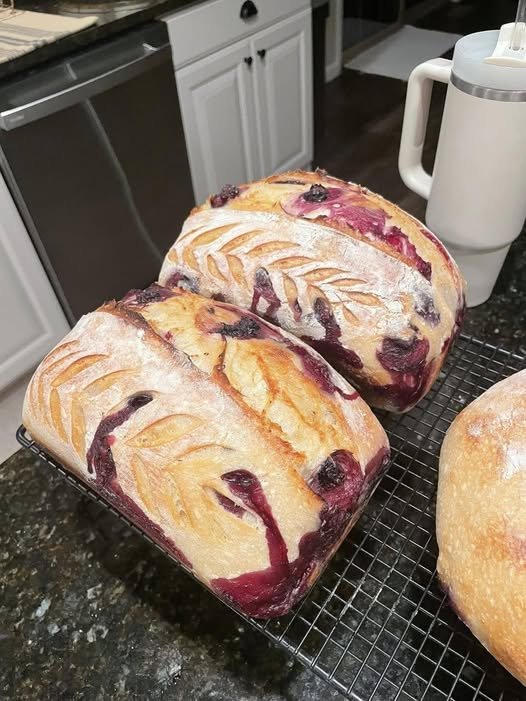
There is something truly special about a freshly baked loaf of homemade sourdough bread. Imagine a beautifully golden, crispy crust, a soft and chewy interior, and juicy blueberries tucked into every slice. This homemade blueberry sourdough bread combines the tangy flavor of naturally fermented sourdough with the sweetness of blueberries, creating a loaf that looks beautiful and tastes incredible.
Inspired by rustic artisan bread, this recipe is perfect for weekend baking, a special breakfast, or an afternoon snack. The purple-blue streaks from the berries give each loaf a unique appearance, while the open crumb and crisp crust make every slice irresistible.
Whether you are an experienced sourdough baker or trying flavored sourdough for the first time, this recipe will guide you through the process step by step.
Why You Will Love This Recipe
This blueberry sourdough bread offers the perfect balance of sweet and tangy flavors. The sourdough starter adds a subtle, fermented taste, while the blueberries provide bursts of fruity sweetness.
The long fermentation helps develop the bread’s flavor and texture without requiring commercial yeast. A hot oven creates a crisp, golden crust, while the inside remains tender and chewy.
You can enjoy it plain, toasted with butter, or served with cream cheese, honey, or your favorite breakfast spread.
Recipe Details
- Prep time: 30 minutes
- Fermentation time: 4–6 hours, depending on temperature and starter activity
- Cold proof: 8–16 hours
- Bake time: 40–50 minutes
- Total time: Approximately 13–24 hours, mostly hands-off
- Yield: 1 large loaf
Ingredients
For the Sourdough Bread
- 500 g bread flour
- 350 g water, at room temperature
- 100 g active sourdough starter, recently fed and bubbly
- 10 g salt
- 150–200 g blueberries, fresh or frozen
Optional Additions
- 1 teaspoon lemon zest for a fresh citrus flavor
- 1 tablespoon honey for a subtle sweetness
- A little rice flour or bread flour for dusting the proofing basket
Important: Frozen blueberries should be used straight from the freezer rather than thawed. They can still color the dough, so handle them gently.
Step-by-Step Instructions
Step 1: Prepare the Dough
In a large mixing bowl, combine the water and active sourdough starter. Stir until the starter is mostly dissolved.
Add the bread flour and mix until no dry patches remain. The dough will feel sticky and rough, which is normal.
Cover the bowl and let the dough rest for 30–45 minutes. This resting period, known as autolyse when flour and water are rested before adding salt and starter, helps the flour absorb water and makes the dough easier to handle.
Step 2: Add the Salt
Sprinkle the salt over the dough. Wet your hands slightly and squeeze, fold, and pinch the dough until the salt is evenly incorporated.
If you are using honey or lemon zest, add it at this stage and work it into the dough.
Cover the bowl and let the dough rest for approximately 30 minutes before beginning the folds.
Step 3: Build Strength With Stretch and Folds
Over the next two hours, perform three or four sets of stretch-and-folds, spacing each set about 30 minutes apart.
To complete a set, gently lift one side of the dough, stretch it upward without tearing, and fold it over the center. Rotate the bowl and repeat on all four sides.
As you work, the dough should become smoother, stronger, and more elastic. Keep it covered between each set to prevent the surface from drying out.
Step 4: Add the Blueberries
After the first one or two sets of folds, gently incorporate the blueberries.
Lightly wet your hands and stretch the dough into a rough rectangle. Scatter the berries over the surface, then fold the dough over itself to enclose them.
Avoid squeezing the berries, as this can release excess juice and turn the dough purple. Some streaking is natural and gives the finished bread its beautiful appearance.
If the berries begin escaping during folding, gently tuck them back inside the dough.
Step 5: Bulk Fermentation
Cover the bowl and allow the dough to ferment at room temperature until it looks noticeably puffier, has a smoother surface, and shows bubbles along the sides.
This commonly takes around four to six hours in a moderately warm kitchen, but the timing depends on the strength of your starter and the temperature of the dough.
Do not rely on the clock alone. The dough should increase in volume by roughly 30–50% rather than necessarily doubling, especially when working with a fruit-filled dough.
Step 6: Shape the Loaf
Lightly flour your work surface and gently turn out the dough. Stretch it into a loose rectangle, taking care not to crush the berries.
Fold the top third toward the center, then fold the bottom third over it. Roll or fold the dough into a compact loaf, creating surface tension without tearing the outer layer.
Place the shaped dough seam-side up in a well-floured proofing basket or a bowl lined with a clean, floured kitchen towel.
Step 7: Cold Proof Overnight
Cover the dough and refrigerate it for eight to sixteen hours.
Cold proofing helps develop the sourdough flavor and firms the dough, making it easier to score before baking. It also gives the blueberries time to blend their fruity flavor into the loaf.
Keep the dough refrigerated until you are ready to bake.
Step 8: Preheat the Oven
Place a Dutch oven with its lid inside your oven and preheat to 475°F (245°C) for approximately 30–45 minutes.
The Dutch oven traps steam during the initial baking stage, helping the loaf expand and develop a crisp crust.
Always handle the hot Dutch oven carefully, using suitable oven gloves.
Step 9: Score and Bake
Turn the chilled dough onto a piece of parchment paper. Dust off any excess flour and use a sharp bread lame or razor to make one confident slash across the top.
You can add decorative scoring around the main cut, as shown in rustic artisan loaves, but avoid making too many deep cuts through areas containing blueberries.
Carefully transfer the dough into the hot Dutch oven. Cover and bake for 25 minutes.
Remove the lid, reduce the temperature to 450°F (230°C), and bake for another 15–25 minutes, until the crust is deeply golden and the loaf is baked through.
If the berries release juice onto the crust, some dark purple patches are perfectly normal.
Step 10: Cool Before Slicing
Transfer the bread to a wire rack and let it cool completely, ideally for at least two hours.
Although the aroma may tempt you to cut into it immediately, cooling allows the crumb to finish setting. Slicing too early can leave the interior gummy, especially around juicy berries.
Once cooled, slice with a serrated bread knife and enjoy!
Expert Tips for Perfect Blueberry Sourdough
Use an active starter. Your starter should be bubbly, recently fed, and capable of rising reliably. A weak starter may produce a dense loaf.
Handle the berries gently. Fresh blueberries are easier to incorporate without excessive juice. Frozen berries are convenient but may create more purple streaks.
Watch the fermentation. Dough fermentation varies with room temperature, starter strength, and flour. Look for changes in volume and texture rather than following time alone.
Do not skip the cooling period. A completely cooled loaf will have a better crumb and cleaner slices.
Adjust for moisture. Blueberries release juice as they bake. If your berries are especially juicy, start with 150 g rather than 200 g.
How to Serve Blueberry Sourdough Bread
This bread is delicious in many different ways. Toast a slice and spread it with salted butter for a simple breakfast. Add cream cheese and a drizzle of honey for a richer treat, or serve it with Greek yogurt and fresh fruit.
For a special brunch, pair it with scrambled eggs, coffee, or tea. Slightly stale slices also make excellent French toast, especially when served with maple syrup and a handful of fresh berries.
Storage Instructions
Store the completely cooled loaf in a bread bag or wrapped in a clean kitchen towel at room temperature for up to two days. Because the bread contains fresh fruit, avoid keeping it in a warm, humid environment.
For longer storage, slice the loaf and freeze the slices in an airtight freezer-safe bag for up to three months. Toast frozen slices directly or allow them to thaw at room temperature.
Discard the bread if you notice mold or any unusual signs of spoilage.
Frequently Asked Questions
Can I use frozen blueberries?
Yes. Add them while frozen and work quickly to minimize bleeding. Expect more purple streaks than with fresh berries.
Can I make this recipe without a Dutch oven?
Yes. Bake on a preheated baking stone or heavy baking sheet and introduce steam using a separate oven-safe tray of hot water, following your oven manufacturer’s safety guidance. The crust may differ slightly.
Why is my blueberry sourdough gummy?
Possible causes include underbaking, slicing before the loaf cools, excessive moisture from the berries, or insufficient fermentation. Bake until the crust is deeply colored and allow the loaf to cool fully.
Can I add cinnamon or lemon zest?
Absolutely. A little lemon zest brightens the blueberry flavor, while a small amount of cinnamon adds warmth. Add these ingredients sparingly so they do not overpower the sourdough.
Final Thoughts
Homemade blueberry sourdough bread is a beautiful combination of artisan baking and fruity sweetness. Its golden crust, chewy interior, and pockets of juicy blueberries make it a memorable addition to breakfast, brunch, or an afternoon snack.
Although sourdough takes patience, most of the process involves simply resting, folding, and allowing the dough to ferment naturally. With an active starter, gentle handling, and careful baking, you can create a rustic loaf that looks as wonderful as it tastes.
Give this recipe a try, enjoy the aroma of freshly baked bread, and serve each slice warm or toasted with your favorite spread. Once you experience the combination of tangy sourdough and sweet blueberries, this loaf may become one of your favorite homemade breads.

Leave a Reply