
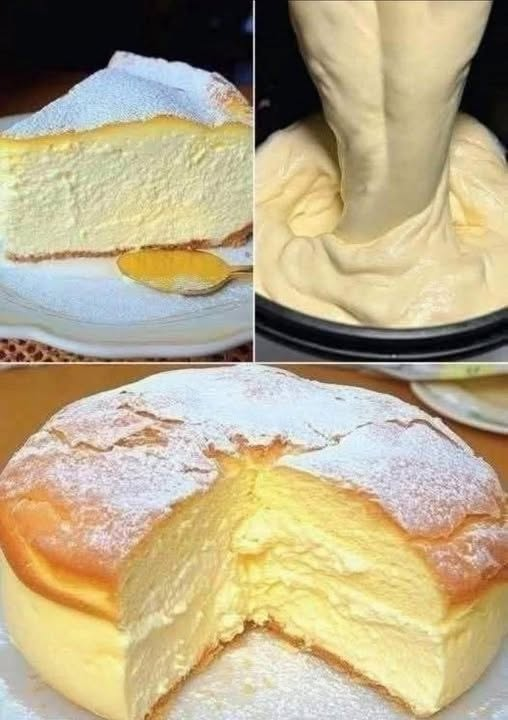
If you love cheesecake but want something lighter, softer, and lower in carbohydrates, this Fluffy Keto Japanese Cheesecake is a recipe you need to try. It has the delicate, airy texture of a Japanese-style cheesecake while still delivering the rich, creamy flavor you expect from a classic cheesecake.
Unlike dense New York cheesecake, this version is light and almost cloud-like. The center is soft, creamy, and gently jiggly when it comes out of the oven. A simple low-carb crust adds a subtle buttery base, while the cheesecake itself gets its richness from cream cheese, eggs, and a little heavy cream.
The result is a beautiful golden cake with a tender interior that practically melts in your mouth.
Why You’ll Love This Cheesecake
There is something special about a cheesecake that feels rich without being overly heavy. This recipe achieves exactly that.
The secret is in the eggs. Separating the eggs and whipping the whites creates tiny air bubbles throughout the batter. When baked gently, those bubbles expand and give the cheesecake its characteristic soft and fluffy texture.
Because this recipe uses almond flour instead of regular wheat flour and a low-carb sweetener instead of conventional sugar, it can fit beautifully into a ketogenic lifestyle.
It is also naturally gluten-free and makes an impressive dessert for family dinners, celebrations, or weekend baking.
Ingredients
For the crust
- ¾ cup finely ground almond flour
- 2 tablespoons melted butter
- 1 tablespoon powdered erythritol or another low-carb sweetener
- ¼ teaspoon vanilla extract
- Pinch of salt
For the cheesecake
- 8 ounces full-fat cream cheese, softened
- ¼ cup heavy cream
- 4 large eggs, separated
- ⅓ cup powdered low-carb sweetener
- 1 teaspoon vanilla extract
- 1 tablespoon lemon juice
- 1 tablespoon almond flour
- Pinch of salt
- ½ teaspoon baking powder, optional
For finishing
- Powdered low-carb sweetener
- Fresh berries, optional
- A few mint leaves, optional
For the best texture, use full-fat cream cheese. Make sure it is softened to room temperature before mixing.
Choosing a Sweetener
For a smooth cheesecake, powdered sweetener works best because it dissolves more easily into the batter.
Erythritol is a popular choice, but you can also use a monk-fruit/erythritol blend or another granulated sweetener designed for low-carbohydrate baking.
The sweetness of different products varies, so adjust the quantity according to the sweetener you’re using.
Avoid adding regular powdered sugar if you’re specifically trying to keep the recipe suitable for a ketogenic diet.
How to Make the Cheesecake
1. Prepare the pan
Preheat your oven to 325°F (165°C).
Line the bottom of an 8-inch round cake pan with parchment paper.
If possible, use a springform pan, but a regular cake pan can also work.
Wrap the outside of the pan with aluminum foil if you plan to bake the cheesecake in a water bath. This prevents water from getting into the pan.
2. Prepare the crust
In a small bowl, combine the almond flour, melted butter, powdered sweetener, vanilla, and salt.
Mix until the ingredients resemble damp crumbs.
Press the mixture firmly into the bottom of the prepared pan.
You don’t need a thick crust. A thin layer is enough to provide a buttery base without overpowering the delicate cheesecake.
Bake the crust for approximately 8–10 minutes, then remove it from the oven and allow it to cool slightly.
3. Prepare the cream cheese mixture
Place the softened cream cheese in a large mixing bowl.
Add the heavy cream and mix until smooth.
Add the egg yolks, powdered sweetener, vanilla extract, lemon juice, almond flour, salt, and optional baking powder.
Mix gently until the batter is completely smooth.
Avoid leaving lumps of cream cheese in the mixture because they can create uneven pockets in the finished cake.
4. Whip the egg whites
Place the egg whites in a completely clean and dry bowl.
Using an electric mixer, beat them until they become foamy.
Continue beating while gradually adding a little of the powdered sweetener.
Beat until the egg whites form soft to medium peaks.
Don’t overbeat them until they’re extremely stiff. Slightly softer peaks are easier to fold into the cheesecake batter without losing too much air.
This step is what gives the cake its beautiful fluffy texture.
5. Fold everything together
Add approximately one-third of the whipped egg whites to the cream cheese mixture.
Fold gently using a spatula.
Once incorporated, add another third and fold again.
Finally, add the remaining egg whites.
Use slow, gentle movements. Don’t vigorously stir the batter because you want to preserve as much air as possible.
The finished batter should look smooth, pale, and airy.
6. Pour into the pan
Pour the batter over the prepared crust.
Gently tap the pan once or twice on the counter to remove any very large air bubbles.
Don’t tap it aggressively because that can cause the whipped egg whites to lose volume.
Place the cake pan inside a larger roasting pan.
Pour hot water into the larger pan until it reaches approximately 1 inch up the side of the cheesecake pan.
This water bath helps create a gentle, humid baking environment and reduces the chance of the delicate cheesecake drying out.
7. Bake gently
Place the cheesecake in the oven and bake for approximately 50–65 minutes.
The exact time will depend on your oven and the size of your pan.
The cheesecake should look golden around the edges and slightly puffed.
The center should still have a gentle wobble when you carefully move the pan.
Don’t wait until the center is completely firm. It will continue cooking and setting as it cools.
8. Cool gradually
Turn off the oven when the cheesecake is finished.
Leave the oven door slightly open and allow the cheesecake to cool inside for approximately 15–20 minutes.
This gradual cooling process can help minimize sudden temperature changes that may cause the cake to collapse or crack.
Remove the cheesecake from the oven and allow it to cool completely.
Once cooled, refrigerate it for at least 2 hours before slicing.
For the best flavor and texture, chilling it overnight is even better.
Tips for a Light and Fluffy Cheesecake
The most important thing is to fold the egg whites gently.
If you stir too aggressively, the air bubbles will disappear and the cake will become much denser.
Room-temperature cream cheese and eggs are also helpful. Cold ingredients can be more difficult to combine smoothly.
Don’t open the oven repeatedly while the cheesecake is baking. Sudden temperature changes can cause a delicate cake to sink.
A water bath is highly recommended because it helps the cheesecake bake evenly and remain moist.
Finally, don’t worry if the cheesecake shrinks slightly as it cools. A small amount of shrinking is completely normal with this style of cake.
How to Serve It
Once chilled, remove the cheesecake from the pan and place it on a serving plate.
Dust the top lightly with powdered low-carb sweetener for a simple, elegant finish.
For a beautiful presentation, add a few fresh strawberries, raspberries, or blueberries.
You can also serve individual slices with a spoonful of unsweetened whipped cream.
For a richer dessert, drizzle a small amount of melted sugar-free chocolate over each slice.
The cheesecake is delicious cold, but you can also let individual slices sit at room temperature for 10–15 minutes before serving. This makes the center softer and creamier.
Storage
Store leftover cheesecake in an airtight container or cover it tightly with plastic wrap.
Keep it refrigerated and enjoy it within several days.
You can also freeze individual slices. Wrap each slice well and place it in a freezer-safe container.
When you’re ready to enjoy one, thaw it overnight in the refrigerator.
Freezing individual portions is especially convenient when you want a quick dessert without having to bake another cake.
Frequently Asked Questions
Why did my cheesecake crack?
Cracking can happen when the cheesecake is baked at too high a temperature or cooled too quickly. A gentle oven temperature and gradual cooling can help.
Why did it sink?
Some sinking is normal with Japanese-style cheesecake. However, excessive sinking can happen if the egg whites are under-whipped, overmixed, or if the cheesecake is removed from a very hot oven too quickly.
Can I make it without the crust?
Yes. Simply line the pan with parchment paper and pour the cheesecake batter directly into it. This makes the recipe even simpler and slightly reduces the carbohydrates.
Can I use coconut flour?
Coconut flour absorbs much more liquid than almond flour, so it should not be substituted in equal amounts. For the best result, stick with finely ground almond flour unless you’re comfortable adjusting the entire recipe.
Final Thoughts
This Fluffy Keto Japanese Cheesecake combines everything wonderful about a classic Japanese-style cheesecake with ingredients that make it much more suitable for a low-carbohydrate lifestyle.
It is soft, airy, creamy, lightly sweet, and beautifully golden. The almond-flour crust adds just enough buttery flavor while allowing the delicate cheesecake filling to remain the star.
The key to success is patience: whip the egg whites properly, fold them gently, bake the cheesecake slowly, and allow it to cool gradually.
Once chilled, slice it into thick pieces and dust the top with a little powdered low-carb sweetener. The result is an elegant homemade dessert that looks beautiful on a serving plate and tastes even better.
Light as a cloud, creamy in the center, and wonderfully satisfying, this cheesecake is proof that a low-carb dessert can still feel indulgent and special.

