
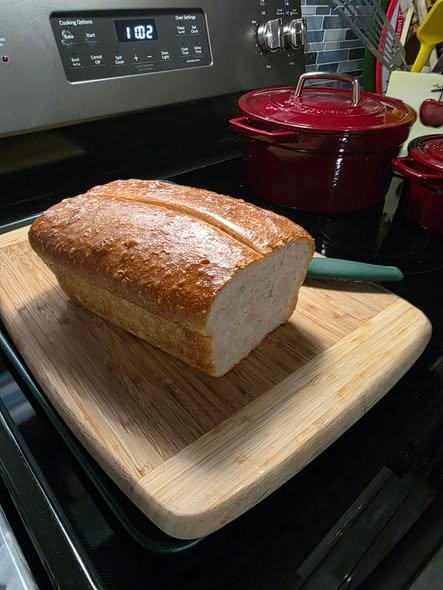
There is nothing quite like the smell of freshly baked bread filling the kitchen. This Homemade Soft Sandwich Bread is a simple, comforting recipe that produces a beautifully golden loaf with a soft, tender crumb and a deliciously fresh flavor. It is perfect for everyday sandwiches, toast, breakfast, lunchboxes, or simply spreading with butter while the bread is still slightly warm.
Unlike many store-bought loaves, homemade bread has a wonderful freshness and texture that makes every slice special. This recipe uses simple ingredients that you may already have in your kitchen, and the process is beginner-friendly. With a little patience while the dough rises, you can enjoy a bakery-style loaf right at home.
Why You’ll Love This Bread
This homemade sandwich bread has a soft interior and a lightly golden crust. The loaf is sturdy enough to hold sandwich fillings without falling apart, but tender enough to make delicious toast.
The recipe is also versatile. You can keep the loaf simple, or add a little honey, herbs, seeds, or whole wheat flour to customize it.
Fresh homemade bread is especially satisfying because you control the ingredients. There are no complicated steps, and you can adjust the sweetness, softness, and crust according to your preference.
Ingredients
For one standard loaf, you will need:
- 3 cups all-purpose or bread flour
- 2 ¼ teaspoons active dry yeast
- 2 tablespoons sugar
- 1 teaspoon salt
- 1 cup warm milk
- ¼ cup warm water
- 2 tablespoons unsalted butter, melted
- 1 large egg
- 1 tablespoon honey, optional
- Extra butter for brushing the baked loaf
For a slightly richer loaf, you can use whole milk. If you prefer a lighter bread, regular milk works perfectly well.
How to Make Homemade Sandwich Bread
1. Activate the Yeast
Start by warming the milk and water. The liquid should be warm to the touch but not hot.
Pour the warm liquid into a large bowl and add the sugar and active dry yeast. Stir gently and allow the mixture to sit for approximately 5–10 minutes.
You should see a light layer of foam forming on top. This indicates that the yeast is active and ready to use.
If the mixture does not become foamy, the yeast may be inactive or the liquid may have been too hot or too cold.
2. Make the Dough
Add the egg, melted butter, and honey if using.
Stir until combined.
Gradually add the flour and salt. Mix with a wooden spoon or spatula until a soft dough begins to form.
The dough may look slightly sticky at first, but that is completely normal.
3. Knead the Dough
Transfer the dough to a lightly floured surface.
Knead it for approximately 8–10 minutes, gently folding and pressing the dough until it becomes smooth and elastic.
You can also use a stand mixer fitted with a dough hook and knead on low to medium speed.
The finished dough should feel soft and slightly tacky but should not stick heavily to your hands.
Try not to add too much flour during kneading. Excess flour can make the finished bread dense and dry.
4. First Rise
Place the kneaded dough into a lightly greased bowl.
Cover it with a clean kitchen towel or plastic wrap.
Leave it in a warm, draft-free area for approximately 1–1½ hours, or until it has doubled in size.
The rising time can vary depending on the temperature of your kitchen. In a warm environment, the dough may rise more quickly.
5. Shape the Loaf
Once the dough has doubled, gently press it down to remove excess air.
Transfer it to a lightly floured surface and shape it into a rectangle.
Roll the dough tightly from one end to the other, creating a log approximately the length of your loaf pan.
Pinch the seam gently to seal it.
Place the shaped dough seam-side down into a greased 9 × 5-inch loaf pan.
6. Second Rise
Cover the loaf pan loosely with a clean towel.
Allow the dough to rise again for approximately 30–45 minutes.
The dough should become puffy and rise above the edges of the loaf pan.
This second rise helps create the light and soft texture that makes sandwich bread so enjoyable.
While the dough is rising, preheat your oven to 375°F (190°C).
7. Bake the Bread
Once the dough has finished its second rise, place the loaf pan in the preheated oven.
Bake for approximately 30–35 minutes, or until the top becomes beautifully golden brown.
The bread should sound slightly hollow when tapped gently.
If the top begins browning too quickly, loosely cover it with aluminum foil during the final part of baking.
8. Brush With Butter
Remove the bread from the oven and immediately brush the top with a little melted butter.
This simple step gives the crust a soft texture and adds a delicious buttery flavor.
Allow the bread to cool in the pan for approximately 10 minutes.
Then carefully remove it from the pan and transfer it to a wire rack.
Let it cool completely before slicing.
Although it can be tempting to cut into a warm loaf immediately, allowing it to cool helps the crumb finish setting properly.
Tips for Perfect Sandwich Bread
Use Fresh Yeast
Fresh, active yeast is essential for good bread. If your yeast is old or inactive, the dough may fail to rise.
Do Not Overheat the Milk
Very hot liquid can kill yeast. Always aim for comfortably warm liquid.
Avoid Too Much Flour
A soft dough produces softer bread. Add flour gradually and stop once the dough becomes manageable.
Knead Properly
Kneading develops gluten, which gives the bread structure and helps it rise properly.
The dough should become smooth and elastic rather than rough and sticky.
Let the Dough Rise Fully
Do not rush either rising stage. Proper fermentation helps create a lighter loaf with a better texture.
Cool Before Slicing
Fresh bread continues to set after baking. Cutting it too early can compress the soft interior.
Easy Variations
This basic sandwich bread can easily be customized.
Honey Sandwich Bread
Replace the sugar with honey or add a little extra honey for a naturally sweet flavor.
Whole Wheat Sandwich Bread
Replace up to one-third of the all-purpose flour with whole wheat flour. You may need a little extra liquid depending on the flour.
Herb Bread
Add dried rosemary, oregano, basil, or Italian seasoning to the dough for a savory loaf.
Seeded Bread
Sprinkle sunflower seeds, sesame seeds, pumpkin seeds, or flaxseeds over the top before baking.
Garlic Butter Bread
Add a small amount of garlic powder and dried herbs to the dough, then brush the baked loaf with garlic butter.
How to Store Homemade Bread
Once completely cool, store the loaf in an airtight bread bag or container.
Keep it at room temperature for approximately 3–4 days.
Avoid refrigerating homemade bread unless necessary because refrigeration can cause bread to lose its softness more quickly.
For longer storage, slice the loaf and freeze it in a freezer-safe bag.
Individual slices can be removed as needed and toasted directly from frozen.
How to Serve This Bread
This loaf is perfect for classic sandwiches. Use it for turkey and cheese, chicken salad, tuna salad, egg salad, grilled cheese, or simple ham and cheese sandwiches.
For breakfast, toast a slice and spread it with butter, peanut butter, cream cheese, or your favorite jam.
You can also use it for French toast. The soft crumb absorbs the egg mixture beautifully while remaining tender after cooking.
Another delicious option is toast topped with avocado, eggs, tomatoes, or cottage cheese.
Frequently Asked Questions
Why is my homemade bread dense?
Dense bread can result from inactive yeast, too much flour, insufficient kneading, or not allowing the dough enough time to rise.
Can I use bread flour?
Yes. Bread flour often produces a slightly chewier loaf and can provide excellent structure.
Can I make this bread without an egg?
Yes. The egg adds richness and tenderness, but you can leave it out and slightly adjust the liquid if needed.
Can I make the dough ahead of time?
Yes. You can prepare the dough and refrigerate it after the first rise. Bring it closer to room temperature before shaping and completing the second rise.
Final Thoughts
This Homemade Soft Sandwich Bread is an easy recipe that delivers a beautiful loaf with a golden crust and soft, tender center. It is made with simple ingredients and does not require complicated bread-making techniques, making it a great recipe for both beginners and experienced home bakers.
Once you make your first loaf, you may find yourself preferring homemade bread over packaged bread. The aroma alone makes the effort worthwhile, and there is something incredibly satisfying about slicing into a loaf that you made from scratch.
Enjoy it fresh with butter, turn it into sandwiches for lunch, toast it for breakfast, or use it for French toast on the weekend. This versatile homemade loaf is soft, flavorful, and perfect for keeping on hand throughout the week.
Recipe at a Glance
Prep Time: 25 minutes
First Rise: 1–1½ hours
Second Rise: 30–45 minutes
Bake Time: 30–35 minutes
Total Time: About 3 hours
Yield: 1 loaf
Difficulty: Easy to Moderate
Best Tip: For an especially soft crust, brush the freshly baked loaf with melted butter and allow it to cool completely before slicing.

