
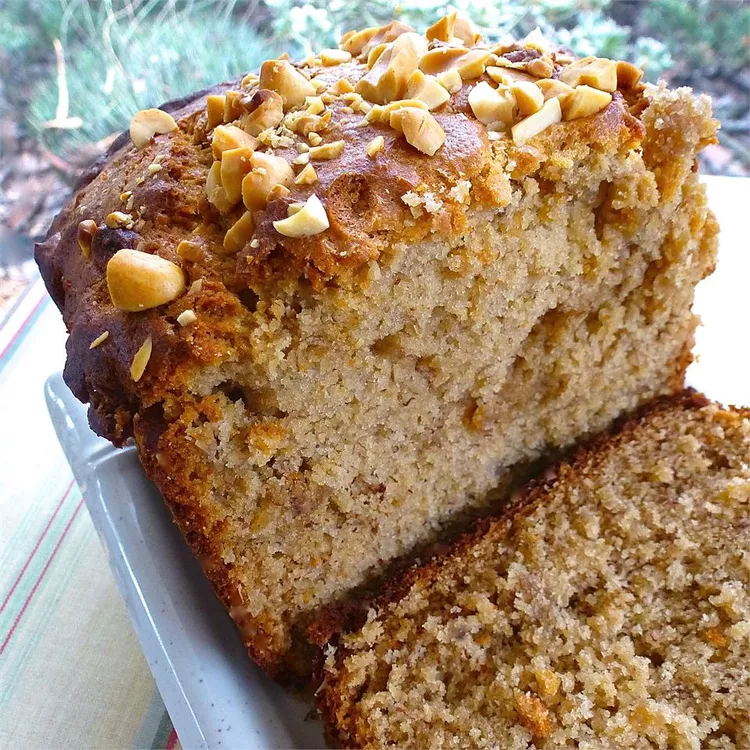
There is something wonderfully comforting about a freshly baked nut cake. Golden brown on the outside, soft and tender in the center, and generously covered with crunchy roasted nuts, this cake is perfect with a cup of tea or coffee. The cake in the photo has a beautifully rustic appearance, with a rich golden crust, a moist crumb, and plenty of chopped nuts scattered over the top.
This easy homemade nut cake is designed to recreate that look and texture. It is not overly sweet, allowing the buttery flavor and toasted nuts to shine. The inside is soft and slightly dense, while the top develops a delicious crunchy crust.
Whether you are baking for a weekend family gathering, an afternoon snack, or simply want something homemade to enjoy with your morning coffee, this recipe is a wonderful choice.
Why You’ll Love This Nut Cake
This cake is simple enough for beginner bakers but impressive enough to serve to guests. It requires basic pantry ingredients and can be prepared without any complicated decorating techniques.
The chopped nuts on top add wonderful texture. You can use cashews, almonds, walnuts, hazelnuts, or a combination of your favorites. For a flavor similar to the cake pictured, cashews and almonds work particularly well.
The cake is also versatile. You can serve it plain, dust it lightly with powdered sugar, or add a simple drizzle of honey or caramel sauce.
Ingredients
For the Cake
2 cups all-purpose flour
1 teaspoon baking powder
½ teaspoon baking soda
¼ teaspoon salt
½ teaspoon ground cinnamon
½ cup unsalted butter, softened
¾ cup granulated sugar
2 large eggs, at room temperature
1 teaspoon vanilla extract
½ cup plain yogurt
¼ cup milk
¾ cup finely chopped mixed nuts
For the Nut Topping
½ cup roughly chopped cashews
¼ cup chopped almonds
2 tablespoons chopped walnuts
1 tablespoon brown sugar
1 tablespoon melted butter
You can adjust the nut mixture according to what you have available. If you prefer a cake with lots of nuts throughout, reserve a little extra for the batter.
Step 1: Prepare the Oven and Pan
Begin by preheating your oven to 350°F (175°C).
Grease a standard 9 x 5-inch loaf pan with butter or cooking spray. Line the bottom and two long sides with parchment paper, leaving a little overhang. This makes it much easier to lift the finished cake from the pan.
If you prefer a round cake, you can use an 8-inch round cake pan instead, although the baking time may vary slightly.
Step 2: Prepare the Dry Ingredients
In a medium bowl, whisk together the flour, baking powder, baking soda, salt, and cinnamon.
Mixing these ingredients separately helps distribute the leavening agents evenly throughout the flour. This is important because it prevents areas of the cake from becoming overly dense or developing a bitter taste from concentrated baking soda.
Set the bowl aside while you prepare the wet ingredients.
Step 3: Cream the Butter and Sugar
Place the softened butter and granulated sugar in a large mixing bowl.
Using a hand mixer or stand mixer, beat them together for about 2–3 minutes, until the mixture becomes lighter, creamy, and slightly fluffy.
This step helps incorporate air into the batter, contributing to a lighter cake texture.
Add the eggs one at a time, beating well after each addition. Then add the vanilla extract and mix until combined.
If your mixture looks slightly curdled at this stage, don’t worry. It will come together once the dry ingredients are added.
Step 4: Combine the Batter
Add about one-third of the flour mixture to the butter mixture and gently mix.
Add half of the yogurt and milk, then continue alternating between the dry ingredients and the remaining yogurt mixture. Mix only until everything is combined.
Avoid overmixing the batter. Too much mixing can develop the gluten in the flour and result in a tougher, heavier cake.
Finally, fold in the ¾ cup of chopped nuts using a spatula.
The finished batter should be thick but soft and easy to spread.
Step 5: Prepare the Nut Topping
In a small bowl, combine the chopped cashews, almonds, walnuts, brown sugar, and melted butter.
The melted butter helps the nuts toast beautifully during baking while the brown sugar adds a subtle caramelized flavor.
For the rustic appearance shown in the photo, keep some of the nuts fairly large rather than chopping everything finely.
Step 6: Fill the Pan
Transfer the cake batter into your prepared loaf pan.
Use a spatula to spread the batter evenly and smooth the surface. Sprinkle the nut mixture generously over the top.
Press the nuts very gently into the batter with your fingertips or the back of a spoon. Don’t push them too deeply—they should remain visible on the surface and develop a beautiful toasted color.
Step 7: Bake
Place the pan in the center of the preheated oven and bake for approximately 50–60 minutes.
Start checking the cake around the 50-minute mark. Insert a wooden skewer or toothpick into the center. If it comes out clean or with a few moist crumbs attached, the cake is ready.
If the top begins browning too quickly while the center still needs more time, loosely cover the cake with aluminum foil and continue baking.
Once baked, remove the cake from the oven and allow it to cool in the pan for about 10–15 minutes.
Then carefully lift it out using the parchment paper and transfer it to a wire rack.
The Secret to a Moist Nut Cake
The key to getting a moist crumb is not overbaking the cake.
Yogurt provides moisture and a subtle tang while the butter gives the cake its rich flavor. Room-temperature ingredients also blend more easily, creating a smoother batter.
Another important tip is to let the cake cool before slicing. Cutting into a hot cake can cause the crumb to crumble or appear gummy. Give it at least 30–45 minutes to settle.
Serving Suggestions
This nut cake is delicious on its own, but there are plenty of ways to serve it.
Slice it thickly and serve with hot tea or coffee for an afternoon treat. For dessert, warm a slice slightly and serve it with vanilla ice cream.
You can also add a light drizzle of honey, maple syrup, or caramel sauce. A dusting of powdered sugar is another simple option.
For breakfast, toast a slice lightly and spread it with butter. The nuts become even more fragrant when warmed.
Storage
Store the cooled cake in an airtight container at room temperature for up to 3 days.
For longer storage, refrigerate it for up to a week. Bring individual slices to room temperature before serving, or warm them briefly in the microwave.
The cake can also be frozen. Wrap individual slices tightly in plastic wrap and place them in a freezer-safe bag or container. Freeze for up to 2 months. Thaw overnight in the refrigerator or at room temperature.
Final Thoughts
This homemade nut cake is the kind of recipe that feels both simple and special. It doesn’t require frosting or elaborate decoration—the golden crust and generous layer of toasted nuts provide all the beauty it needs.
The combination of a buttery, tender crumb and crunchy roasted nuts makes every bite satisfying. You can customize the recipe with your favorite nuts, add a little cinnamon or cardamom, or even mix in dried fruit such as raisins or chopped dates.
For the best result, use fresh nuts, avoid overmixing the batter, and keep a close eye on the cake during the final minutes of baking.
One slice is rarely enough—serve this rustic nut cake with a hot cup of tea and enjoy a wonderfully comforting homemade treat!

