There is something truly special about freshly baked French bread. The beautiful golden crust, the delicate aroma, and the soft, airy interior make a homemade baguette irresistible. Whether you enjoy it with butter, serve it alongside soup, or use it to prepare delicious sandwiches, a freshly baked baguette brings a little taste of a French bakery into your kitchen.
This homemade French baguette recipe is designed to help you create long, golden loaves with a crisp exterior and a tender, chewy crumb. You do not need to be a professional baker to achieve excellent results. With a few simple ingredients, proper dough handling, and the right baking technique, you can make delicious baguettes at home.
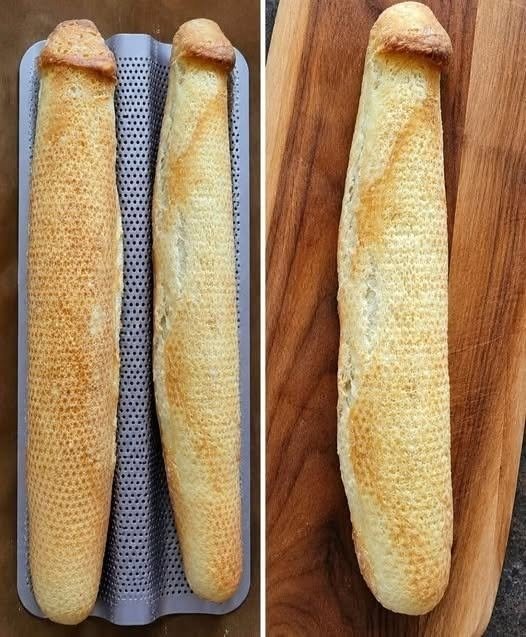
The loaves in the photo have an attractive golden surface and a long, slender shape. This recipe recreates that style using a traditional yeast dough and an optional perforated baguette pan to help the loaves maintain their shape while baking.
Why You Will Love This Recipe
Crispy golden crust: High oven heat helps develop a beautiful exterior.
Soft, airy interior: Proper fermentation creates a light and chewy crumb.
Simple ingredients: Flour, water, yeast, and salt are all you need.
Bakery-style appearance: Shape the dough into long, elegant loaves.
Versatile serving options: Enjoy the bread with breakfast, lunch, dinner, or snacks.
Preparation and Cooking Time
Preparation time: 25 minutes
First rise: 1–1½ hours
Second rise: 30–45 minutes
Baking time: 20–25 minutes
Total time: Approximately 2½–3 hours
Yield: 2 medium baguettes
Ingredients
500 g bread flour or strong all-purpose flour
350 ml lukewarm water
7 g instant yeast
10 g salt
1 teaspoon sugar, optional
A little flour for dusting
Cornmeal or semolina, optional, for the baking tray
The dough should be soft and slightly tacky. Bread flour usually provides a chewier texture, while all-purpose flour can produce a lovely baguette when handled gently.
Instructions
Step 1: Mix the Dough
In a large mixing bowl, combine the flour and instant yeast. Add the lukewarm water and mix with a wooden spoon until the flour is moistened and a rough dough forms.
Add the salt and optional sugar. Continue mixing until everything is evenly incorporated.
The dough may initially feel sticky, which is normal for baguette dough. Avoid adding too much extra flour because a dry dough can produce a dense loaf instead of the light, airy texture you want.
Cover the bowl and let the dough rest for approximately 15–20 minutes. This short resting period allows the flour to absorb water and makes the dough easier to handle.
Step 2: Knead the Dough
Transfer the dough to a lightly floured surface. Knead for approximately 8–10 minutes by hand, or 5–7 minutes using a stand mixer with a dough hook.
The dough should become smoother and more elastic as you work it. It does not need to be completely dry or firm.
If the dough feels very sticky, lightly wet your hands rather than adding large amounts of flour. This helps maintain the proper hydration needed for a tender interior.
Place the dough in a lightly greased bowl and cover it.
Step 3: Allow the Dough to Rise
Leave the dough in a warm place for 60–90 minutes, or until it has increased noticeably in size.
For better flavor, you can allow the dough to ferment more slowly in the refrigerator overnight. If using this method, cover the dough well and let it warm slightly before shaping.
Good fermentation helps develop the bread’s flavor, structure, and interior air pockets. However, avoid allowing the dough to overproof, as it may become weak and difficult to shape.
Step 4: Divide and Shape the Baguettes
Turn the risen dough onto a lightly floured work surface. Divide it into two equal portions.
Gently flatten each portion into a rectangle. Fold the upper edge toward the center and press lightly to seal. Fold the lower edge upward, then bring the dough together lengthwise to create a tight seam.
Roll each piece gently from the center outward, gradually extending it into a long loaf. Aim for a length that fits your baking tray or baguette pan.
Pinch the seam closed and place each loaf seam-side down. If you want the rounded ends shown in the photo, gently taper the ends rather than making them extremely pointed.
Handle the dough carefully so you preserve as much of the gas created during fermentation as possible.
Step 5: Let the Shaped Loaves Rise
Place the shaped loaves on a baguette pan or a baking tray lined with parchment paper. If you are using a flat tray, leave enough space between the loaves.
Cover them loosely with a clean kitchen towel and allow them to rise for 30–45 minutes.
The loaves should become slightly puffy and feel lighter. Avoid overproofing, because dough that rises too much may collapse or spread during baking.
Meanwhile, preheat your oven to 230°C (450°F). Allow enough time for the oven to reach the correct temperature.
Step 6: Prepare for Baking
Just before baking, dust the loaves lightly with flour if desired. Using a sharp bread lame or razor blade, make three or four shallow diagonal slashes along the top of each baguette.
These cuts help control how the bread expands in the oven. If you prefer the smooth, rounded appearance shown in your photo, you can leave the surface unscored, although the loaves may open naturally in places.
For a crispier crust, introduce steam during the beginning of baking. Place a heatproof metal tray in the oven while it preheats, then carefully add hot water to that tray when the bread goes in. Keep your hands and face away from the steam. Never pour water onto an oven’s glass door or onto an unapproved surface.
Step 7: Bake Until Golden
Bake the baguettes at 230°C (450°F) for approximately 20–25 minutes, depending on their thickness and your oven.
The loaves should develop a golden-brown crust and sound hollow when tapped on the bottom. If they are browning too quickly, reduce the temperature slightly toward the end of baking.
For a crispier finish, remove the steam tray after the first 10 minutes if it is safe to do so, then continue baking until the crust is well colored.
Transfer the baguettes to a wire rack and let them cool for at least 20–30 minutes before slicing. Cooling allows the crumb to finish setting and helps prevent a gummy interior.
Tips for Perfect Homemade Baguettes
Measure ingredients accurately. A kitchen scale provides more consistent results than measuring flour by volume.
Do not overuse flour. A slightly tacky dough helps create a light, open crumb.
Build dough strength. If the dough feels weak, use gentle stretch-and-fold movements during the first rise.
Preheat thoroughly. A hot oven encourages good expansion and crust development.
Use steam carefully. Steam during the initial baking period helps keep the crust flexible while the bread expands.
Cool before cutting. Slicing too early can compress the soft interior and make it seem undercooked.
How to Serve French Baguettes
Fresh baguettes are delicious with butter, jam, honey, or cheese. Serve slices alongside creamy soups, salads, pasta, and roasted vegetables.
For a quick snack, toast slices with garlic butter. You can also fill the bread with grilled chicken, cheese, lettuce, tomatoes, or other sandwich ingredients.
If you enjoy a traditional breakfast, serve warm baguette slices with butter and a cup of tea or coffee.
Storage and Freezing
Store a completely cooled baguette in a paper bag or bread box at room temperature and enjoy it within one to two days for the best texture. A plastic bag keeps bread softer but may also soften the crust.
To freeze, wrap the cooled loaf tightly and place it in a freezer-safe bag for up to three months. Thaw at room temperature and warm in a 180°C (350°F) oven for approximately 5–10 minutes to refresh the crust.
Frequently Asked Questions
Can I make baguettes without a special pan?
Yes. A regular baking tray lined with parchment paper works well. Arrange the loaves with enough space between them.
Why is my baguette dense?
Common causes include insufficient fermentation, adding too much flour, weak dough development, or shaping too aggressively.
Why is the crust soft?
Too little initial heat, insufficient baking, or storing the bread while warm can soften the crust. Let the loaves cool uncovered on a wire rack.
Can I prepare the dough ahead of time?
Yes. Refrigerating the dough overnight can improve flavor. Keep it covered and allow extra time for the dough to warm and rise before shaping.
Final Thoughts
Homemade French baguettes are a rewarding baking project that turns simple ingredients into beautiful, flavorful bread. With a little patience and attention to fermentation, shaping, and oven temperature, you can create long golden loaves with a crisp crust and a soft, chewy center.
Serve them fresh from the oven once they have cooled slightly, share them with family, or freeze a loaf for another day. Once you experience the aroma and flavor of homemade baguettes, you may never look at store-bought bread the same way again!

Leave a Reply