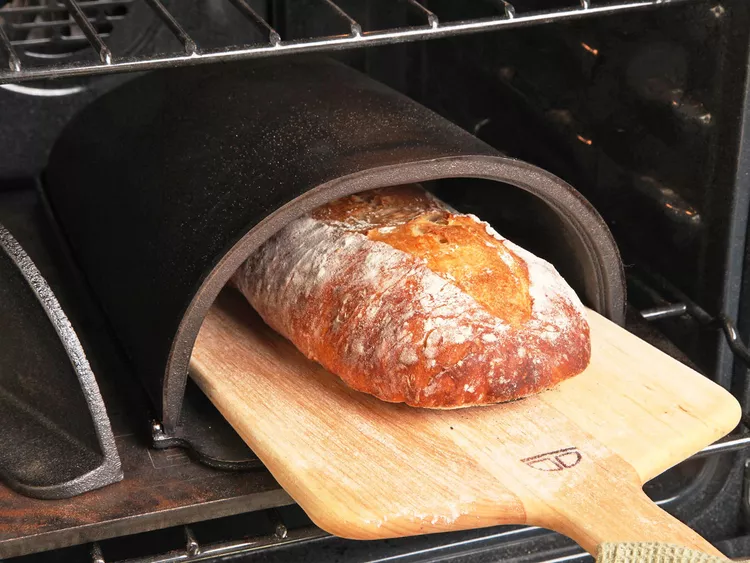
How Steam Affects The Crust And Crumb Of Your Bread
Prep Time: 30 minutes active | Fermentation: 8–12 hours | Baking Time: 40–50 minutes | Yield: 1 large loaf
Introduction
There is nothing quite like the smell of freshly baked bread filling your kitchen. A homemade artisan sourdough loaf, with its golden-brown crust, beautiful cracks, and soft, chewy interior, is a delicious treat that can turn an ordinary meal into something special. The bread in the picture showcases the rustic appearance of artisan bread, with a flour-dusted crust and a beautifully risen center.
Making artisan sourdough bread at home might seem difficult at first, but with the right ingredients, patience, and a few simple techniques, you can create bakery-quality bread in your own kitchen. This recipe focuses on developing flavor through fermentation and achieving a crispy crust with a tender crumb.
Whether you are a beginner baker or someone who already enjoys making homemade bread, this recipe will guide you through every step, from mixing the dough to baking the perfect loaf.
Ingredients for Homemade Artisan Bread
Fresh-Baked Sourdough Bread Recipe
To make one large artisan sourdough loaf, gather the following ingredients.
- 500 grams bread flour or strong white flour
- 350 grams lukewarm water
- 100 grams active sourdough starter
- 10 grams salt
- A little extra flour for dusting
- Rice flour or baking parchment for easier handling, if needed
Important: This recipe uses an active sourdough starter, which is a mixture of flour and water containing naturally occurring yeast and bacteria. Your starter should look bubbly and expanded after feeding. If you do not have a sourdough starter, you can use a small amount of instant yeast instead, although the flavor and fermentation process will be different.
Step 1: Mix the Flour and Water
Woman pouring water on rye and wheat flour in bowl
Begin by adding the bread flour and water to a large mixing bowl. Mix them together with a wooden spoon or your hands until all the flour is hydrated and no large dry patches remain.
The dough may look rough and sticky at this stage. That is completely normal.
Cover the bowl and allow the mixture to rest for approximately 30–45 minutes. This resting period is known as autolyse. It allows the flour to absorb water and helps gluten begin developing naturally.
A good gluten structure is essential for artisan bread because it helps the dough trap gas during fermentation, resulting in a lighter loaf with a better texture.
Step 2: Add the Sourdough Starter and Salt
After the resting period, add the active sourdough starter and salt to the dough.
Use your fingers to pinch, fold, and squeeze the ingredients into the mixture until everything is evenly combined. The dough may initially feel slippery or difficult to handle, but it should become more cohesive as you work it.
Avoid adding too much extra flour. A slightly sticky dough generally produces a more open and tender crumb.
Cover the bowl and let the dough rest for another 20–30 minutes before beginning the strengthening process.
Step 3: Develop the Dough with Stretch and Folds
A Realistic Sourdough Baking Schedule for Busy Professionals – LIVING JIN
Instead of kneading the dough continuously, this recipe uses a simple stretch-and-fold technique.
- Wet your hands lightly to prevent sticking.
- Grab one side of the dough and gently stretch it upward.
- Fold the stretched portion over the center.
- Turn the bowl and repeat on the remaining sides.
- Cover the dough and let it rest for about 30 minutes.
Repeat this process three or four times over approximately two hours.
Each round helps strengthen the gluten network, making the dough smoother, more elastic, and better able to hold its shape.
By the end of this stage, the dough should feel stronger and stretch more easily without tearing.
Step 4: Allow the Dough to Rise
Transfer the dough to a lightly greased or clean bowl and cover it. Let it ferment at room temperature until it has visibly expanded, looks airy, and shows bubbles along the sides.
Depending on your room temperature and starter strength, this stage may take approximately 4–6 hours or longer.
Do not rely only on the clock. Dough ferments faster in warm conditions and more slowly in cooler kitchens. For many sourdough recipes, a rise of around 50–75% can be a useful guide, although the ideal amount depends on your dough and fermentation conditions.
During this time, natural yeast produces carbon dioxide, creating the airy structure that makes sourdough bread so appealing.
Patience is essential. Under-fermented dough may produce a dense loaf, while excessively fermented dough can become weak and difficult to shape.
Step 5: Shape the Loaf
How to Shape Sourdough: Boule vs Batard | Krustic
Once the dough has fermented sufficiently, gently transfer it onto a lightly floured work surface.
Fold the edges toward the center to create a rough round shape. Turn the dough over so the seam is underneath, then gently drag it across the work surface to create surface tension.
Avoid pressing too much air out of the dough. The gas produced during fermentation contributes to the bread’s light interior.
Place the shaped loaf seam-side up in a floured proofing basket or a bowl lined with a clean, floured kitchen towel.
Cover it and allow it to rest for approximately 30–60 minutes before transferring it to the refrigerator for an overnight proof of 8–12 hours.
Cold fermentation helps develop flavor and makes the dough easier to score. If you prefer to bake on the same day, you can instead allow the shaped dough to proof at room temperature until it looks puffy and responds slowly when gently pressed.
Step 6: Preheat the Oven
Pass the Dutchie – by Andrew Janjigian – Wordloaf
Preheat your oven to 240°C (465°F).
For the best crust, place a Dutch oven or heavy oven-safe covered pot inside while the oven heats for approximately 30–45 minutes.
The preheated pot creates a hot baking environment and traps steam released by the dough. This allows the bread to expand before the crust hardens.
If you do not have a Dutch oven, you can bake the loaf on a preheated baking stone or heavy tray and introduce steam using a suitable oven-safe method. Always follow your oven manufacturer’s safety instructions, and never pour water directly onto a glass oven door or an oven component that is not designed for it.
Step 7: Score and Bake the Bread
BA’s Best Bread Recipe | Bon Appétit
Carefully remove the hot pot from the oven. Turn the dough onto a piece of baking parchment, keeping the seam underneath.
Use a bread lame or a very sharp knife to make one confident slash along the top of the loaf, approximately 1–2 centimeters deep.
Scoring gives the bread a controlled place to expand during baking and creates the attractive split seen on many artisan loaves.
Carefully lower the dough into the hot pot and cover it with the lid.
Bake covered at 240°C for approximately 20 minutes. Remove the lid, reduce the temperature to 220°C (425°F), and continue baking for another 20–25 minutes, or until the crust is deeply golden brown.
The finished loaf should feel light for its size and have a firm, crisp crust. If you use a thermometer, the center will typically be around 96–99°C (205–210°F).
Step 8: Cool Before Slicing
Chef John’s New and Improved Sourdough Bread Recipe – video Dailymotion
Remove the bread from the oven and place it on a wire rack.
Although the aroma may tempt you to cut into it immediately, allow the loaf to cool for at least one hour, preferably longer for a large loaf.
During cooling, the interior continues to set and moisture redistributes throughout the crumb. Cutting the bread too early can leave the inside gummy or make it appear underbaked even when the loaf is fully cooked.
Once cooled, slice it with a serrated bread knife to reveal its soft interior and crisp, flavorful crust.
Tips for Perfect Artisan Sourdough Bread
- Use an active starter: A bubbly, recently fed starter gives the dough a better chance of rising well.
- Measure ingredients accurately: A digital kitchen scale is more reliable than measuring flour by cups.
- Watch the dough, not just the clock: Temperature and starter activity strongly affect fermentation.
- Handle the dough gently: Preserve as much of the gas inside as possible when shaping.
- Preheat thoroughly: A hot baking surface supports a better oven spring and crust.
- Bake until deeply colored: A rich golden-brown crust generally provides more flavor than a pale one.
- Store it properly: Keep the cooled loaf cut-side down on a bread board for short-term storage, or place it in a paper bag. Freeze sliced bread for longer storage.
What to Serve with Homemade Artisan Bread
A Realistic Sourdough Baking Schedule for Busy Professionals – LIVING JIN
Tomato and Basil Soup
Avocado Egg Toast Recipe | GetCookMatch
Homemade artisan bread is wonderfully versatile. Serve warm slices with butter, olive oil, or your favorite homemade spread. It pairs beautifully with creamy soups, fresh salads, roasted vegetables, and hearty stews.
For breakfast, toast a slice and top it with scrambled eggs, avocado, cheese, or fruit preserves. You can also use it to make delicious sandwiches because its sturdy crumb holds fillings well.
If you enjoy bold flavors, try serving it with garlic butter, hummus, or a mixture of olive oil and herbs.
Frequently Asked Questions
- Why is my sourdough bread dense?
Dense bread can result from an inactive starter, insufficient fermentation, weak gluten development, or shaping that is too rough. Make sure your starter is active and give the dough enough time to rise.
- Can I make artisan bread without a Dutch oven?
Yes. Use a preheated baking stone or heavy baking tray and a safe method for creating steam in the oven. The crust may be somewhat different, but you can still achieve excellent results.
- Why is my crust not crispy?
The loaf may need more baking time, or moisture may have softened the crust after baking. Bake until deeply golden and cool completely on a wire rack.
- How long does homemade sourdough bread last?
For the best texture, enjoy it within two to three days. Store it in a breathable bread bag or bread box, and freeze slices if you need to keep them longer.
Conclusion
Making homemade artisan sourdough bread is a rewarding experience that combines simple ingredients with the magic of fermentation. From mixing the dough and developing gluten to shaping, scoring, and baking, every stage contributes to the finished loaf.
The secret to a beautiful loaf is not complicated equipment or professional baking skills. It is using an active starter, allowing enough time for fermentation, handling the dough carefully, and baking it in a thoroughly heated oven.
Follow these steps, experiment with fermentation times, and soon you can enjoy your own rustic artisan bread with a crisp golden crust and a soft, chewy center. Serve it fresh with your favorite meals, share it with family and friends, and enjoy the satisfaction of baking delicious bread from scratch.

Leave a Reply