
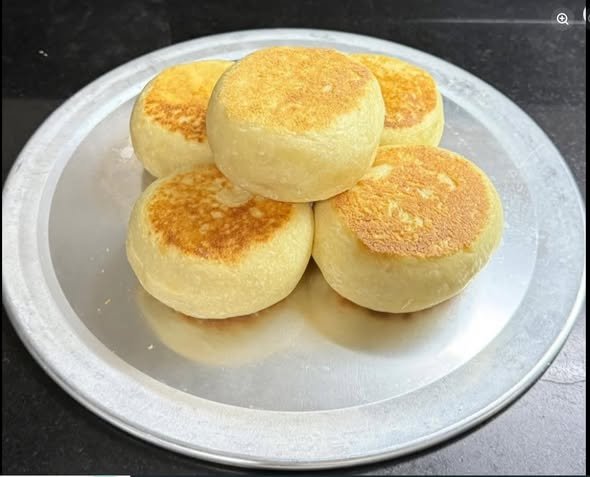
There is something wonderfully comforting about freshly made bread, especially when it comes straight from a hot skillet instead of the oven. These soft homemade skillet bread buns are golden and lightly crisp on the outside, while the inside stays fluffy, tender, and pillowy. Their beautiful round shape and golden-brown tops make them look bakery-worthy, yet they are surprisingly simple to prepare at home.
This recipe is perfect when you want fresh bread without turning on the oven. The buns are cooked gently in a covered skillet, allowing them to rise and cook evenly while developing a beautiful golden crust. They make an excellent breakfast, snack, or side dish and can be served with both sweet and savory toppings.
Why You’ll Love These Skillet Buns
The biggest advantage of these buns is their simplicity. You do not need a special bread machine or complicated equipment. A mixing bowl, rolling pin, and heavy skillet are enough.
The dough is soft and slightly enriched, giving the finished buns a tender texture. After the dough rises, it is divided into portions, shaped into thick rounds, and cooked slowly over low heat.
Unlike deep-fried breads, these buns require only a small amount of oil or butter for the skillet. This gives them a delicate golden surface without making them greasy.
They are also wonderfully versatile. Serve them warm with butter and honey, use them as breakfast rolls, or slice them open and fill them with eggs, cheese, vegetables, or cooked meat.
Ingredients
For approximately 8 soft skillet buns, you will need:
- 3 cups (375 g) all-purpose flour
- 2 tablespoons granulated sugar
- 1 teaspoon salt
- 2 teaspoons instant yeast
- ¾ cup (180 ml) warm milk
- ¼ cup (60 ml) warm water
- 2 tablespoons vegetable oil or melted butter
- 1 large egg
- Extra flour for shaping
- 1 to 2 tablespoons butter or oil for cooking
The milk helps make the buns soft and tender, while the small amount of sugar adds a gentle sweetness and helps the surface develop a beautiful golden color.
Step 1: Prepare the Yeast Mixture
If you are using active dry yeast, combine the warm milk, warm water, sugar, and yeast in a small bowl. Stir gently and allow it to sit for approximately 5 to 10 minutes.
A light layer of foam should begin to appear on the surface.
If you are using instant yeast, you can add it directly to the dry ingredients and continue with the recipe.
Make sure the liquid is warm rather than hot. Excessively hot liquid can damage the yeast and prevent the dough from rising.
Step 2: Make the Dough
Add the flour and salt to a large mixing bowl.
Pour in the yeast mixture, followed by the egg and vegetable oil or melted butter.
Mix everything together until a soft dough forms.
The dough may initially look rough and slightly sticky. This is completely normal. Once all the ingredients have come together, transfer the dough to a lightly floured surface.
Knead for approximately 7 to 10 minutes.
As you knead, the dough should become smooth, elastic, and soft. If it feels extremely sticky, add a little flour, but avoid adding too much. A dough that is too dry will produce dense buns.
You can also use a stand mixer fitted with a dough hook if you prefer.
Step 3: Let the Dough Rise
Place the kneaded dough in a lightly greased bowl.
Cover it with plastic wrap or a clean kitchen towel and leave it in a warm, draft-free place for approximately 1 to 1½ hours.
The dough should become noticeably larger and ideally double in size.
The exact rising time will depend on the temperature of your kitchen. A warm environment will speed up fermentation, while a cooler kitchen may require additional time.
Do not rush this stage. Properly risen dough is one of the secrets to achieving light and fluffy buns.
Step 4: Divide the Dough
Once the dough has risen, gently press it down to release some of the excess air.
Transfer it to a lightly floured work surface.
Divide the dough into approximately 8 equal pieces. If you want perfectly uniform buns, use a kitchen scale to weigh each portion.
Take one piece at a time and shape it into a smooth ball by folding the edges underneath.
Place the dough balls on a lightly floured tray and cover them with a clean towel.
Step 5: Shape the Buns
Gently flatten each dough ball with your palm until it becomes a thick, round disk.
You want the buns to remain fairly thick. Avoid flattening them too much because their height gives them that soft, pillowy appearance.
Cover the shaped buns again and let them rest for approximately 20 to 30 minutes.
This short second rest allows the gluten to relax and gives the yeast another opportunity to create air inside the dough.
Step 6: Heat the Skillet
Choose a heavy-bottomed skillet, cast-iron pan, or nonstick frying pan with a lid.
Lightly grease the skillet with butter or a small amount of oil.
Place the skillet over low to medium-low heat and allow it to warm gradually.
It is important not to use very high heat. The outside of the buns can brown too quickly while the center remains undercooked.
A gentle cooking temperature is the key to evenly cooked, golden buns.
Step 7: Cook the Buns
Carefully place the shaped buns into the skillet, leaving enough space between them for expansion.
Cover the skillet with a lid.
Cook the buns slowly for approximately 6 to 10 minutes on the first side.
Check the bottom occasionally. When it becomes golden brown, carefully turn each bun over.
Cover the skillet again and continue cooking for another 5 to 8 minutes.
The buns should gradually become puffed and golden on both sides.
If they are browning too quickly, reduce the heat. If they are taking too long and remaining pale, increase the heat slightly.
Every skillet behaves differently, so use the color and texture of the buns as your guide.
Step 8: Check for Doneness
The finished buns should feel light but slightly firm when gently pressed.
If you are unsure whether they are cooked through, remove one bun and cut it open. The center should be soft and fully cooked rather than sticky or doughy.
Once finished, transfer the buns to a wire rack or clean plate.
For an extra-soft crust, brush the hot buns lightly with melted butter.
Tips for Soft, Fluffy Buns
Keep the dough soft. Avoid adding too much flour while kneading.
Give the dough enough time to rise. Under-proofed dough can result in heavy buns.
Cook slowly. Low heat allows the center to cook before the exterior becomes too dark.
Use a lid. Covering the skillet traps heat and helps the buns cook evenly.
Do not overcrowd the pan. Leave enough room for each bun to expand.
Brush with butter after cooking. This adds flavor and keeps the surface pleasantly tender.
Serving Ideas
These skillet buns are delicious while still warm.
For a simple breakfast, slice one open and spread it with butter, honey, jam, or cream cheese.
For a savory meal, fill the buns with scrambled eggs, cheese, grilled chicken, vegetables, or cooked meat.
They also make excellent mini sandwich rolls. Add lettuce, tomatoes, cheese, and your favorite filling for an easy homemade lunch.
For children, serve them warm with a little butter and honey or a favorite fruit spread.
You can also turn them into a delicious afternoon snack by serving them alongside tea or coffee.
How to Store Them
Allow the buns to cool completely before storing.
Place them in an airtight container or resealable food bag and keep them at room temperature for up to a couple of days.
For longer storage, wrap the buns individually and freeze them in a freezer-safe bag.
When you want to enjoy them again, warm them gently in a skillet, microwave, or oven. A little butter added before reheating can make them taste almost freshly baked.
Easy Variations
Once you have mastered the basic dough, you can experiment with different flavors.
Add dried herbs such as oregano, parsley, or rosemary for savory buns.
For a cheesy version, mix shredded cheese into the dough or place cheese inside each bun before shaping.
You can also add garlic butter after cooking for a delicious side dish.
For a sweet variation, increase the sugar slightly and add cinnamon, vanilla, or a little cardamom. Serve the finished buns with honey or fruit preserves.
Final Thoughts
These homemade skillet bread buns are proof that you do not always need an oven to make beautiful, fluffy bread. With a simple yeast dough, a little patience, and a covered skillet, you can create soft golden buns with a wonderfully tender center.
The secret is to keep the dough soft, allow it enough time to rise, and cook the buns slowly over gentle heat. Once you get comfortable with the process, you can easily make a fresh batch whenever you need bread for breakfast, lunch, dinner, or a snack.
Serve them warm with butter, use them for sandwiches, or enjoy them straight from the skillet. Their golden crust and soft interior make these simple homemade buns a recipe you will want to make again and again.

