
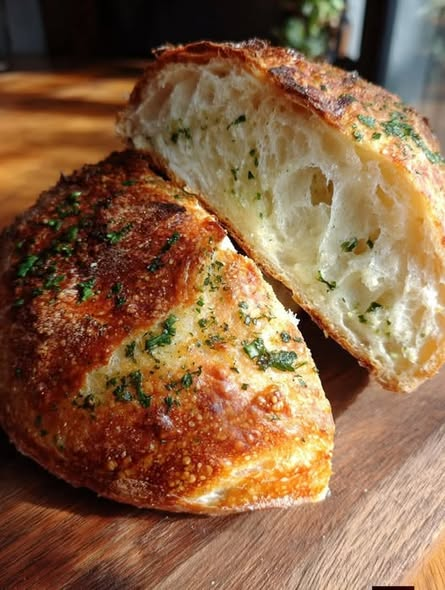
This Garlic Herb Crusty Artisan Bread is inspired by the beautiful rustic loaf in the picture—golden brown and crisp on the outside, soft and airy on the inside, with plenty of buttery garlic and fresh herbs. The loaf has a deliciously crunchy crust and a light, chewy center with beautiful air pockets. It is perfect alongside soups, pasta, grilled chicken, or simply enjoyed warm with butter.
The best part is that you don’t need a fancy bread machine. A Dutch oven and a little patience are enough to create a bakery-style loaf at home.
Ingredients
For the Bread
- 3 cups (375 g) all-purpose or bread flour
- 1½ teaspoons salt
- 1 teaspoon instant yeast
- 1½ cups (360 ml) warm water
- 1 tablespoon olive oil
- 1 teaspoon honey or sugar
For the Garlic Herb Topping
- 3 tablespoons melted butter
- 3–4 cloves garlic, finely minced
- 2 tablespoons fresh parsley, finely chopped
- 1 tablespoon fresh rosemary, finely chopped
- 1 tablespoon fresh oregano or thyme
- ¼ teaspoon salt
- ¼ teaspoon black pepper
- 1 tablespoon grated Parmesan, optional
How to Make Garlic Herb Artisan Bread
1. Prepare the Dough
Start by adding the flour, salt, and instant yeast to a large mixing bowl. Stir everything together so the ingredients are evenly distributed.
In a separate small bowl, combine the warm water, honey or sugar, and olive oil. The water should be warm but not hot. Extremely hot water can damage the yeast.
Slowly pour the liquid mixture into the flour mixture. Use a wooden spoon or your hands to combine everything until a rough, sticky dough forms.
Don’t worry if the dough looks messy at this stage. Artisan bread dough is supposed to be softer and wetter than traditional sandwich bread dough.
2. Let the Dough Rest
Cover the bowl tightly with plastic wrap or a clean kitchen towel.
Leave the dough at room temperature for about 1½ to 2 hours, or until it becomes noticeably larger and bubbly.
For even better flavor, you can let the dough rise slowly in the refrigerator overnight. The longer fermentation gives the bread a deeper, more complex flavor and helps create those beautiful large air pockets inside the loaf.
3. Shape the Loaf
Once the dough has risen, lightly flour your work surface.
Gently transfer the dough onto the surface. Try not to press all the air out of it because those air bubbles help create the open, airy texture visible in the finished bread.
Fold the edges of the dough toward the center several times, then turn it over so the smooth side is facing upward.
Shape it into a round loaf by gently pulling the dough toward you while rotating it. The goal is to create some surface tension without aggressively kneading the dough.
Place the shaped loaf on a piece of parchment paper.
Cover it loosely and allow it to rest for another 30–45 minutes.
4. Prepare the Garlic Herb Butter
While the bread is having its final rest, prepare the topping.
Add melted butter to a small bowl. Stir in the minced garlic, chopped parsley, rosemary, oregano or thyme, salt, and black pepper.
If you want an extra cheesy flavor, add a little grated Parmesan.
Mix well and set aside.
The combination of garlic, butter, and herbs will soak into the crust during baking, creating the delicious golden topping seen on the bread.
5. Score the Bread
Preheat your oven to 450°F (230°C) with a Dutch oven inside. Allow the Dutch oven to heat for at least 30 minutes.
Once the loaf has finished its second rise, carefully make one or two shallow cuts across the top using a sharp knife or bread lame.
Scoring allows the bread to expand properly in the oven instead of cracking randomly.
Brush the top generously with the garlic herb butter, saving a little for later.
If desired, sprinkle a small amount of Parmesan and additional chopped herbs over the top.
6. Bake the Bread
Carefully remove the hot Dutch oven from the oven.
Place the dough, together with its parchment paper, inside the Dutch oven.
Cover with the lid and bake for 25 minutes.
The covered environment traps steam, which helps the loaf develop a beautifully crisp crust while keeping the inside soft and airy.
After 25 minutes, remove the lid.
Reduce the oven temperature to 425°F (220°C) and continue baking for another 15–20 minutes, or until the bread becomes deeply golden brown.
For the gorgeous rustic crust shown in the picture, allow the surface to become nicely browned rather than removing the loaf too early.
If you have leftover garlic butter, brush a thin layer over the hot bread immediately after removing it from the oven.
7. Cool Before Slicing
This step is very important.
Transfer the bread to a wire rack and let it cool for at least 30–45 minutes before slicing.
Although the smell of fresh garlic bread will make it tempting to cut immediately, allowing the loaf to cool gives the interior time to finish setting.
When you finally slice it open, you should see a soft, chewy interior with irregular holes and a crisp golden crust.
Tips for the Best Artisan Bread
Use the right amount of water: The dough should be soft and slightly sticky. Avoid adding lots of extra flour because this can make the finished bread dense.
Don’t overwork the dough: Gentle handling helps preserve the air bubbles that create the open crumb.
Use fresh garlic: Freshly minced garlic gives the topping a much stronger and more delicious flavor than garlic powder.
Fresh herbs are best: Parsley, rosemary, thyme, and oregano all work beautifully. You can use whichever combination you enjoy.
Preheat the Dutch oven: A properly heated Dutch oven is one of the secrets to getting that bakery-style crust.
Don’t skip the cooling time: Cutting the bread while it is extremely hot can make the inside seem gummy.
Easy Variations
For a cheesy garlic bread, add shredded mozzarella or Parmesan during the final few minutes of baking.
For a spicy version, mix red pepper flakes or finely chopped chili into the garlic butter.
For a rosemary garlic loaf, use extra fresh rosemary and a little sea salt on top.
You can also add roasted garlic instead of fresh garlic for a sweeter, milder flavor.
How to Serve
This crusty garlic herb bread is incredibly versatile. Serve thick slices alongside creamy soups, tomato soup, chicken soup, or pasta dishes. It also makes an excellent side for grilled meat, roasted vegetables, or salads.
For a simple snack, slice the warm loaf and spread it with salted butter. The butter melts into the airy center while the crispy crust provides the perfect contrast.
You can also use leftover bread to make garlic croutons, bruschetta, or homemade breadcrumbs.
Storage
Store completely cooled bread in a paper bag or loosely wrapped kitchen towel at room temperature for up to 2 days. Avoid storing crusty bread in a sealed plastic bag because the moisture can soften the crispy crust.
For longer storage, slice the bread and freeze it in an airtight freezer-safe bag for up to 2–3 months. Reheat slices directly in the oven or toaster for a fresh, crispy texture.
Final Thoughts
This Garlic Herb Crusty Artisan Bread is the perfect recipe when you want something that looks impressive but doesn’t require complicated bread-making equipment. The golden crust, fluffy interior, fragrant garlic, and fresh herbs make every slice irresistible.
The contrast between the crunchy outside and soft, airy center is what makes this loaf so special. Serve it warm from the oven with butter, alongside your favorite meal, or enjoy it by itself for a comforting homemade treat.
