
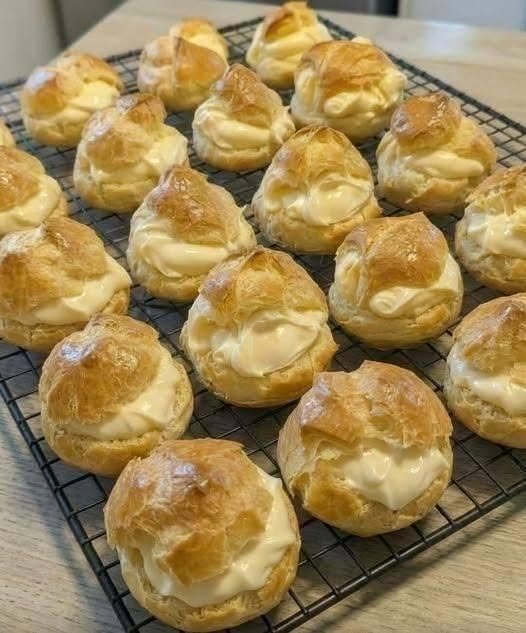
There is something irresistible about a tray of freshly baked homemade cream puffs. Golden, airy, and wonderfully crisp on the outside, these little pastries are filled with a generous amount of smooth vanilla cream. They look elegant enough for a celebration but are surprisingly simple once you understand the basic technique.
Cream puffs are made from choux pastry, a unique dough that doesn’t require yeast or baking powder. Instead, the pastry puffs dramatically in the oven because of the steam created by the water and eggs. The result is a hollow pastry with a delicate shell that’s perfect for filling.
The cream puffs pictured here have that classic rustic appearance: beautifully browned shells, slightly cracked tops, and plenty of creamy filling tucked inside. They are wonderful for afternoon tea, birthdays, showers, holidays, or simply when you’re craving a bakery-style dessert at home.
Why You’ll Love This Recipe
These cream puffs have three elements that work beautifully together:
A light and airy choux pastry
A rich, silky vanilla pastry cream
A delicate powdered-sugar finish
The shells aren’t overly sweet, which allows the creamy filling to shine. Once baked and cooled, they can be filled just before serving or prepared several hours in advance.
The recipe may look intimidating at first, but choux pastry is actually quite forgiving if you follow a few important steps.
Ingredients
For the Choux Pastry
1 cup water
½ cup unsalted butter
1 tablespoon granulated sugar
¼ teaspoon salt
1 cup all-purpose flour
4 large eggs, at room temperature
For the Vanilla Cream Filling
2 cups whole milk
½ cup granulated sugar
4 large egg yolks
¼ cup cornstarch
2 tablespoons unsalted butter
2 teaspoons vanilla extract
Pinch of salt
Optional Finish
Powdered sugar
Melted chocolate
Fresh berries
Caramel sauce
How to Make Homemade Cream Puffs
- Prepare the Choux Dough
Preheat your oven to 425°F (220°C) and line a baking sheet with parchment paper.
Add the water, butter, sugar, and salt to a medium saucepan.
Heat over medium heat until the butter has completely melted and the mixture comes to a full boil.
Once it begins boiling, remove the saucepan from the heat and immediately add all of the flour.
Stir vigorously with a wooden spoon or sturdy spatula.
At first, the mixture will look lumpy, but continue stirring until it forms a smooth ball of dough.
Return the saucepan to medium-low heat.
Cook the dough for approximately 1–2 minutes, stirring constantly. This step removes some of the excess moisture and helps create the structure needed for beautifully puffed pastries.
The dough should pull away from the sides of the pan and leave a thin film on the bottom.
- Add the Eggs
Transfer the hot dough to a mixing bowl.
Let it cool for several minutes so that it is warm rather than scorching hot.
Add the eggs one at a time, mixing thoroughly after each addition.
Don’t worry if the dough looks separated after adding an egg. Keep mixing and it will come back together.
The finished dough should be smooth, glossy, and thick enough to hold its shape.
You may not need every drop of the final egg, depending on the size of your eggs and how much moisture was cooked from the dough.
A useful test is to lift some dough with your spatula. It should fall slowly and form a thick V-shaped ribbon.
- Pipe the Cream Puffs
Transfer the dough to a piping bag fitted with a large round tip.
Pipe approximately 2-inch rounds onto the prepared baking sheet, leaving several inches between each one.
If small peaks remain on top, lightly wet your fingertip and gently flatten them.
Try to make the portions as evenly sized as possible so they bake at the same rate.
For the beautiful rounded shape shown in the photograph, avoid making the pastry too flat. The dough should be piped into compact little mounds.
- Bake Until Golden
Place the tray in the preheated oven.
Bake at 425°F for approximately 15 minutes.
Then reduce the temperature to 375°F (190°C) and continue baking for another 15–20 minutes.
The pastries should become deeply golden and feel relatively light when lifted.
Avoid opening the oven during the first part of baking. A sudden drop in temperature can cause the delicate pastries to collapse.
Once they are beautifully browned, turn off the oven.
You can leave the cream puffs inside for another 5–10 minutes with the oven door slightly cracked. This helps dry the interiors.
Transfer them to a wire rack and allow them to cool completely.
- Make the Vanilla Pastry Cream
While the pastry shells cool, prepare the filling.
Heat the milk in a saucepan until steaming but not boiling.
In a separate bowl, whisk together the egg yolks, sugar, cornstarch, and salt until smooth and pale.
Slowly pour some of the hot milk into the egg mixture while whisking constantly.
This process, called tempering, gently raises the temperature of the eggs without scrambling them.
Pour the mixture back into the saucepan.
Cook over medium heat while whisking constantly.
After several minutes, the mixture will thicken dramatically.
Once it reaches a thick pudding-like consistency, remove it from the heat.
Stir in the butter and vanilla extract.
Transfer the pastry cream to a clean bowl and press plastic wrap directly against the surface.
Refrigerate until completely chilled.
- Fill the Cream Puffs
Once the shells and pastry cream are completely cool, you’re ready for the best part.
There are two easy ways to fill the pastries.
Method One: Cut and Fill
Use a serrated knife to cut each cream puff horizontally.
Spoon or pipe a generous amount of vanilla pastry cream into the bottom half.
Place the top back on.
This method gives you the beautiful appearance seen in the photograph, with the cream visibly peeking out between the two halves.
Method Two: Pipe From the Bottom
Use a small piping tip to make a hole in the bottom of each pastry.
Pipe the pastry cream directly into the hollow center.
This method gives the cream puffs a cleaner appearance and keeps the filling contained inside.
The Secret to Light, Crisp Cream Puffs
The biggest secret to successful cream puffs is proper moisture control.
The dough needs enough moisture to create steam in the oven, but the finished shells also need to dry sufficiently so they don’t collapse.
That’s why baking time matters.
If the shells are removed too early, they may look beautifully puffed but collapse as they cool.
Don’t be afraid of a rich golden-brown color. Slightly darker shells are generally preferable to pale ones because they are more thoroughly dried.
Another important tip is to avoid adding all of the eggs automatically. Egg size varies, and the amount of moisture remaining in your dough after cooking also varies.
Add the eggs gradually and watch the consistency.
Make-Ahead Tips
Cream puffs are excellent for entertaining because several components can be prepared ahead of time.
The pastry cream can be made 1–2 days in advance and stored in the refrigerator.
The baked shells can also be prepared ahead. Store completely cooled, unfilled shells in an airtight container.
If the shells lose some crispness, place them in a 300°F oven for approximately 5–10 minutes to refresh them. Allow them to cool before filling.
For the best texture, fill the cream puffs relatively close to serving time. The longer the pastry sits with filling inside, the softer the shell becomes.
Delicious Variations
Once you’ve mastered the basic recipe, there are many ways to customize these pastries.
Chocolate Cream Puffs
Add melted chocolate or cocoa to the pastry cream for a rich chocolate filling.
Strawberry Cream Puffs
Fold finely chopped strawberries into lightly sweetened whipped cream and use it instead of pastry cream.
Coffee Cream Puffs
Add a small amount of instant espresso powder to the vanilla pastry cream for a coffeehouse-inspired version.
Chocolate-Topped Puffs
Dip the tops of the finished cream puffs into melted chocolate and allow the chocolate to set.
Lemon Cream Puffs
Add fresh lemon zest and a little lemon juice to the pastry cream for a bright, refreshing filling.
How to Store Them
Unfilled pastry shells can be stored at room temperature in an airtight container for approximately 1–2 days.
Filled cream puffs should be refrigerated because the pastry cream contains dairy and eggs.
For the best texture, enjoy filled cream puffs within 24 hours.
If you’re serving them at a gathering, keep them chilled until shortly before serving.
Final Thoughts
Homemade cream puffs may look like something that belongs behind the glass counter of a French bakery, but they’re absolutely achievable in your own kitchen.
The key is learning how the choux pastry should look at each stage. Cook the flour mixture properly, add the eggs gradually, pipe consistent portions, and bake the shells until they’re deeply golden and dry.
Then comes the reward: cracking open one of those light, crisp pastries and filling it with silky vanilla cream.
For an especially beautiful presentation, arrange the finished cream puffs on a large serving platter and dust them lightly with powdered sugar just before serving. The contrast between the golden pastry and pale cream makes them look every bit as inviting as the batch pictured above.
A simple choux pastry, a rich vanilla filling, and a little patience are all you need to make bakery-style cream puffs at home. Once you’ve made them successfully, you’ll have a versatile pastry recipe that can be adapted for chocolate, coffee, fruit, caramel, or almost any filling you can imagine.

