
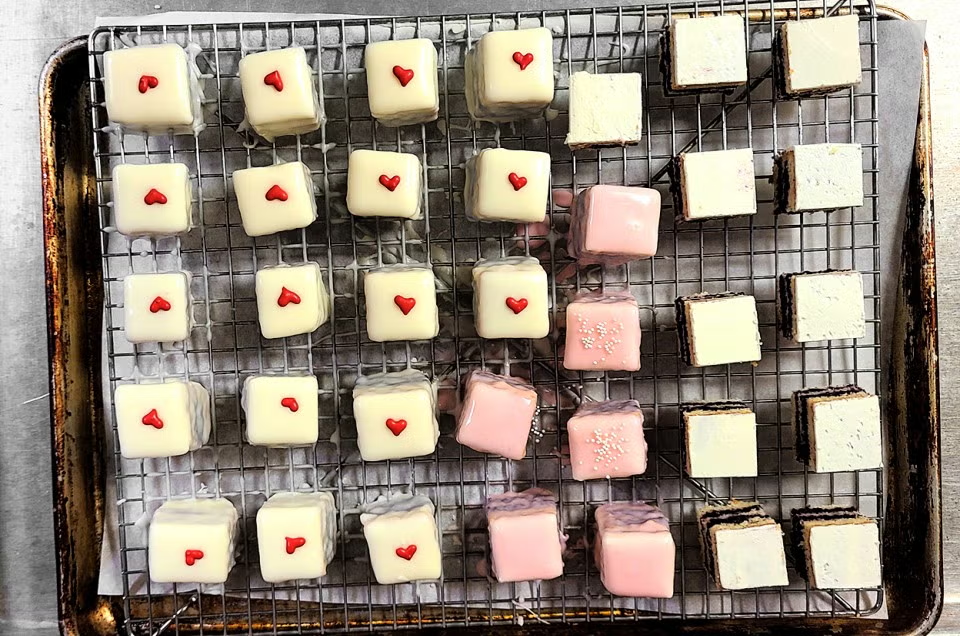
There is something undeniably special about tiny desserts. Maybe it is because they look like little gifts, each one made to be picked up, admired, and enjoyed in just a few delicious bites. These adorable heart-topped petit fours are exactly that kind of treat—delicate, creamy, colorful, and perfect for sharing with the people you love.
Inspired by the beautiful bite-sized cakes pictured above, this recipe features soft vanilla cake layered with a sweet filling, cut into neat little squares, and covered with a smooth white or pastel-pink coating. Tiny red hearts, sprinkles, or other decorations add the final touch.
These little cakes are perfect for Valentine’s Day, Mother’s Day, bridal showers, baby showers, afternoon tea, birthdays, anniversaries, or simply those days when you want to make an ordinary afternoon feel a little more beautiful.
The best thing about petit fours is that they look much more complicated than they really are. With a few simple techniques and a little patience, you can create a tray of elegant miniature cakes right in your own kitchen.
What Are Petit Fours?
Petit fours are small, decorative cakes traditionally made from sponge cake, layered with fillings, covered with icing or chocolate, and decorated beautifully. The name comes from French and roughly translates to “small oven.”
For this homemade version, we are keeping things approachable. You can use a soft vanilla sheet cake as the base, a simple buttercream or jam filling between the layers, and a white chocolate glaze to create that smooth finish seen in the photograph.
The cakes can be made in different colors and decorated however you like. White coating gives them a classic, elegant appearance, while pink coating makes them especially charming for romantic celebrations.
Ingredients
For the Cake
1 1/2 cups all-purpose flour
1 1/2 teaspoons baking powder
1/4 teaspoon salt
1/2 cup unsalted butter, softened
3/4 cup granulated sugar
2 large eggs
2 teaspoons vanilla extract
1/2 cup whole milk
For the Filling
1/2 cup softened butter
1 1/2 cups powdered sugar
1 teaspoon vanilla extract
1–2 tablespoons milk or heavy cream
2–3 tablespoons raspberry or strawberry jam, optional
For the Coating
16 ounces white chocolate or white candy melts
1–2 tablespoons coconut oil or shortening, if needed
A few drops of pink food coloring, optional
For Decoration
Small red heart candies or heart sprinkles
White or pink sprinkles
Edible glitter, optional
Finely crushed freeze-dried strawberries, optional
How to Make the Cake
Begin by preheating your oven to 350°F (175°C). Line a rectangular baking pan with parchment paper, leaving a little overhang on the sides. This makes it easier to lift the finished cake from the pan.
In a medium bowl, whisk together the flour, baking powder, and salt. Set this mixture aside.
In a large mixing bowl, beat the softened butter and sugar together until light and fluffy. This usually takes about 2–3 minutes. Add the eggs one at a time, mixing well after each addition. Stir in the vanilla.
Add the dry ingredients gradually, alternating with the milk. Begin and finish with the dry ingredients. Mix only until the batter is smooth. Overmixing can make the cake dense, and we want a soft, tender texture.
Spread the batter evenly into the prepared pan and bake for approximately 18–22 minutes, or until the center springs back lightly when touched and a toothpick inserted into the middle comes out clean.
Allow the cake to cool completely before assembling the petit fours.
Prepare the Filling
While the cake cools, prepare the buttercream.
Beat the softened butter until creamy. Gradually add the powdered sugar, mixing on low speed at first to prevent a cloud of sugar from covering your kitchen.
Add the vanilla and one tablespoon of milk or cream. Beat for another 2–3 minutes until the buttercream becomes smooth and fluffy.
If you want a fruity flavor, spread a very thin layer of raspberry or strawberry jam over the cake before adding the buttercream. The slight tartness of the fruit is wonderful with the sweetness of the white chocolate coating.
Assemble the Layers
Once the cake has completely cooled, carefully remove it from the pan.
Trim the edges with a sharp knife so you have a neat rectangle. This step is optional, but it will make the finished petit fours look much more polished.
Slice the cake horizontally into two layers if your cake is thick enough. Spread a thin, even layer of buttercream over the first layer. Add a thin layer of jam if desired, then place the second cake layer on top.
Gently press down so the layers adhere without squeezing the filling out from the sides.
For the neatest results, refrigerate the assembled cake for 30–60 minutes. A chilled cake is much easier to cut into clean squares.
Cut the Petit Fours
Use a sharp knife to cut the cake into small squares. You can make them approximately 1 1/2 to 2 inches wide, depending on how large you want each dessert.
For especially clean edges, wipe the knife with a warm, damp cloth between cuts.
Do not worry if the first few pieces are not perfect. Petit fours are handmade treats, and their slight individuality is part of their charm.
Arrange the little squares on a wire rack placed over a baking sheet lined with parchment paper. The rack allows excess coating to drip away rather than collecting around the bottoms of the cakes.
Make the White Chocolate Coating
Melt the white chocolate or candy melts gently in the microwave in 20–30-second intervals, stirring after each interval.
Alternatively, melt the chocolate in a heatproof bowl over a saucepan of gently simmering water.
Do not allow water or steam to come into contact with the chocolate, as this can cause it to seize.
If the melted chocolate is too thick for dipping or pouring, stir in a small amount of coconut oil or shortening until you reach a smooth, flowing consistency.
For pink petit fours, divide some of the melted coating into a separate bowl and add a tiny amount of pink food coloring. Gel coloring generally gives you stronger color without adding much liquid.
Coat the Cakes
Place each chilled cake square on the wire rack. Spoon the melted coating over the top, allowing it to gently run down the sides.
You can also carefully dip the cakes if your coating is thin enough, but spooning the coating over them often gives you more control.
Use a small spatula or knife to smooth the tops if necessary.
Allow the excess coating to drip through the rack. If the first layer looks thin, let it set slightly and add a second layer.
While the coating is still soft, add a tiny red heart to the center of each cake.
You can alternate between white and pink coatings to create a beautiful assortment. Some cakes can be decorated with hearts, while others can be finished with sprinkles or a dusting of edible glitter.
The Secret to Beautiful Petit Fours
The key to making these little cakes look professional is temperature.
Your cake should be completely cool before you apply the coating. Chilling the assembled cake also makes cutting much easier.
At the same time, the chocolate coating should be warm enough to flow smoothly but not so hot that it melts the buttercream.
Work in small batches if necessary. If the cakes become too warm while you are decorating them, place the tray in the refrigerator for a few minutes.
Another important tip is to avoid making the filling too thick. A thin, even layer creates attractive little cake sandwiches without making the squares difficult to coat.
Creative Variations
There are countless ways to customize these petit fours.
For a chocolate version, replace a small portion of the flour with unsweetened cocoa powder and use chocolate buttercream.
For a lemon version, add finely grated lemon zest to the cake and use lemon curd as the filling.
For a strawberry version, add strawberry jam between the layers and decorate the pink-coated cakes with freeze-dried strawberry crumbs.
You can also experiment with pastel colors such as lavender, pale blue, mint green, or peach. These shades are especially beautiful for baby showers and afternoon tea parties.
Instead of squares, cut the cake into tiny rectangles, circles, diamonds, or hearts.
How to Store Them
Store the finished petit fours in an airtight container in the refrigerator. They can generally be kept for several days, although they are at their freshest within the first two or three days.
Before serving, allow them to sit at room temperature for approximately 15–20 minutes. This allows the buttercream to soften slightly and improves the texture.
If you are preparing them for an event, you can make the cake and filling ahead of time, assemble them, and refrigerate them. Coat and decorate the petit fours closer to serving time for the freshest appearance.
Perfect for Every Celebration
These heart-topped petit fours are more than just pretty desserts. They are the kind of little treats that make people smile before they even take the first bite.
Arrange them on a beautiful serving platter, place them beside cups of tea or coffee, and watch how quickly they disappear.
They are especially lovely as edible gifts. Pack a few into small boxes lined with parchment paper, tie them with ribbon, and you have a homemade present that feels thoughtful and personal.
Final Thoughts
There is a certain magic in making tiny desserts by hand. Each little cake requires attention, patience, and a touch of creativity. But when the final tray is covered with glossy white and pink squares, each decorated with a tiny heart, all that effort feels worthwhile.
These sweet petit fours combine soft vanilla cake, creamy filling, smooth white chocolate, and charming decorations in one irresistible bite. They are elegant enough for celebrations yet simple enough to make at home.
Most importantly, they are made for sharing. Because sometimes the smallest desserts carry the biggest message: a little sweetness, a little love, and a beautiful moment enjoyed together.
Recipe at a Glance
Prep time: 30 minutes
Bake time: 20 minutes
Chilling time: 45–60 minutes
Decorating time: 30 minutes
Total time: About 2 hours
Yield: Approximately 24–30 mini petit fours
Difficulty: Intermediate
A little cake, a little sweetness, and a tiny heart on top—because the most beautiful desserts are the ones made with love. ❤️

