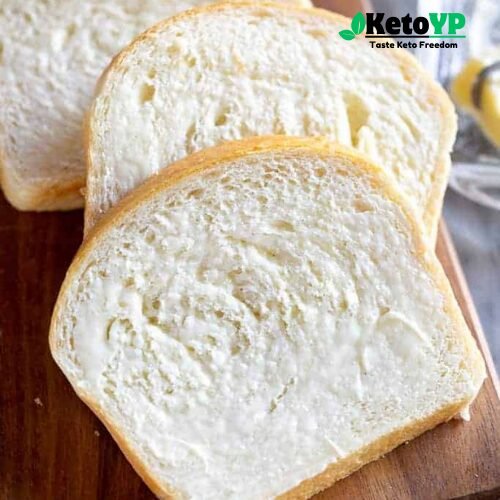
The unbeatable smell of freshly Homemade Bread Recipe coming out of your own oven! This no-fuss recipe will guide you step by step into creating a soft, airy loaf of bread with just the perfect golden crust—to toast for sandwiches, make crispy slices for breakfast or snuggle up with for some good old-fashioned, spread-the-butter on and get-warm delight. Dive into the art of bread-making and bring a taste of the bakery right into your kitchen!

There is so much to love about this bread recipe! If I had to narrow it down to the best parts, it would be that it only requires pantry staples: no milk, eggs, or butter are needed! It is also super simple and nearly foolproof. Whether you are a beginner or an experienced bread baker, this recipe is almost impossible to mess up, and I can assure you it will be a hit in your kitchen!
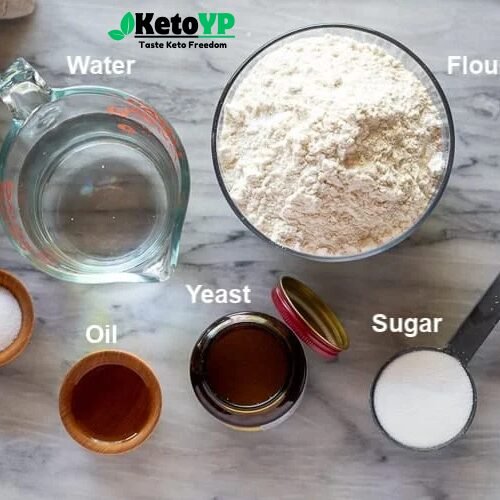
Ingredients Needed:
Warm Water (105-115°F): This will activate the yeast and start getting the rise going.
Active Dry Yeast: Instant or rapid rise yeast works too, just follow my adjustments in the recipe card.
Granulated Sugar or Honey: Feeds the yeast and adds tenderness to the bread.
Salt: Flavor booster
Oil: Vegetable, canola, or melted butter – your choice.
Flour: Use bread flour or All-Purpose flour, and the recipe as is, unless you must adjust for higher elevations or drier environments. This dough should form shaggy, more easily divided, but will still slightly stick to your fingers. Avoid overflouring to ensure airy, tender bread!

Do I need a Bread Maker or Stand Mixer?
No special equipment is required for this white bread recipe! If you have a stand mixer, it will make the process easier, but a mixing bowl and a wooden spoon are all you really need. Then you can knead the dough by hand. If you have a bread machine, you can also use it with this recipe, though you may have to cut the ingredients in half to make a single loaf, depending on the size of your machine.
Homemade Bread Recipe
Proof the yeast: Mix yeast and sugar or honey in a large bowl or stand mixer with warm water. Let it be frothy and bubbly for 5-10 minutes. This step-proofing-is the proof that the yeast will be active; if there is no foam, that yeast may not be active-restart with fresh yeast.

Prepare the Dough: Add sugar or honey, salt, oil, and 3 cups of flour to yeast mixture. Mix to combine. Gradually add a cup of flour and mix, then continue adding it in ½ cup parts until the dough begins pulling away from the sides of the bowl.
Knead the Dough: Knead the dough on medium speed for 5 minutes or by hand on a lightly floured surface for 5-8 minutes. Dough should be smooth, elastic, a little bit sticking to a clean finger but not too wet.
First Rise: Grease an extra-large mixing bowl with oil or cooking spray. Add the dough, cover it with a dish towel or plastic wrap, and let it rise in a warm place* until it has doubled in size. That should take about 1 ½ hours.

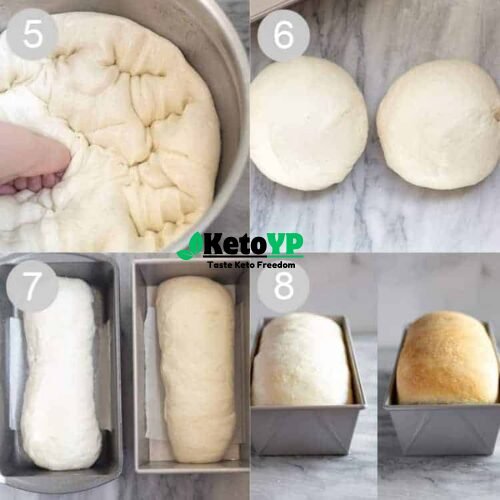
Punch Down the Dough: Gently punch the dough down to release air bubbles.
Form the Loaves: Divide the dough in half and work each half into a log shape before placing them into greased loaf pans.
Second Rise: Spray two pieces of plastic wrap lightly with cooking spray, then put the plastic wrap lightly over the tops of the pans so that the dough can rise to 1 inch above the loaves for the final 45-60 minutes.
Bake: Preheat oven to 350°F with rack in lower/middle position. Bake for 30-33 minutes, or until tops are golden brown. Tap top of a loaf; it should sound hollow when fully baked.
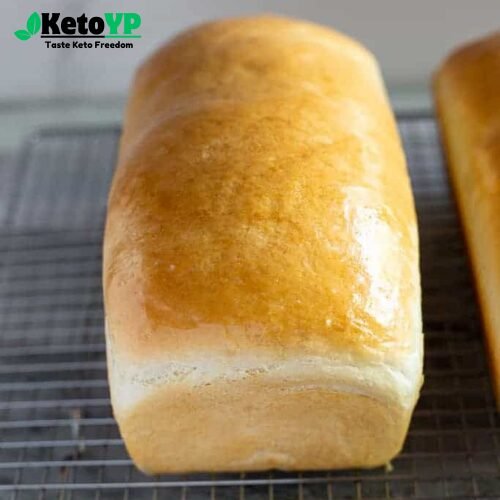
Cool: Invert baked loaves onto a wire cooling rack. Brush tops with butter, then let bread cool at least 15 minutes before slicing.
Storage: Refrigerate after cooling. Store bread in an airtight container or in an airtight bag at room temperature for 2-3 days or in the refrigerator for up to 5 days.

Make Ahead And Freezing Instructions For Homemade Bread Recipe
Make Ahead: Mix dough through step 4, place in a large, airtight container and refrigerate for up to 1 day. Bring to room temperature, punch down, and shape into loaves.
Freezing Bread Dough: Mix the dough to step 6 (just before the second rise). Formed loaves may be placed in a freezer-safe or disposable aluminum bread pan, covered tightly with two layers of aluminum foil, and frozen for up to 3 months. Loaves are thawed and allowed to finish the second rise at room temperature for about 5 hours, then baked as directed.
Freeze baked bread: cool completely and then place the loaves into freezer-safe resealable bags. It freezes well for up to 3 months. Allow it to thaw at room temperature or in the fridge overnight when you’re ready to serve.
Variations:
Cinnamon Swirl Bread: After you’ve punched down and divided the dough into two pieces at step 7, roll each of these pieces out into a rectangle. Sprinkle ¼ cup sugar with 2 teaspoons cinnamon over the dough leaving a 1-inch border around the dough, then roll up tightly into a log and pinch ends to seal before placing seam side down into the loaf pan. Resume at step 8.Raisin Bread: Add 2 cups of raisins in step 3 and then do the cinnamon swirl instructions.

TIPS For Homemade Bread Recipe
Check Your Yeast Freshness: Make sure your yeast is fresh and active. If your yeast is old or past its expiration date, it will not foam when you are proofing it. This means your bread won’t rise as expected.
Temperature of Water Matters: You should use warm water of 105-115°F to activate the yeast. Water that is too hot can kill the yeast. Water that is too cold won’t activate it well.
Measure Flour Correctly: Use a spoon, and level the flour when you’re measuring it correctly. This way, not too much is packed in your measuring cup. There’s nothing worse than this amount of flour making your bread heavy and dense.
Tacky dough should be relatively smooth and elastic. Then add a little flour; when it pulls back just a little from the sides of your bowl, stop – do not add too much or you will dry it out.
Rising Environment: If your kitchen is cool, let dough rise in a slightly warm, off oven. Just turn the oven on for a few minutes; turn it off before putting the dough in to rise.
Punching Down: Once your dough has risen, punch it down to remove air bubbles. This helps achieve a consistent crumb texture and avoids holes in your bread.
Double Rising is Magic: The dough will rise in the dough ball and then again in the loaf pan. This ensures it gets a lighter texture and a better flavor to the bread.
Positioning in Oven: In order to bake it evenly, place the oven rack in the center or lower-middle position. Thus, it reduces the chances of the top getting too browned before the rest is done.
Hollow Sound Test: Tap the top of the loaf after baking; it should sound hollow. This means that it is well-done.
Cool Before Slicing: Cool the bread to at least 15-20 minutes on a wire rack before slicing. This does not let it crumble and the crumb starts to set.
FAQs For Homemade Bread Recipe
1. Can I substitute instant yeast for active dry yeast?
Yes, you can use instant or rapid-rise yeast. Instant yeast needs no rehydrating with water; you can add it directly to the flour. You might get a little more aggressive rise, so keep an eye on your dough.
2. Why did my bread not rise?
Maybe, your yeast is dead. You’ll want to determine if you’re yeast will be frothing when it proofs. So, if your yeast’s not frothing, possibly it has run out already or has stopped working, and the other thing might be the water temperature too, as that could just kill the yeast by being much too hot; just heat it up and let it be warm; it will be at the temperature ranging from 105-115°F.
3. How can I tell my dough has taken enough flour?
This dough should be smooth, elastic, and tacky enough not to stick heavily to your fingers. Gradually add flour in ½-cup increments, stirring with a rubber spatula after each addition until the dough starts to come away from the sides of the bowl.
4. Can this recipe be made gluten-free?
This recipe works well for bread or all-purpose flour, but some gluten-free flours can be used – results vary since gluten will provide the bulk of structure and texture to the bread. A better choice may be a gluten-free bread-specific recipe.
5. Is there a way to obtain a softer crust?
Brushing the top of the loaf with melted butter right after baking can soften the crust. Even cooling the loaf in an airtight container or bag can help lock in moisture.
6. Why is my bread dense or heavy?
Dense bread typically results from too much flour or under-kneading. Measure flour carefully and avoid adding too much. Proper kneading helps develop gluten, which gives bread that light, airy texture.
7. How do I store freshly baked bread?
Keep cooled bread in an airtight container or bag at room temperature for 2-3 days. Keep it in the refrigerator for up to 5 days or freeze it for up to 3 months if you want to keep it for longer periods.
8. Can I freeze the dough?
Yes! Shape the dough, put it in a loaf pan, and freeze before the second rise. Let it thaw and finish out the second rise at room temperature (about 5 hours) before baking.
9. Can I double the recipe?
Absolutely! You can double the ingredients to make four loaves instead of two. Make sure you have sufficient mixing and kneading capacity in your bowl or stand mixer.
10. How do I know if my bread is cooked?
Tap the loaf top after baking. It will have a hollow sound. You should use a thermometer to make sure the inside of the bread has reached 190°F.
Homemade Bread Recipe
24
servings15
minutes20
minutes202
kcalIngredients
4 – 5 1/2 cups all-purpose or bread flour*2 cups warm water (105-115 degrees)
1 Tablespoons active dry yeast*
1/4 cup honey or sugar
2 teaspoons salt
2 Tablespoons oil (canola or vegetable)
Directions
- Proof the Yeast: Mix the yeast, warm water, and a pinch of sugar or honey in a big bowl or stand mixer. Let it sit for 5-10 minutes until it becomes frothy and bubbly. This process, called “proofing,” verifies that the yeast is active. If you do not see foam, it may be that your yeast is dead; start over with fresh yeast.
- Mix Dough Ingredients: Add the remaining sugar or honey, salt, oil, and 3 cups of flour to the yeast mixture, and mix until combined. Gradually add another cup of flour, then continue adding flour ½ cup at a time with the mixer running, until the dough begins to pull away from the bowl’s sides. The dough should be smooth, elastic, and slightly tacky without being overly sticky. Add a bit more flour if needed.
- Knead the Dough: Knead the dough on medium speed for 4-5 minutes (or by hand on a lightly floured surface for 5-8 minutes).
- First Rise: Grease a large bowl with oil or cooking spray and place the dough inside, turning to coat. Cover the bowl with a dish towel or plastic wrap, and allow the dough to rise in a warm place until doubled in size, about 1 ½ hours.
- Prepare Bread Pans: Spray two 9×5-inch loaf pans abundantly with cooking spray on all sides. Optional: Put a small piece of parchment paper in the bottom of the pans.
- Punch and Shape: Punch the dough down to release air bubbles. Divide it into two equal parts, shape each into a log, and place in prepared loaf pans.
- Second Rise: Lightly spray a clean, dry dish towel over the pans, or spritz two sheets of plastic wrap with cooking spray, gently placing them over the pans. Let it rise again for 45 minutes to an hour, when it will have just started to rise about an inch above the loaf pans. Gently remove the cover before baking.
- Bake: Preheat the oven to 350°F. Bake for 30-33 minutes, or until the tops are golden brown. Tap the top of a loaf; it should sound hollow when fully baked.
- Cool: Invert the loaves onto a wire cooling rack and brush the tops with butter. Let the bread cool for at least 10 minutes before slicing.
- Storage: After cooled, store in a closed container or plastic bag at room temperature for 2-3 days, or in the refrigerator for 5 days.
Notes
- Flour Options: Both bread flour and all-purpose flour can be used interchangeably in this recipe without adjustments. If you prefer a chewier texture, opt for bread flour. However, be cautious with whole wheat flour; it cannot be substituted cup-for-cup due to its different gluten levels. For a delicious whole wheat option, check out my favorite Whole Wheat Bread recipe.
Yeast Substitution: If using instant or rapid-rise yeast, skip the proofing step. Simply mix the yeast directly with the other ingredients in step 2. Be aware that rise times will be shorter with instant yeast, so keep an eye on the dough.
Quick-Rise Tip: To accelerate the first rise, follow these steps: after mixing the dough, place it in a well-greased bowl, turning it to coat all sides. Cover the bowl with plastic wrap. Preheat your oven to 180°F and then turn it off. Place the covered bowl in the oven, leaving the door slightly ajar, and let the dough rise until doubled in size. This method creates a warm environment that encourages faster rising.
Make Ahead: If you want to prepare the dough in advance, complete the process up to step 4 (before the first rise). Store the dough in a large airtight container in the refrigerator for up to one day. When ready, remove it from the fridge and let it come to room temperature before proceeding with the punching down and shaping into loaves.
Freezing Instructions:
For Freezing Dough: Prepare the recipe up to step 6 (before the second rise). Place the shaped loaves in freezer-safe or disposable aluminum pans. Cover them tightly with a double layer of aluminum foil and freeze for up to 3 months. When you’re ready to bake, allow the loaves to thaw and complete the second rise at room temperature for about 5 hours, then bake as directed.
For Freezing Baked Bread: After the baked bread has cooled completely, place each loaf in a freezer-safe resealable bag and freeze for up to 3 months. To thaw, leave the bread at room temperature on the countertop or refrigerate it overnight.
Using a Bread Machine: If you prefer using a bread machine, consider halving this recipe to make just one loaf, depending on your machine’s capacity. Always refer to your bread machine’s manual for specific instructions.
Nutrition Facts
24 servings per container
- Amount Per ServingCalories202
- % Daily Value *
- Total Fat
2g
4%
- Saturated Fat 1g 5%
- Sodium 196mg 9%
- Potassium 56mg 2%
- Total Carbohydrate
41g
14%
- Dietary Fiber 1g 4%
- Sugars 3g
- Protein 5g 10%
- Calcium 8%
- Iron 2%
* The % Daily Value tells you how much a nutrient in a serving of food contributes to a daily diet. 2,000 calories a day is used for general nutrition advice.


