
There is something wonderfully comforting about a loaf of homemade bread. The smell of a freshly baked loaf filling the kitchen, the crisp golden crust, and the soft, airy center make bread baking feel like a special occasion—even when you are simply preparing breakfast for your family. This artisan no-knead bread is one of those recipes that looks impressive but is surprisingly simple to make.
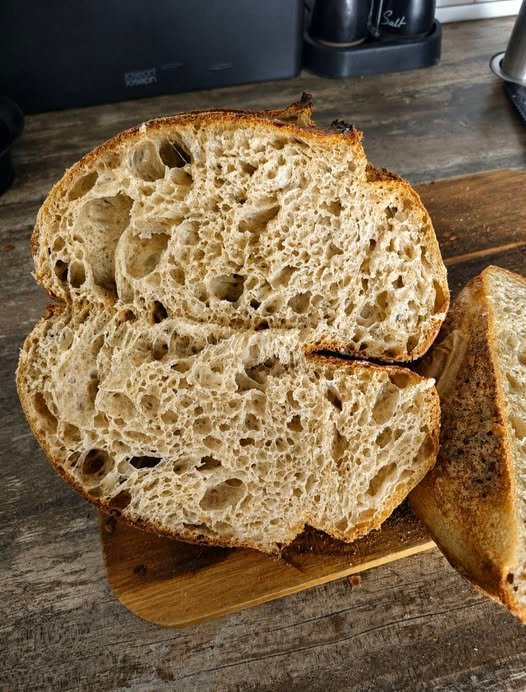
The beautiful loaf in the photo has a rustic golden crust and an exceptionally open, hole-filled crumb. That texture comes from a wet dough, a small amount of yeast, and, most importantly, a long fermentation. Unlike traditional bread recipes, this one does not require vigorous kneading. Time does most of the work for you.
Why You’ll Love This Bread
The biggest advantage of no-knead bread is its simplicity. You do not need a stand mixer, special bread machine, or advanced baking skills. A bowl, spoon, flour, yeast, water, salt, and a Dutch oven are enough.
The long resting period allows the yeast to slowly develop flavor while the dough naturally builds strength. When baked inside a preheated Dutch oven, the trapped steam helps create a beautifully crisp crust while keeping the interior moist and light.
This bread is perfect for sandwiches, toast, breakfast, soups, or simply eating warm with butter.
Ingredients
For one large artisan loaf, you will need:
- 3 ½ cups (about 450 g) all-purpose or bread flour
- 1 ½ teaspoons salt
- ¼ teaspoon instant yeast
- 1 ½ cups (360 ml) lukewarm water
- A little extra flour for shaping
- Parchment paper for baking
Bread flour can give you a slightly chewier loaf, while all-purpose flour works very well and is easy to find.
Equipment
You only need a few basic items:
- Large mixing bowl
- Wooden spoon or spatula
- Kitchen towel or plastic wrap
- Dutch oven with a lid
- Parchment paper
- Wire cooling rack
A kitchen scale is also helpful because measuring flour by weight gives more consistent results.
Step 1: Mix the Dough
Add the flour, salt, and instant yeast to a large mixing bowl. Stir briefly to distribute the ingredients evenly.
Pour in the lukewarm water and mix everything together with a wooden spoon or spatula. Continue stirring until there are no large patches of dry flour.
The dough should look rough, sticky, and somewhat shaggy. Do not worry if it does not look smooth. This is exactly what you want at this stage.
There is no need to knead the dough. Simply cover the bowl tightly with plastic wrap or a clean kitchen towel.
Step 2: Let the Dough Ferment
This is the most important part of the recipe.
Leave the covered dough at room temperature for approximately 12 to 18 hours. A slightly warm kitchen may require less time, while a cooler kitchen can take longer.
During this period, the yeast slowly ferments the dough. You will notice that it becomes larger, bubbly, and full of air pockets. These bubbles are responsible for the beautiful open crumb seen in artisan bread.
Do not rush this stage. The long fermentation is what gives the loaf its flavor and texture.
Step 3: Shape the Dough
Once the dough has risen, generously flour your work surface. Carefully turn the dough out of the bowl.
Because the dough is wet and sticky, use floured hands. Gently fold the edges toward the center several times. You are not trying to knead the dough; you simply want to create a loose, rounded shape.
Avoid pressing the dough aggressively because you want to preserve as much of the fermentation-created air as possible.
Place the shaped dough onto a piece of parchment paper. Cover it lightly with a clean towel and let it rest for another 30 to 60 minutes.
Step 4: Preheat the Dutch Oven
While the dough is resting, place your Dutch oven and its lid inside the oven.
Preheat the oven to 230°C (450°F). Allow the Dutch oven to heat for at least 30 minutes.
Preheating the Dutch oven is essential. When the cold dough enters the extremely hot pot, it immediately begins baking and rising. The enclosed environment also traps steam, which helps produce that distinctive crisp artisan crust.
Be extremely careful when handling the hot Dutch oven and always use appropriate oven gloves.
Step 5: Bake the Bread
Carefully remove the hot Dutch oven from the oven.
Using the parchment paper as a sling, lower the dough into the Dutch oven. If desired, you can make one or two shallow cuts across the top of the dough with a sharp knife. These cuts give the expanding loaf room to open during baking.
Cover the Dutch oven with its lid and return it to the oven.
Bake covered for approximately 30 minutes. The covered environment traps steam, allowing the bread to develop a thin, crisp crust while continuing to expand.
After 30 minutes, carefully remove the lid. Continue baking for another 10 to 15 minutes, or until the crust becomes a rich golden brown.
If you prefer a darker, crunchier crust, you can give it a few additional minutes, but keep a close eye on it.
Step 6: Cool Completely
When the bread is finished, carefully remove it from the Dutch oven and transfer it to a wire rack.
This is the hardest part: do not cut it immediately!
Allow the loaf to cool for at least one hour before slicing. Although the bread may smell irresistible, cutting it while it is extremely hot can cause the interior to become gummy.
Once cooled, use a serrated bread knife to slice through the crust. You should see a light, airy interior filled with irregular holes.
Tips for Perfect No-Knead Bread
For the best results, remember that dough consistency can change depending on the flour and weather. If your dough seems extremely wet, avoid adding large amounts of flour. A little flour on your hands and work surface is usually enough.
Temperature also affects fermentation. In a warm kitchen, the dough may rise faster. In a cooler environment, it may need additional time.
Most importantly, learn to look at the dough rather than relying only on the clock. A properly fermented dough should be noticeably expanded, bubbly, and airy.
How to Serve It
This artisan bread is incredibly versatile. Serve thick slices with butter and honey for breakfast, or toast them and top with eggs, avocado, cheese, or jam.
It is also wonderful alongside creamy soups and hearty stews because the crunchy crust is perfect for dipping. For a simple snack, drizzle toasted slices with olive oil and sprinkle them with salt.
How to Store Homemade Bread
For the best crust, keep the cooled loaf at room temperature in a paper bag or loosely wrapped in a clean kitchen towel. Avoid storing crusty bread in a tightly sealed plastic bag because trapped moisture can soften the crust.
If you cannot finish the loaf within a couple of days, slice it and freeze the slices in an airtight freezer bag. Individual slices can be toasted directly from frozen whenever you need them.
Final Thoughts
This artisan no-knead bread proves that delicious homemade bread does not have to be complicated. With a handful of basic ingredients and plenty of fermentation time, you can create a loaf with a crisp, deeply golden crust and a soft, wonderfully airy interior.
The secret is patience. Mix the dough, let time develop its flavor, shape it gently, and bake it in a hot Dutch oven. Once you cut into that beautiful loaf and hear the crust crackle, you will understand why homemade bread is so satisfying.
Whether served with breakfast, paired with dinner, or enjoyed warm with a little butter, this rustic loaf is a recipe worth keeping. Baking is love made visible—and every slice is worth the wait.

