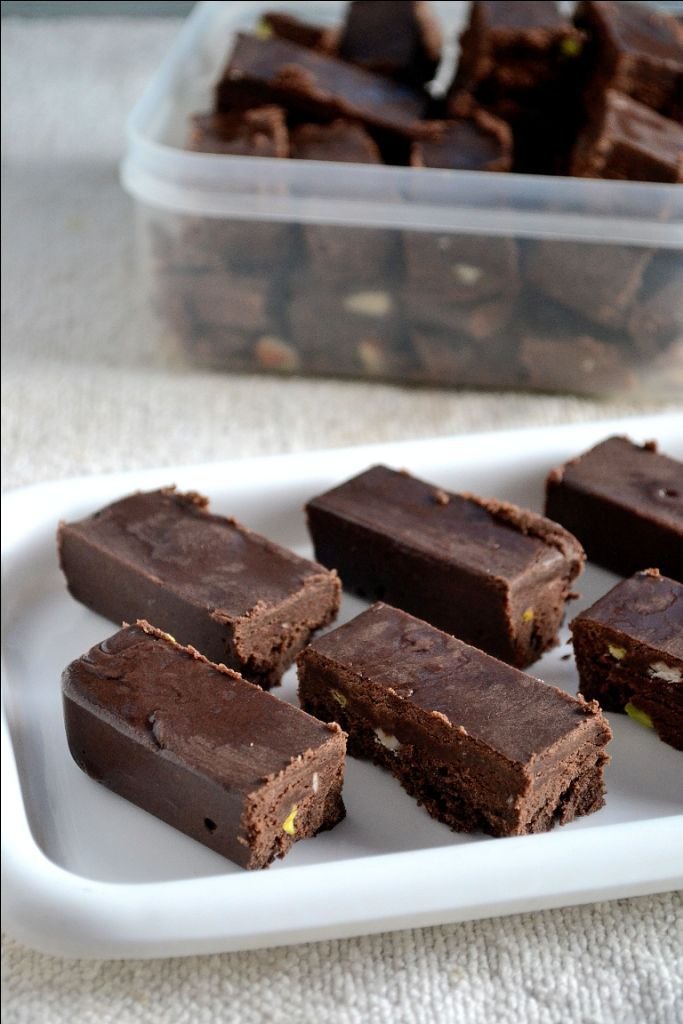
If you’re following a keto lifestyle but still crave something rich, chocolatey, and indulgent, these Keto Chocolate Fudge Brownies are the perfect treat. They are dense, soft, intensely chocolaty, and filled with little bites of crunchy nuts. The brownies shown in the image have that gorgeous fudgy texture with a smooth chocolate surface and a satisfying bite, making them perfect for keeping in the refrigerator whenever a chocolate craving strikes.
Unlike traditional brownies, this keto-friendly version is made without regular flour or refined sugar. Almond flour provides structure, unsweetened cocoa powder gives the brownies their deep chocolate flavor, and a low-carb sweetener provides sweetness without using conventional granulated sugar.
These brownies are wonderful for dessert, an afternoon snack, or a small sweet treat with coffee. They’re also easy to make and require only one bowl for the batter.
Why You’ll Love These Keto Brownies
These brownies are designed for chocolate lovers who don’t want to give up rich desserts while following a lower-carbohydrate eating pattern.
The texture is the real highlight. Instead of being light and cakey, these brownies are intentionally dense and fudgy. The center stays soft while the edges become slightly firmer during baking.
Chopped nuts add a wonderful contrast to the smooth chocolate base. You can use walnuts, pecans, almonds, or even pistachios depending on what you have available.
Another advantage is that these brownies are easy to prepare ahead of time. In fact, chilling them can make the texture even firmer and more fudge-like.
Ingredients
For approximately 12–16 brownies, you’ll need:
- 1 cup almond flour
- ½ cup unsweetened cocoa powder
- ½ cup granulated erythritol or another suitable keto sweetener
- ½ cup unsalted butter, melted
- 2 large eggs
- 1 teaspoon vanilla extract
- ½ teaspoon baking powder
- ¼ teaspoon salt
- 3 ounces unsweetened baking chocolate, melted
- ½ cup chopped walnuts or pecans
- 2 tablespoons unsweetened almond milk, if needed
Optional Additions
You can also add:
- ¼ cup sugar-free chocolate chips
- 2 tablespoons chopped pistachios
- ½ teaspoon espresso powder
- A small pinch of cinnamon
- Unsweetened shredded coconut
When choosing ingredients, check the nutrition labels of your specific products because carbohydrate counts can vary between brands, particularly for sweeteners and chocolate.
Preparing the Baking Pan
Start by preheating your oven to 350°F (175°C).
Line an 8-inch square baking pan with parchment paper, leaving some paper hanging over the sides. This makes it much easier to lift the brownies from the pan after baking.
Lightly grease the parchment with butter or cooking spray.
Using a square pan rather than a larger rectangular pan helps create thick brownies with the dense texture shown in the photo.
Melt the Chocolate and Butter
Place the unsalted butter and unsweetened baking chocolate in a microwave-safe bowl.
Heat in short intervals, stirring between each one, until the mixture is completely melted and smooth.
You can also melt the butter and chocolate together in a heatproof bowl set over a saucepan of gently simmering water.
Once melted, allow the mixture to cool for a few minutes.
The chocolate should remain liquid but shouldn’t be extremely hot when you add the eggs.
Mix the Wet Ingredients
Add the eggs to the melted chocolate and butter mixture.
Whisk gently until combined.
Add the vanilla extract and continue mixing.
The mixture should become glossy and smooth.
If you’re using espresso powder, you can add it at this stage. Espresso doesn’t necessarily make the brownies taste like coffee; instead, a small amount can intensify the chocolate flavor.
Add the Dry Ingredients
In the same bowl, add the almond flour, unsweetened cocoa powder, keto sweetener, baking powder, and salt.
Using a spatula, stir everything together until a thick chocolate batter forms.
The batter will be considerably thicker than traditional brownie batter. This is completely normal.
If the mixture seems unusually dry, add 1 tablespoon of unsweetened almond milk at a time until it becomes thick but spreadable.
Avoid adding too much liquid because the brownies should remain dense and fudgy.
Fold in the Nuts
Add the chopped walnuts or pecans to the batter.
Gently fold them through using a spatula.
Reserve a small handful of nuts if you’d like to sprinkle them over the top before baking.
The nuts provide a delicious crunchy contrast to the soft chocolate brownie.
For the brownies shown in the image, you could also use chopped pistachios for small pops of green throughout the chocolate mixture.
Transfer the Batter to the Pan
Spoon the brownie batter into the prepared baking pan.
Because the batter is thick, use the back of a spatula to spread it evenly from corner to corner.
Smooth the surface as much as possible.
If desired, sprinkle the reserved chopped nuts over the top.
You can also add a few sugar-free chocolate chips for an even more decadent finish.
Bake the Brownies
Place the pan in the preheated oven and bake for approximately 18–24 minutes.
The exact baking time depends on your oven and the thickness of the brownies.
The edges should look set, while the center should still have a slight softness.
Don’t wait until the entire center looks completely firm. Overbaking is one of the easiest ways to lose the fudgy texture.
Insert a toothpick into the center. For fudgy brownies, you want it to come out with a few moist crumbs rather than completely clean.
The Most Important Step: Cooling
Once the brownies are finished baking, remove the pan from the oven and place it on a cooling rack.
Allow the brownies to cool completely in the pan.
For an especially dense and fudge-like texture, refrigerate the cooled brownies for at least 1–2 hours before slicing.
Chilling allows the butter and chocolate to firm up and makes it easier to create clean slices.
This is also why brownies often taste even better the next day.
How to Cut Perfect Brownies
Once chilled, lift the brownies out of the pan using the parchment paper.
Place them on a cutting board.
For clean edges, use a sharp knife and wipe the blade between cuts.
Cut the brownies into 12 large pieces or 16 smaller squares.
If you want brownies similar to those pictured, cut them into rectangular bars rather than small squares.
Tips for the Best Keto Brownies
Don’t overbake. The center should remain slightly soft when the brownies come out of the oven.
Use good-quality cocoa powder. Since chocolate is the main flavor, a good unsweetened cocoa powder makes a noticeable difference.
Chill before cutting. Refrigeration helps produce that firm, fudgy texture.
Measure almond flour carefully. Too much flour can make the brownies dry.
Choose your sweetener carefully. Different keto sweeteners have different sweetness levels and textures. Follow the package conversion instructions when substituting.
Let the chocolate cool slightly. Very hot chocolate can partially cook the eggs when they’re added.
Easy Variations
These brownies are incredibly versatile.
For double chocolate brownies, add sugar-free chocolate chips to the batter.
For salted chocolate brownies, sprinkle a tiny amount of flaky salt over the top after baking.
For peanut butter brownies, swirl unsweetened peanut butter through the batter before baking.
For mint chocolate brownies, add a small amount of sugar-free mint flavoring.
For pistachio brownies, replace some of the walnuts with chopped pistachios.
For a richer chocolate flavor, add a small amount of espresso powder to the batter.
How to Store Them
Store completely cooled brownies in an airtight container in the refrigerator.
They should stay delicious for several days when properly refrigerated.
Because these brownies become firmer when chilled, you can enjoy them straight from the refrigerator or allow them to sit at room temperature for a few minutes before serving.
For longer storage, wrap individual brownie pieces and freeze them in a freezer-safe container.
When you’re ready for one, allow it to thaw in the refrigerator or at room temperature.
Serving Ideas
These brownies are delicious all by themselves, but you can make them even more special.
Serve one with a spoonful of unsweetened whipped cream and a few chopped nuts.
You can also drizzle the top with melted sugar-free chocolate or add a small amount of unsweetened almond butter.
For a simple dessert, warm a brownie slightly and serve it with a keto-friendly ice cream or whipped cream.
A cup of coffee or unsweetened tea makes an excellent pairing with the rich chocolate flavor.
Nutritional Note
Because this recipe is designed with low-carb ingredients, it can fit into many keto-style meal plans. However, “keto” nutrition isn’t automatic—the total carbohydrates depend on the specific almond flour, chocolate, sweetener, and nuts you use.
If you’re tracking macros, calculate the nutrition using the exact brands and quantities in your kitchen. Also keep portion size in mind, since nuts and chocolate can contribute significant calories even when a recipe is low in carbohydrates.
Final Thoughts
These Keto Chocolate Fudge Brownies are the kind of dessert that makes a low-carb lifestyle feel much less restrictive. They’re rich, chocolatey, wonderfully dense, and filled with crunchy nuts that make every bite satisfying.
The recipe is simple enough for a beginner baker and requires no complicated techniques. Just melt the chocolate and butter, mix the ingredients together, fold in your favorite nuts, and bake until the edges are set and the center remains fudgy.
The hardest part is waiting for them to cool!
Once chilled, cut them into thick bars and keep them refrigerated so you always have a delicious chocolate treat ready when a craving hits.
Whether you’re making them for yourself, sharing them with family, or preparing a dessert for a keto-friendly gathering, these brownies are an easy and satisfying choice. With their deep chocolate flavor, soft fudgy center, and beautiful nutty texture, they’re sure to become a favorite addition to your collection of easy keto dessert recipes.

Leave a Reply