
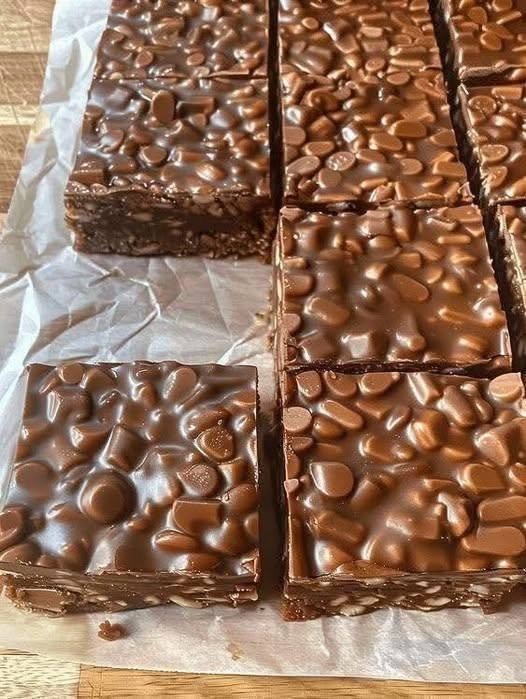
There are some desserts that look almost too good to cut into, and these chocolate nut crunch bars are exactly that kind of treat. Thick, glossy, intensely chocolatey, and packed with crunchy nuts, these bars are perfect for anyone who loves the combination of smooth chocolate and plenty of texture.
Inspired by the delicious chocolate bars in the photo, this recipe creates a generous slab of chocolate filled with roasted nuts and topped with even more chocolate and nuts. The finished bars have a satisfying contrast: a firm, slightly fudgy chocolate base, plenty of crunchy nuts throughout, and a glossy chocolate topping that melts in your mouth.
The best part? They are surprisingly easy to make. There is no complicated cake batter, no decorating skills required, and no special equipment beyond a saucepan and a baking pan. Once everything is combined, the refrigerator does most of the work.
Whether you are making them for a family gathering, a holiday dessert table, an afternoon coffee treat, or simply because you are craving chocolate, these bars are guaranteed to disappear quickly.
Why You’ll Love These Chocolate Nut Bars
These chocolate bars are incredibly versatile. You can use your favorite combination of nuts, adjust the sweetness, and even add other ingredients such as dried fruit, coconut, or chocolate chips.
The recipe is also ideal for preparing ahead of time. In fact, allowing the bars to chill thoroughly makes them easier to slice and gives the chocolate a wonderful firm texture.
The key is using good-quality chocolate and roasting the nuts before adding them. Roasting brings out the natural oils and gives the nuts a deeper, more intense flavor that pairs beautifully with chocolate.
Ingredients
For the chocolate nut base
- 400 g semi-sweet or dark chocolate, chopped
- 100 g unsalted butter
- 120 ml heavy cream
- 2 tablespoons honey or golden syrup
- 1 teaspoon vanilla extract
- 250 g roasted mixed nuts
- 100 g chocolate chips or chocolate chunks
- 100 g crushed cookies or digestive biscuits
- 1 small pinch of salt
For the topping
- 250 g milk or dark chocolate
- 1 tablespoon coconut oil or neutral vegetable oil
- 100–150 g roasted nuts
- 50 g chocolate chips, optional
- A small pinch of flaky sea salt, optional
You can use almonds, peanuts, cashews, hazelnuts, pecans, walnuts, or pistachios. A mixture of several nuts gives the bars a particularly attractive appearance and creates different textures in every bite.
How to Make Chocolate Nut Crunch Bars
1. Prepare the pan
Start by preparing a square baking pan, approximately 20 x 20 cm (8 x 8 inches).
Line the pan with parchment paper, leaving some paper hanging over the sides. This makes it much easier to lift the finished chocolate slab from the pan.
For thicker bars like those shown in the photograph, you can use a slightly smaller pan. If you prefer thinner bars, use a larger pan.
Set the prepared pan aside.
2. Roast the nuts
If your nuts are not already roasted, spread them over a baking sheet and roast them at 175°C/350°F for about 8–10 minutes.
Keep an eye on them because nuts can go from beautifully toasted to burnt surprisingly quickly.
Once they smell fragrant and have taken on a slightly deeper color, remove them from the oven and allow them to cool.
You can leave some nuts whole and roughly chop the rest. Keeping a mixture of sizes is ideal because it gives the bars the same chunky, generously filled appearance as the ones in the photograph.
3. Melt the chocolate mixture
Place the chopped chocolate, butter, heavy cream, and honey or golden syrup in a heatproof bowl.
Set the bowl over a saucepan containing a small amount of gently simmering water. Make sure the bottom of the bowl does not touch the water.
Stir slowly until everything melts together into a smooth, glossy chocolate mixture.
Remove the bowl from the heat and stir in the vanilla extract and a small pinch of salt.
The salt is important because it balances the sweetness and makes the chocolate flavor taste richer.
Allow the mixture to cool for a few minutes. You don’t want it to be completely cold, but it should no longer be extremely hot.
4. Add the nuts and crunchy ingredients
Stir the roasted nuts, chocolate chips, and crushed cookies into the melted chocolate.
Mix gently but thoroughly until everything is coated.
The mixture should be thick and heavily packed with nuts. If you look at the bars in the photograph, one of their most appealing features is that there is plenty of filling rather than just a thin layer of nuts.
Don’t worry if the mixture looks somewhat rough or uneven. That’s exactly what you want.
5. Transfer to the pan
Pour the chocolate-nut mixture into the prepared baking pan.
Use a spatula or the back of a spoon to spread it evenly into the corners.
Press the mixture down gently so there are no large air pockets. However, avoid pressing it so firmly that the nuts become completely buried.
Smooth the surface as much as possible.
6. Make the glossy chocolate topping
Now comes the part that gives these bars their beautiful appearance.
Melt the remaining 250 g of chocolate with the coconut oil or vegetable oil.
The small amount of oil helps create a smoother, glossier topping and makes the finished chocolate slightly easier to cut.
Pour the melted chocolate over the nut-filled base.
Spread it evenly with a spatula.
Before the chocolate sets, scatter the additional roasted nuts over the surface. Add chocolate chips if desired.
For an extra sophisticated finish, sprinkle a very small amount of flaky sea salt over the top.
Don’t add too much salt—the chocolate should remain the dominant flavor.
7. Chill until firm
Place the pan in the refrigerator for at least 3–4 hours, or preferably overnight.
This waiting period is important.
The chocolate needs enough time to become completely firm, while the layers settle together into a dense, sliceable bar.
If you try cutting them too soon, the chocolate may be soft and the pieces can fall apart.
Once completely chilled, remove the slab from the refrigerator and lift it from the pan using the parchment paper.
8. Cut into bars
For clean cuts, allow the chocolate slab to sit at room temperature for approximately 10–15 minutes.
Use a large, sharp knife to cut it into squares or rectangles.
For the chunky appearance shown in the photograph, large rectangular pieces work beautifully.
If you want perfectly clean edges, warm the knife under hot water, dry it thoroughly, and then make each cut. Wipe the knife clean between cuts.
Helpful Tips for Perfect Chocolate Nut Bars
Use good chocolate. Since chocolate is the main ingredient, its flavor makes a noticeable difference. Dark chocolate creates a richer, less sweet bar, while milk chocolate produces a sweeter and creamier result.
Don’t skip roasting the nuts. Even if you purchase roasted nuts, giving them a few additional minutes in the oven can intensify their flavor.
Mix different nuts. Almonds provide crunch, cashews add creaminess, hazelnuts give a beautiful roasted flavor, and peanuts create a classic chocolate-and-nut combination.
Don’t overheat the chocolate. Chocolate should be melted gently. Excessive heat can cause it to become thick or grainy.
Let the bars chill completely. This is one of the most important steps. A properly chilled bar will hold its shape beautifully when sliced.
Variations to Try
There are countless ways to customize these chocolate bars.
For a salted chocolate version, use dark chocolate and finish with flaky sea salt.
For a rocky-road-inspired version, add mini marshmallows and chopped nuts to the filling.
For a fruit-and-nut version, mix in dried cranberries, raisins, cherries, or chopped apricots.
For a coconut version, add 50–75 g of toasted shredded coconut.
You can also replace some of the nuts with puffed rice or crispy cereal for a lighter, crunchier texture.
How to Store Them
Store the finished bars in an airtight container.
They can be kept in the refrigerator for approximately 1–2 weeks. For the best flavor, allow each piece to sit at room temperature for a few minutes before serving.
You can also freeze the bars. Wrap individual pieces in parchment paper and place them in a freezer-safe container. They will keep for around 2–3 months.
Thaw them in the refrigerator before serving.
Final Thoughts
These chocolate nut crunch bars are proof that a simple dessert can still look incredibly impressive. The combination of a rich chocolate base, roasted nuts, crunchy pieces, and a glossy chocolate topping makes every bite satisfying.
They are especially wonderful when served alongside coffee or tea, but honestly, there is no special occasion required. Keep a batch in the refrigerator and you will always have an indulgent homemade treat ready whenever a chocolate craving strikes.
The beauty of this recipe is that you don’t have to make every piece perfectly uniform. In fact, the rustic, generously covered appearance is part of the charm. Pile on the nuts, let the chocolate shine, and cut the slab into generous pieces.
Rich, crunchy, chocolatey, and incredibly easy—these homemade chocolate nut bars are a dessert worth making again and again.

