
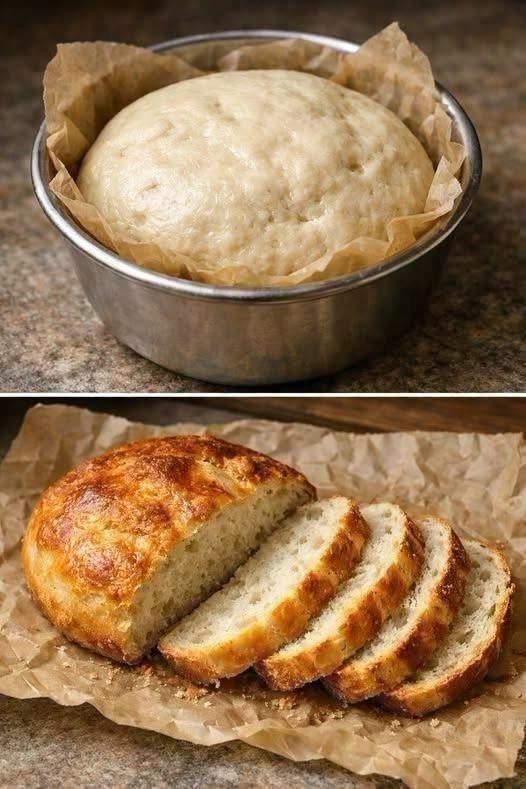
There is nothing quite like the smell of freshly baked bread filling the kitchen. A warm loaf with a golden, crisp crust and a soft, tender center is one of the simplest homemade treats, yet it can make an ordinary meal feel special. This Easy Homemade Rustic Bread Recipe is perfect for anyone who wants to bake beautiful homemade bread without complicated ingredients or advanced techniques.
The loaf shown in the photo has a beautiful golden crust and a soft, airy interior. It is sliced into thick pieces and looks perfect for serving with butter, jam, eggs, soup, or a hearty family dinner. The recipe uses simple pantry ingredients and allows the dough to rise before baking, creating a light texture and delicious homemade flavor.
Why You’ll Love This Homemade Bread
This rustic bread is easy to prepare and requires only a handful of basic ingredients. You do not need an expensive bread machine or special baking equipment. A mixing bowl, a baking pan or Dutch oven, and an oven are enough to get started.
The dough is soft and slightly sticky when first mixed, but after resting and rising, it becomes much easier to handle. Baking at a high temperature helps create the golden crust while keeping the inside soft and fluffy.
This bread is also versatile. You can keep the recipe simple or add herbs, garlic, cheese, seeds, or other ingredients to create your own version.
Ingredients
For one medium-sized loaf, you will need:
- 3 cups all-purpose flour or bread flour
- 1 cup warm water
- 2¼ teaspoons active dry yeast
- 1 tablespoon granulated sugar
- 1 teaspoon salt
- 2 tablespoons olive oil or melted butter
- 1 large egg, optional, for brushing the top
- 1 tablespoon water, if using the egg wash
- Extra flour for shaping
For an extra flavorful loaf, you can also add:
- 1 teaspoon garlic powder
- 1 teaspoon dried oregano
- 1 tablespoon sesame seeds
- 1 tablespoon sunflower seeds
These additions are optional, so the basic recipe can remain simple.
Step 1: Activate the Yeast
Begin by adding the warm water to a large mixing bowl. The water should feel comfortably warm rather than hot.
Add the sugar and active dry yeast. Stir gently and let the mixture sit for approximately 5–10 minutes.
The yeast should begin to foam or look slightly bubbly. This is a good indication that it is active and ready to use.
If your yeast does not foam at all, check the expiration date and water temperature before continuing.
Step 2: Mix the Dough
Add the flour and salt to the yeast mixture.
Pour in the olive oil or melted butter and stir everything together with a wooden spoon or sturdy spatula.
Continue mixing until a rough dough forms and there are no large areas of dry flour remaining.
The dough may look somewhat sticky at this stage. That is normal.
Avoid adding too much flour because a very dry dough can result in a dense loaf.
Step 3: Knead the Dough
Transfer the dough to a lightly floured work surface.
Knead the dough for approximately 8–10 minutes. Push the dough forward with the heel of your hand, fold it back toward you, rotate it slightly, and repeat.
As you knead, the dough should gradually become smoother and more elastic.
If it is extremely sticky, add a small amount of flour, one tablespoon at a time. Try to keep the dough soft rather than making it firm.
You can also knead the dough in a stand mixer using a dough hook if you prefer.
Step 4: First Rise
Place the kneaded dough into a lightly oiled bowl.
Turn it once so the surface is lightly coated with oil.
Cover the bowl with plastic wrap or a clean kitchen towel and place it somewhere warm.
Allow the dough to rise for approximately 1–1½ hours, or until it has doubled in size.
The exact time depends on the temperature of your kitchen. A warmer environment will usually make the dough rise faster, while a cooler room may require more time.
Do not worry if the dough takes longer than expected. The appearance and size of the dough are more important than following the clock exactly.
Step 5: Shape the Loaf
Once the dough has doubled, gently press it down to release some of the air.
Transfer it to a lightly floured surface and shape it into a round loaf.
To create a smooth surface, fold the edges underneath the dough and gently rotate the loaf while creating tension across the top.
Place the shaped dough into a parchment-lined baking dish or a lightly greased round pan.
The parchment paper also makes it easier to remove the baked bread from the pan.
Step 6: Second Rise
Cover the shaped dough loosely with a clean towel.
Allow it to rest and rise again for approximately 30–45 minutes.
During this second rise, the dough should become visibly puffy.
Do not allow it to rise too much, because over-proofed dough can lose its structure and produce a flatter loaf.
While the dough is completing its second rise, preheat your oven to 425°F (220°C).
Step 7: Prepare the Top
For a beautifully golden crust, you can brush the top of the dough with a simple egg wash.
Whisk together one egg and one tablespoon of water.
Brush a thin layer over the surface of the dough.
If you prefer not to use an egg, simply brush the surface lightly with olive oil or leave it plain.
You can also sprinkle the top with sesame seeds, sunflower seeds, coarse salt, or dried herbs.
For a rustic appearance, make one or two shallow cuts across the top of the loaf using a sharp knife or bread lame.
These cuts allow the bread to expand during baking.
Step 8: Bake the Bread
Place the loaf in the preheated oven.
Bake for approximately 25–35 minutes, depending on the size and shape of your loaf.
The bread should become deeply golden brown on top, similar to the loaf shown in the photo.
You can check whether the bread is fully baked by tapping the bottom gently. A properly baked loaf should sound hollow.
If the top is browning too quickly, loosely cover it with aluminum foil during the final part of baking.
Step 9: Cool Before Slicing
Once the bread is finished, remove it from the pan and place it on a wire rack.
Allow it to cool for at least 30–60 minutes before slicing.
This is an important step because the inside of the bread continues to finish setting as it cools.
Cutting the loaf while it is extremely hot can make the center appear gummy or cause the slices to collapse.
Once cooled, use a serrated bread knife to cut the loaf into even slices.
Tips for Soft and Fluffy Homemade Bread
Use Fresh Yeast
Fresh, active yeast is essential for good bread. If the yeast is inactive, the dough will not rise properly.
Don’t Add Too Much Flour
One of the most common mistakes when making homemade bread is adding too much flour. The dough should be soft and slightly tacky rather than hard.
Give the Dough Enough Time
Bread dough cannot always be rushed. Temperature, humidity, and yeast activity can all affect how quickly the dough rises.
Knead Properly
Good kneading helps develop gluten, which gives the bread structure and elasticity.
Bake Until Golden
A deeply golden crust usually provides more flavor and texture than a pale loaf. Watch the bread closely during the final few minutes so it does not become overly dark.
Delicious Variations
Once you are comfortable with the basic recipe, you can easily customize it.
For garlic herb bread, add garlic powder, dried parsley, oregano, and a little rosemary to the dough.
For cheesy bread, fold shredded cheddar, mozzarella, or Parmesan into the dough before shaping.
For seeded bread, sprinkle sunflower seeds, sesame seeds, flaxseeds, or pumpkin seeds over the top.
For a slightly sweeter loaf, add an extra tablespoon of sugar and a teaspoon of cinnamon. You can also mix in raisins or dried cranberries.
For a rustic Mediterranean version, add chopped olives, dried herbs, and a little grated Parmesan.
How to Store Homemade Bread
Allow the loaf to cool completely before storing it.
Keep the bread at room temperature in a bread bag, paper bag, or airtight container. It is best enjoyed within 2–3 days for the freshest texture.
For longer storage, slice the bread and freeze the slices in a freezer-safe bag. Place parchment paper between slices if you want to remove individual pieces easily.
Frozen slices can be toasted directly from the freezer.
Ways to Serve This Bread
Fresh homemade bread is delicious with a simple spread of butter. You can also serve it with honey, fruit jam, cream cheese, or peanut butter for breakfast.
For lunch, use thick slices to make sandwiches with cheese, chicken, eggs, vegetables, or your favorite fillings.
At dinner, serve warm slices alongside soup, stew, pasta, roasted chicken, or grilled vegetables. The bread is also excellent for dipping into olive oil and herbs.
Leftover slices can be transformed into French toast, garlic bread, croutons, or homemade breadcrumbs.
Final Thoughts
This Easy Homemade Rustic Bread is a wonderful recipe to keep in your collection. It uses simple ingredients, requires no complicated techniques, and produces a beautiful golden loaf with a soft, tender center.
The key to successful homemade bread is patience. Give the yeast enough time to work, knead the dough properly, allow it to rise until puffy, and bake it until the crust is richly golden.
Once you make this loaf at home, you may find yourself baking it regularly. The smell of fresh bread, the crisp golden crust, and the soft interior make all the waiting worthwhile.
Serve it warm with butter or your favorite spread, or enjoy it alongside your favorite meal. This simple homemade loaf is proof that delicious bakery-style bread can be made right in your own kitchen.

