
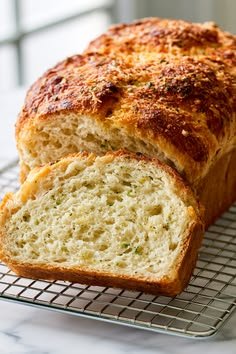
Roasted Garlic & Parmesan Sourdough Bread
There is something incredibly comforting about a freshly baked loaf of sourdough, especially when it is filled with the rich flavor of roasted garlic and savory Parmesan cheese. This Roasted Garlic & Parmesan Sourdough Bread combines the tangy flavor of naturally fermented sourdough with sweet, mellow roasted garlic and nutty Parmesan for a loaf that is crispy on the outside, soft and chewy inside, and packed with flavor.
It is perfect for serving alongside soups, pasta, salads, roasted vegetables, or simply enjoying warm with a little butter. Although homemade sourdough may seem intimidating at first, this recipe is surprisingly simple once you understand the basic fermentation process.
Why You’ll Love This Recipe
This sourdough bread is more than just a basic loaf. Roasting the garlic transforms its sharp flavor into something sweet, creamy, and mellow. Parmesan adds a delicious salty and nutty taste throughout the bread.
You will love this recipe because:
- It has a beautiful crispy crust.
- The inside is soft, chewy, and airy.
- Roasted garlic gives it incredible flavor.
- Parmesan creates savory, cheesy bites.
- It is made with a naturally fermented sourdough starter.
- The dough can be prepared ahead and cold-proofed overnight.
- It makes an impressive homemade gift for family and friends.
Ingredients
For the Roasted Garlic
- 1 whole garlic bulb
- 1 teaspoon olive oil
- A small pinch of salt
For the Sourdough Dough
- 500 g bread flour
- 350 g water, room temperature
- 100 g active sourdough starter
- 10 g salt
- 1 tablespoon olive oil
- 1 whole roasted garlic bulb
- 75–100 g freshly grated Parmesan cheese
You can adjust the amount of Parmesan depending on how cheesy you want the bread to be.
Choosing the Right Sourdough Starter
For the best results, use a sourdough starter that is active, bubbly, and recently fed. A healthy starter should rise noticeably after feeding and have a pleasant slightly tangy aroma.
If your starter is sluggish, your dough may take much longer to ferment. Ideally, feed your starter several hours before making the dough so it is active when you begin.
Step 1: Roast the Garlic
Start by roasting the garlic because it needs time to cool before being added to the dough.
Preheat your oven to 400°F (200°C). Slice the top off the garlic bulb, exposing the individual cloves while keeping the bulb together.
Place the garlic on a small piece of foil. Drizzle it with olive oil and sprinkle lightly with salt. Wrap the garlic loosely in the foil and place it in the oven.
Roast for approximately 35–45 minutes, or until the cloves become soft, golden, and fragrant.
Remove the garlic from the oven and allow it to cool completely.
Once cool enough to handle, gently squeeze the roasted cloves from their skins. They should come out as soft, creamy pieces.
For this recipe, you can leave the garlic cloves whole or lightly mash them with a fork.
Step 2: Mix the Dough
Add the water and active sourdough starter to a large mixing bowl. Stir until the starter is mostly dispersed in the water.
Add the bread flour and mix using your hands or a wooden spoon until there are no large patches of dry flour remaining.
The dough may look rough and shaggy at this stage. That is completely normal.
Cover the bowl and allow the dough to rest for about 30 minutes. This resting period helps the flour absorb the water and makes the dough easier to develop.
Step 3: Add Salt and Olive Oil
After the initial rest, add the salt and olive oil.
Use your fingers to pinch and fold the dough until the salt and oil are evenly distributed. The dough will gradually become smoother and more elastic.
Avoid adding lots of extra flour. Sourdough dough is naturally somewhat sticky, especially during the early stages of fermentation.
Step 4: Add the Roasted Garlic and Parmesan
Once the dough has started developing some strength, gently add the roasted garlic and Parmesan.
Try not to knead aggressively because you want to preserve the developing gluten structure.
Flatten the dough slightly, spread some roasted garlic and Parmesan over the surface, then fold the dough over itself. Continue folding until the ingredients are distributed throughout.
If you prefer visible pockets of garlic and cheese, avoid mixing them too thoroughly.
Step 5: Stretch and Fold
Cover the dough and begin your stretch-and-fold routine.
During the first two hours of bulk fermentation, perform approximately 4 sets of stretch-and-folds, spaced about 30 minutes apart.
To perform a stretch and fold, grab one side of the dough, gently stretch it upward, and fold it over the center. Rotate the bowl and repeat on the remaining sides.
As fermentation continues, the dough should become smoother, stronger, and more elastic.
Step 6: Bulk Fermentation
After your stretch-and-fold sessions, leave the dough covered at room temperature.
Depending on the temperature of your kitchen and the strength of your starter, bulk fermentation may take around 4–6 hours.
Instead of relying only on the clock, look for signs that the dough is ready.
The dough should:
- Increase noticeably in volume.
- Look slightly puffy.
- Have bubbles forming around the edges.
- Feel lighter and more elastic.
- Jiggle gently when the bowl is moved.
Avoid letting the dough over-ferment because this can make shaping difficult and result in a dense or flat loaf.
Step 7: Shape the Loaf
Lightly flour your work surface and gently transfer the dough onto it.
Shape the dough into a round or oval loaf by folding the edges toward the center and creating surface tension.
Try not to press all the air out of the dough.
Place the shaped loaf seam-side up into a well-floured banneton or a bowl lined with a clean, floured kitchen towel.
Step 8: Cold Proof
Cover the dough and place it in the refrigerator for 8–16 hours.
Cold fermentation allows the sourdough flavor to develop while also making the dough easier to score and bake.
An overnight proof is particularly convenient because you can prepare the dough in the evening and bake it the following morning.
Step 9: Bake
Place a Dutch oven inside your oven and preheat to 475°F (245°C) for at least 30–45 minutes.
Carefully turn the cold dough onto a piece of parchment paper.
Use a sharp bread lame or razor blade to score the top. A simple slash works well.
Transfer the dough into the hot Dutch oven.
Cover with the lid and bake for 20 minutes.
Then remove the lid, reduce the temperature to 450°F (230°C), and continue baking for another 20–25 minutes, or until the loaf is deeply golden brown.
The Parmesan may create beautifully browned, crispy areas on the crust.
Step 10: Cool Before Slicing
This is one of the hardest parts!
Allow the bread to cool on a wire rack for at least one hour before slicing.
Cutting sourdough while it is still extremely hot can make the interior gummy because the crumb has not finished setting.
Once cooled, slice the loaf and enjoy the beautiful combination of roasted garlic, Parmesan, and tangy sourdough.
Helpful Tips
Use Fresh Parmesan
Freshly grated Parmesan melts and distributes better than many pre-grated varieties. It also gives the bread a stronger savory flavor.
Don’t Overload the Dough
Although it can be tempting to add lots of garlic and cheese, too many inclusions can interfere with gluten development. Around 75–100 g of Parmesan is a good starting point.
Cool the Garlic Completely
Hot roasted garlic can warm the dough and interfere with fermentation. Always allow it to cool before incorporating it.
Watch Your Fermentation
Sourdough fermentation depends heavily on temperature. A warm kitchen can speed up fermentation, while a cool kitchen can make it considerably slower.
Serving Ideas
This bread is delicious on its own, but there are plenty of ways to serve it.
Try it with:
- Creamy tomato soup
- Chicken soup
- Pasta dishes
- Caesar salad
- Scrambled eggs
- Roasted vegetables
- Grilled chicken
- Steamed vegetables
- Garlic butter
For an especially indulgent snack, toast thick slices and spread them with softened butter while they are still warm.
Storage
Store the cooled loaf in a paper or bread bag at room temperature for up to several days.
Avoid storing fresh sourdough in the refrigerator because refrigeration can make the bread become stale more quickly.
For longer storage, slice the bread and freeze it in an airtight freezer-safe bag. Individual slices can be reheated directly in a toaster or oven.
Final Thoughts
Roasted Garlic & Parmesan Sourdough Bread is a wonderful recipe for anyone who wants to take homemade sourdough to the next level. The naturally tangy bread pairs beautifully with sweet roasted garlic and savory Parmesan, creating a loaf that feels special without requiring complicated techniques.
The crispy golden crust, soft chewy center, creamy garlic pieces, and little pockets of Parmesan make every slice incredibly satisfying. Whether you serve it with dinner, turn it into toast, or simply enjoy it warm with butter, this sourdough loaf is sure to become a favorite.
Once you master this recipe, you can experiment with additions such as fresh rosemary, cracked black pepper, caramelized onions, or different hard cheeses to create your own signature sourdough loaf.
